data-src=../../../includes/saas-only.md
Upload files to Amazon S3
Adobe Commerce as a Cloud Service (SaaS) supports file uploads through GraphQL mutations. This feature allows you to upload files such as images, documents, and other media to the server. Sharing objects with presigned URLs describes how presigned URLs work.
Uploading files is a multi-step process, as shown in the following diagram:
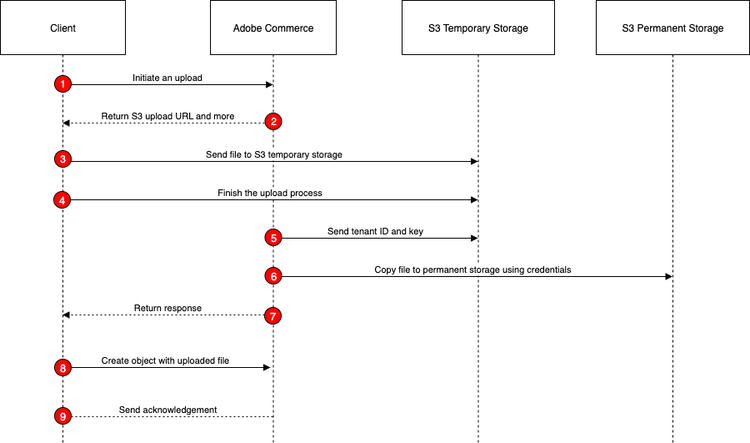
-
Initiate the upload: The shopper clicks an Upload File button on the storefront. The Javascript code on the page uses the
initiateUploadmutation to start the upload process. The mutation specifies the file name provided by the shopper. Commerce uses the AWS SDK to generate the URL to which the file will be uploaded. -
Receive the response: The response from the
initiateUploadmutation includes a presigned URL, a unique key for the file, and an expiration time for the URL. The client code extracts these values from the response. -
Upload the file: The client code uses the presigned URL to upload the file directly to a temporary location in the Amazon S3 bucket. This is done using a standard HTTP PUT request.
The following curl command demonstrates how to upload a file using the presigned URL:
curl --fail --show-error --silent -X PUT --data-binary @./cat.jpg 'https://<bucket>.s3.<region>.amazonaws.com/<path-to-temp-file>?X-Amz-Content-Sha256=UNSIGNED-PAYLOAD&X-Amz-Security-Token=<token>&X-Amz-Algorithm=AWS4-HMAC-SHA256&X-Amz-Credential=<value>&X-Amz-Date=<value>&X-Amz-SignedHeaders=host&X-Amz-Expires=<value>&X-Amz-Signature=<value>...' -
Finalize the upload: After the file is successfully uploaded to S3, the client code calls the
finishUploadmutation to complete the upload process. The mutation includes the unique key received from theinitiateUploadresponse. -
Perform validation: Commerce uses a HEAD request on S3 Temporary to validate the key and size.
-
Move the file: Commerce performs a
CopyObjectoperation to move the file from the temporary location to a permanent location in the S3 bucket. -
Receive the final response: The response from the
finishUploadmutation includes the unique key for the uploaded file. The client code extracts this key from the response. -
Create or update the entity: After
finishUploadsucceeds, the client creates or updates the entity (such as a customer) using the returned hashed key as the attribute value, not a URL or full S3 path. -
Receive the create/update response: The response from the create or update mutation includes the details of the created or updated entity.
Add the uploaded file to an entity
Your Adobe Commerce instance must define a custom attribute that has an input type of file or image. Presigned uploads are supported for the following entities, each managed under Stores > Attributes in the Admin:
- Customer and Customer Address attributes.
- Returns attributes (return/RMA items).
Your custom attribute must have the following properties:
-
Attribute Code: A unique identifier for the attribute, such as
profile_picture. -
Input Type: Set to File (attachment) or Image file.
-
Maximum File Size: The default file size limit on S3 is 16 MB (16777216 bytes).
Once the custom attribute is created, use the key returned by the finishUpload mutation as the attribute value when you create or update the entity. Set the value to the returned hashed key, not a URL or full S3 path.
Add a file to a customer
If the customer custom attribute code is profile_picture, include it in the input of the createCustomerV2 mutation:
mutation {
  createCustomerV2(
    input: {
      email: "john.doe@example.com"
      firstname: "John"
      lastname: "Doe"
      password: "wzB43LF4svFd"
      custom_attributes: [
        {
          attribute_code: "profile_picture"
          value: "cat_106d42b2ee34de81db31d958.jpg"
        }
      ]
    }
  ) {
    customer {
      email
      firstname
      lastname
    }
  }
}
Add a file to a customer address
Include the attribute in the custom_attributesV2 input of the createCustomerAddress mutation. This mutation requires a customer token. The response returns the presigned GET url for the uploaded file.
mutation {
  createCustomerAddress(
    input: {
      firstname: "John"
      lastname: "Doe"
      street: ["123 Main St"]
      city: "Montgomery"
      region: { region_id: 1 }
      postcode: "12345"
      country_code: US
      telephone: "1234567890"
      custom_attributesV2: [
        { attribute_code: "customer_address_image", value: "3_71e56be9494280b9d8b5d491.png" }
      ]
    }
  ) {
    id
    custom_attributesV2 {
      code
      ... on AttributeImage { value url }
      ... on AttributeFile { value url }
    }
  }
}
Add a file to a Return Merchandise Authorization (RMA) item
Assign the uploaded key to a return item's file or image attribute through the entered_custom_attributes input of the requestReturn mutation. This mutation requires a customer token. The response returns the presigned GET url for the uploaded file.
mutation {
  requestReturn(
    input: {
      order_uid: "<order-uid>"
      items: [
        {
          order_item_uid: "<order-item-uid>"
          quantity_to_return: 1
          entered_custom_attributes: [
            { attribute_code: "return_image", value: "damage_d4bb0cef2cac42c61b8d72f1.png" }
          ]
        }
      ]
    }
  ) {
    return {
      uid
      items {
        custom_attributesV2 {
          code
          ... on AttributeImage { value url }
          ... on AttributeFile { value url }
        }
      }
    }
  }
}
Attribute interfaces and implementations provides an example of how to retrieve a file uploaded to Amazon S3.