Build a Wishes and Greetings integration with the Android Mobile SDK
This guide is for Android developers integrating the Wishes and Greetings module from the Embed Mobile SDK, which allows users to browse a collection of available templates, select and personalize one, and export it as an image back to your mobile app for sharing.
Before you begin
Prerequisites
This guide assumes you have a good understanding of Android development and Kotlin programming. You'll need to build a Kotlin Android app in Android Studio, and have a client ID for the Adobe Express Embed SDK.
data-slots=text
data-variant=info
applicationId) for that client ID.Demo application
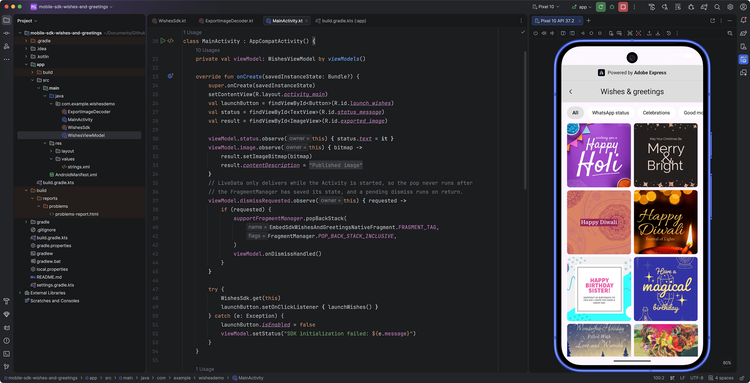
We have prepared an Android demo application that demonstrates the integration of the Wishes and Greetings module, whose screens and code will be used throughout this guide: you can access it on GitHub here.
Use these settings for the tutorial host:
minSdk to 28androidx.appcompat.app.AppCompatActivity and use supportFragmentManagercompileSdk = 36, matching the demo app; install Android SDK Platform 36INTERNET and ACCESS_NETWORK_STATE permissionsRun the demo app
If you'd like to try the finished integration before building your own, run the demo app in Android Studio:
- Open the project. Select File > Open and choose the
mobile-sdk-wishes-and-greetingsfolder, the one that containssettings.gradle.kts, rather than the repository root. If prompted, select Trust Project. - Check the Gradle JDK. In Settings (Android Studio > Settings on macOS), go to Build, Execution, Deployment > Build Tools > Gradle and make sure Gradle JDK is version 17 or later. The JetBrains Runtime bundled with Android Studio works.
- Install Android SDK Platform 36. In Tools > SDK Manager, on the SDK Platforms tab, select the Android 16 platform (API level 36) and select Apply.
- Set your identity values. In
app/src/main/java/com/example/wishesdemo/WishesSdk.kt, replaceyour-client-idwith your client ID. Inapp/build.gradle.kts, setapplicationIdto the package name registered for it. Step 2 explains both values. - Sync the project. Select File > Sync Project with Gradle Files. The first sync needs internet access to download Gradle, the Android Gradle Plugin, and the SDK from Maven Central, and it creates
local.propertieswith your Android SDK path. Sync again after you edit anybuild.gradle.ktsfile. - Prepare a device. Create an emulator in View > Tool Windows > Device Manager with a system image for API 28 or later. A Google APIs or Google Play image includes an up-to-date WebView. Alternatively, connect an Android 9 or later phone with USB debugging enabled.
- Run the app. Select the app run configuration and your device in the toolbar, then select Run > Run 'app'.
data-slots=text
data-variant=error
SDK location not found when you build from the command line, open the project in Android Studio once so it creates local.properties, or set the ANDROID_HOME environment variable. The demo app's README lists more build fixes.Checkpoint: the demo app opens on its host screen. Select Open Wishes and Greetings, pick a template, and select Use image to see the full flow that the rest of this guide builds.
Understand the SDK and host boundary
The Android Mobile SDK gives your existing app a Kotlin API for launching the Wishes and Greetings experience. Your host and the SDK have different responsibilities:
onDismiss and the session callbacksonDismiss for the whole sessionThe distinction matters most at the end of the flow, as receiving an image and dismissing a screen are separate operations. You'll handle both without removing the editor from the publish callback.
1. Prepare the host screen
For the demo app, we've started with a simple screen that launches the Wishes and Greetings module and receives the result. We've kept the host UI small, although in real world scenarios you'll call the SDK from various points in your app.
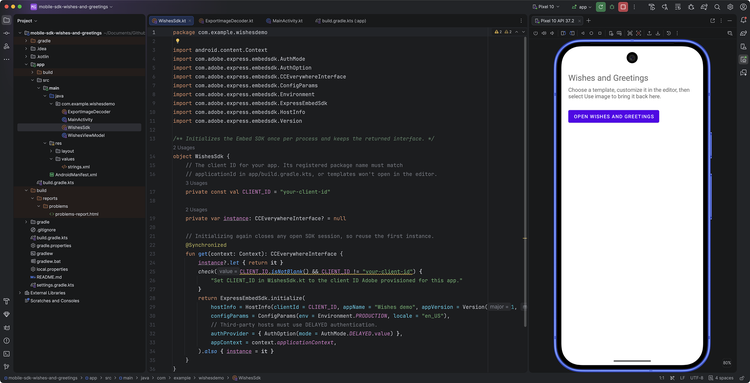
- Use an
AppCompatActivityfor the screen that owns the workflow. - In its layout, add a launch
Button, a statusTextView, and a resultImageView. The demo app usesres/layout/activity_main.xmlwith the IDslaunch_wishes,status_message, andexported_image. - Create a
ViewModelfor the screen. In Step 4, it will own the SDK callbacks along with the status message and exported image they produce.
The launch code later in this guide replaces android.R.id.content and adds the browser transaction to the back stack. That lets the host screen remain the return destination. The result ImageView belongs to your host, not to the SDK Fragment.
Checkpoint: you have a host screen with a place to launch the workflow, report failures, and display the returned image. No SDK screen is open yet.
2. Install the Android SDK dependency
The SDK is published on Maven Central as com.adobe.express.embed:embedsdk. The Android SDK installation README describes the installation steps: add the Maven dependency to your app module, sync Gradle, and import ExpressEmbedSdk. You don't need repository credentials.
data-slots=heading, code
data-repeat=3
settings.gradle.kts
// ...
dependencyResolutionManagement {
    repositoriesMode.set(RepositoriesMode.FAIL_ON_PROJECT_REPOS)
    repositories {
        google()
        // The Adobe Express Embed SDK is published on Maven Central.
        mavenCentral()
    }
}
app/build.gradle.kts
// ...

android {
    namespace = "com.example.wishesdemo"
    compileSdk = 36

    defaultConfig {
        // Must match the package name Adobe registered for your client ID (see WishesSdk.kt).
        applicationId = "com.example.wishesdemo"
        minSdk = 28
        targetSdk = 35
        versionCode = 1
        versionName = "1.0"
    }
    // ...
}

dependencies {
    implementation("com.adobe.express.embed:embedsdk:1.1.1-beta")
    implementation("androidx.appcompat:appcompat:1.7.0")
    implementation("androidx.activity:activity-ktx:1.9.3")
    implementation("androidx.lifecycle:lifecycle-viewmodel-ktx:2.8.7")
    implementation("androidx.lifecycle:lifecycle-livedata-ktx:2.8.7")
    implementation("com.google.android.material:material:1.12.0")
}
src/main/java/com/example/wishesdemo/WishesSdk.kt
package com.example.wishesdemo

// ...

object WishesSdk {
    // The client ID from the Adobe Developer Console for your app.
    // Its registered package name must match applicationId in
    // app/build.gradle.kts
    private const val CLIENT_ID = "your-client-id"

    // ...
}
- Add
mavenCentral()todependencyResolutionManagement.repositoriesinsettings.gradle.kts, if it isn't there already. - Add the SDK to the
dependenciesblock of your app module'sbuild.gradle.kts. Check the GitHub Releases page for the latest version. - Set
applicationIdto the package name Adobe registered for your client ID, and setCLIENT_IDto that client ID. - Sync the project in Android Studio and confirm that the
com.adobe.express.embedsdk.ExpressEmbedSdkimport resolves.
The two identity values must belong together:
CLIENT_ID in WishesSdk.kt, sent in HostInfoapplicationId in app/build.gradle.ktsKeep the client ID out of source in production
To keep the tutorial short, the demo app stores the client ID as a constant in source. In a production app, inject it at build time instead, so each build variant or CI pipeline can supply its own value without editing code. For example, generate a BuildConfig field from a Gradle property:
// app/build.gradle.kts
android {
    buildFeatures { buildConfig = true }
    defaultConfig {
        buildConfigField("String", "EMBED_CLIENT_ID", "\"${providers.gradleProperty("embedClientId").getOrElse("")}\"")
    }
}
Set embedClientId in ~/.gradle/gradle.properties, pass it with -PembedClientId=…, or supply it from your CI secrets, then read BuildConfig.EMBED_CLIENT_ID in place of the constant.
Checkpoint: Gradle resolves the SDK dependency, and your source can import ExpressEmbedSdk.
3. Initialize and retain the SDK
Initialization connects your app's identity and configuration to the SDK interface. The public entry point is ExpressEmbedSdk.initialize, which returns a CCEverywhereInterface synchronously. It isn't a JavaScript-style SDK loader or an initialization promise.
The helper uses these inputs:
hostInfoconfigParamsEnvironment.PRODUCTION and locale en_USauthProviderAuthOption selecting AuthMode.DELAYED, required for third-party hostsappContextAdd the initialization helper to WishesSdk:
data-slots=heading, code
data-repeat=1
src/main/java/com/example/wishesdemo/WishesSdk.kt
// ...
@Synchronized
fun get(context: Context): CCEverywhereInterface {
    instance?.let { return it }
    check(CLIENT_ID.isNotBlank() && CLIENT_ID != "your-client-id") {
        "Set CLIENT_ID in WishesSdk.kt to the client ID Adobe provisioned for this app."
    }
    return ExpressEmbedSdk.initialize(
        hostInfo = HostInfo(clientId = CLIENT_ID, appName = "Wishes demo", appVersion = Version(1, 0, 0)),
        configParams = ConfigParams(env = Environment.PRODUCTION, locale = "en_US"),
        // Third-party hosts must use DELAYED authentication.
        authProvider = { AuthOption(mode = AuthMode.DELAYED.value) },
        appContext = context.applicationContext,
    ).also { instance = it }
}
Wishes demo and Version(1, 0, 0) describe the demo app; replace them with your own app's name and version. HostInfo uses the mobile platform category by default. Use the environment that matches the client ID Adobe gave you; ConfigParams defaults to Environment.PRODUCTION, and the demo app sets it explicitly.
- Call
WishesSdk.getfrom your Activity'sonCreate. Initializing again closes any open SDK session, so the helper returns the same instance on later calls, including after a rotation. - The
checkfails fast with a clear message if the client ID is still the placeholder. - Catch initialization exceptions, show them in the status view, and disable the launch button.
Checkpoint: the host retains one SDK interface and can report initialization failure without opening a broken workflow.
4. Connect the workflow callbacks
Before launching, create the Callbacks object that connects the SDK session to your host UI. You'll pass it, together with an onDismiss handler, when you launch the module in Step 5.
data-slots=text
data-variant=warning
callbacks and onDismiss passed at launch for the whole session, including across configuration changes such as rotation. If they capture your Activity, they keep pointing at the destroyed instance after a rotation: the browser's back control stops closing the screen and a published image never appears. Define them in a ViewModel, which survives the configuration change, and let the current Activity observe it.Use these hooks for this integration:
onLoadInitCallbacks interface; a no-op is sufficient for this hostonCancelonErroronPublishonSessionFinishedonDismissCallbacks; passed separately in the app configuration. Request dismissal of the browse surfacedata-slots=heading, code
data-repeat=1
src/main/java/com/example/wishesdemo/WishesViewModel.kt
class WishesViewModel : ViewModel() {
    // ...
    @Volatile private var publishReceived = false

    fun onLaunch() {
        publishReceived = false
    }

    // ...

    // The SDK may invoke these off the main thread, so LiveData is updated with postValue.
    val onDismiss: () -> Unit = { _dismissRequested.postValue(true) }

    val callbacks: Callbacks = object : Callbacks {
        override var onLoadInit: LoadInitCallback = {}
        override var onLoadStart: LoadStartCallback? = null
        override var onLoad: LoadCallback? = null
        override var onPublishStart: PublishStartCallback? = null
        override var onEvent: EventCallback? = null
        override var onIntentChange: IntentChangeCallback? = null
        override var onWarmupComplete: WarmupCompleteCallback? = null

        override var onCancel: CancelCallback = { _, _ -> setStatus("Session cancelled.") }
        override var onError: ErrorCallback<Any>? = { error ->
            setStatus("SDK error: ${error.code} ${error.message}")
        }
        override var onPublish: PublishCallback? = { _, params -> handlePublish(params) }

        // Fires after the SDK closes its editor. After a publish, leave the browse screen too.
        override var onSessionFinished: SessionFinishedCallback? = {
            if (publishReceived) _dismissRequested.postValue(true)
        }
    }
    // ...
}
The ViewModel exposes three LiveData values that the Activity observes: status, image, and dismissRequested. The SDK can invoke callbacks off the main thread, so they update state with postValue instead of touching views.
The publishReceived flag is reset by onLaunch() before each launch and set when onPublish arrives. onSessionFinished uses it to decide whether to dismiss the browser. It records a publish event, not successful image decoding, so a missing or invalid image still produces a visible error message.
5. Configure and mount Wishes and Greetings
The workflow entry point is sdk.module.wishesAndGreetingsNative. It returns an EmbedSdkWishesAndGreetingsNativeFragment; your host mounts that Fragment.
The arguments divide the configuration into four concerns:
wishesAndGreetingsNativeDocConfiginitialCategoryId unsetwishesAndGreetingsNativeAppConfigonDismiss handlerexportConfigcontainerConfigYou don't need a category identifier to start. The default WishesAndGreetingsNativeDocConfig() uses initialCategoryId = null. If your integration later needs a preselected category, use an identifier supplied for that catalog rather than inventing one from its display label.
The app configuration also accepts metaData, analyticsData, and appVersion, which aren't needed here. It has a colorTheme parameter too, but the browse surface always uses a light theme and ignores it.
Add the launch function to your Activity:
data-slots=heading, code
data-repeat=1
src/main/java/com/example/wishesdemo/MainActivity.kt
private fun launchWishes() {
    val manager = supportFragmentManager
    val tag = EmbedSdkWishesAndGreetingsNativeFragment.FRAGMENT_TAG
    if (manager.isStateSaved || manager.findFragmentByTag(tag) != null) return

    try {
        val module = WishesSdk.get(this).module
        if (module == null) {
            viewModel.setStatus("Wishes and Greetings isn't available.")
            return
        }
        viewModel.onLaunch()
        val fragment = module.wishesAndGreetingsNative(
            wishesAndGreetingsNativeDocConfig = WishesAndGreetingsNativeDocConfig(),
            wishesAndGreetingsNativeAppConfig = WishesAndGreetingsNativeAppConfig(
                // Pass ViewModel-owned handlers, never lambdas that capture this Activity.
                callbacks = viewModel.callbacks,
                onDismiss = viewModel.onDismiss,
            ),
            exportConfig = listOf(
                PublishExportOption(
                    id = "returnImage",
                    label = getString(R.string.export_label),
                    style = ButtonStyle(),
                    action = PublishAction(
                        target = PublishTarget.PUBLISH.value,
                        publishFileType = ImageFileType.PNG.mimeType,
                        outputType = AssetDataType.BASE64,
                        closeTargetOnExport = true,
                        // Otherwise the button stays disabled until the first edit.
                        enableByDefault = true,
                    ),
                ),
            ),
        )
        // Selecting a template opens the SDK's editor over this fragment; closing it returns here.
        manager.beginTransaction()
            .replace(android.R.id.content, fragment, tag)
            .addToBackStack(tag)
            .commit()
    } catch (e: Exception) {
        viewModel.setStatus("Could not open Wishes and Greetings: ${e.message}")
    }
}
- Connect your launch button to this function after SDK initialization succeeds.
- The first guard skips the launch if the browser is already open, which prevents duplicate launches, or if the
FragmentManagerhas already saved its state. It doesn't queue the launch; the user can tap again once the Activity resumes. - A
nullmodule or a launch exception is reported in the status view instead of failing silently.
data-slots=text
data-variant=success
6. Open a template in the SDK editor
When users select a template in the browser, the SDK carries the selected template identifier into its editor and forwards the export configuration you supplied at launch—this transition is part of the Wishes and Greetings workflow.
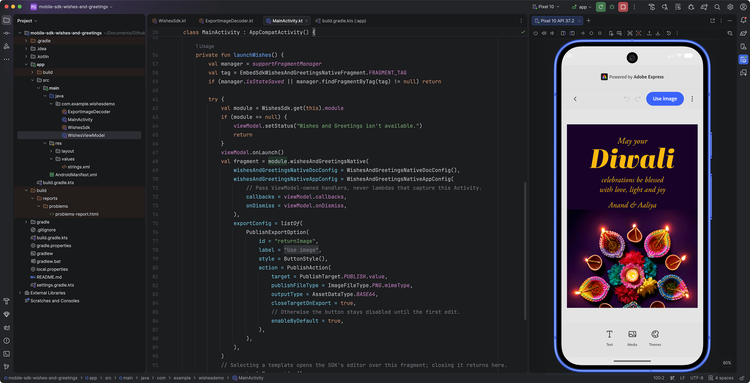
With containerConfig unset, the editor opens over the browse surface using the default content container. Keep the hosting Activity alive while the editor is active. The normal close path returns to the browser; your dismiss handling determines when to return from the browser to your own screen.
Checkpoint: selecting a template should open that design in the editor. You can personalize it there before returning the image to your host.
7. Edit the template
In the editor, your users can remix the template with the power and precision of Adobe Express' editing tools. They can add new text and media, or change text, images, colors, and other design elements provided by the template.
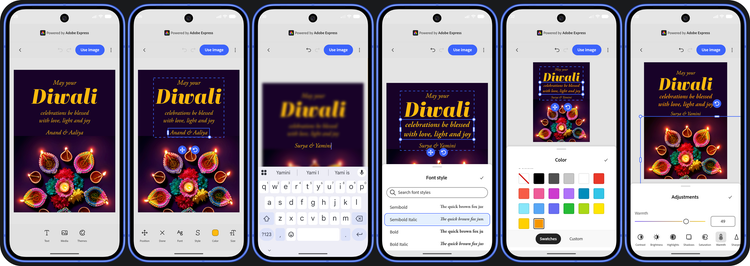
Additional tools may be introduced in future versions of the module. Currently, users can add or modify text and media, as well as customize the template’s color theme. For both new and existing elements, the editor provides a rich set of controls to fine-tune the design, such as font selection, size, format, color and style adjustment, layout, background removal, and much more!
Once they are satisfied with their edits, they can proceed clicking the "Use image" button, which triggers the onPublish callback.
8. Receive the published PNG
The launch function defines one export option. Its outer fields identify the UI action, and PublishAction defines the returned data:
idreturnImagelabelUse imagestyleButtonStyle()targetPublishTarget.PUBLISH.valuepublishFileTypeImageFileType.PNG.mimeTypeoutputTypeAssetDataType.BASE64closeTargetOnExporttrueenableByDefaulttrueWhen users select Use image in the editor, the onPublish callback receives the intent and PublishParams. The payload contains a nullable asset list; it can also include exportButtonId and documentId. The export event is not itself a Bitmap.
The ViewModel's onPublish hands the parameters to handlePublish:
data-slots=heading, code
data-repeat=1
src/main/java/com/example/wishesdemo/WishesViewModel.kt
private fun handlePublish(params: PublishParams) {
    publishReceived = true
    val data = params.asset.orEmpty()
        .firstOrNull { it.dataType == AssetDataType.BASE64 }
        ?.getData()
        ?.takeIf { it.isNotBlank() }
    if (data == null) {
        setStatus("Publish returned no image.")
        return
    }
    viewModelScope.launch(Dispatchers.Default) {
        try {
            _image.postValue(ExportImageDecoder.decode(data))
            setStatus("Image received.")
        } catch (e: CancellationException) {
            throw e
        } catch (e: Exception) {
            setStatus("The returned image could not be displayed; try publishing again.")
        }
    }
}
- Mark the publish event as received.
- Pick the first asset with the
BASE64data type you requested and a nonemptygetData()value. If there isn't one, report it in the status view. - Decode the data off the main thread in
viewModelScope, so decoding continues even if the Activity is recreated, then post the bitmap and status. - Rethrow
CancellationExceptionto preserve coroutine cancellation instead of reporting it as an image error.
9. Decode and display the image in your host
Keep image handling in the host rather than embedding it in SDK navigation. The demo app's ExportImageDecoder turns the Base64 payload into a Bitmap small enough to display:
data-slots=heading, code
data-repeat=1
src/main/java/com/example/wishesdemo/ExportImageDecoder.kt
object ExportImageDecoder {
    private const val MAX_EDGE = 2048

    /** Decodes a Base64 image, or a data URI, and downsamples it to fit within [MAX_EDGE] pixels. */
    fun decode(base64: String): Bitmap {
        val bytes = Base64.decode(base64.substringAfter("base64,"), Base64.DEFAULT)
        val options = BitmapFactory.Options().apply { inJustDecodeBounds = true }
        BitmapFactory.decodeByteArray(bytes, 0, bytes.size, options)
        require(options.outWidth > 0 && options.outHeight > 0) { "Not a valid image." }
        options.inSampleSize = 1
        while (maxOf(options.outWidth, options.outHeight) / options.inSampleSize > MAX_EDGE) {
            options.inSampleSize *= 2
        }
        options.inJustDecodeBounds = false
        return checkNotNull(BitmapFactory.decodeByteArray(bytes, 0, bytes.size, options)) {
            "The image could not be decoded."
        }
    }
}
- Accept either raw Base64 or a data URI by taking the text after the
base64,marker, if present. - Read the image bounds first, without allocating the full bitmap, and reject data that isn't a valid image.
- Choose a power-of-two sample size so the longest edge is at most 2,048 pixels, then decode the bitmap.
The Activity observes the ViewModel and shows the result:
data-slots=heading, code
data-repeat=1
src/main/java/com/example/wishesdemo/MainActivity.kt
viewModel.status.observe(this) { status.text = it }
viewModel.image.observe(this) { bitmap ->
    result.setImageBitmap(bitmap)
    result.contentDescription = getString(R.string.published_image)
}
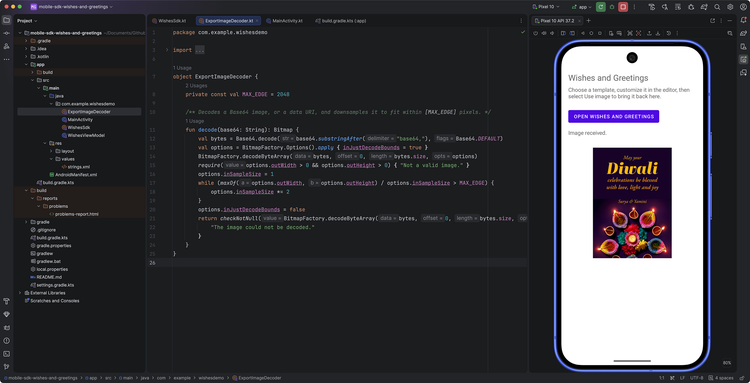
Decoding starts when the publish callback arrives, even though the editor still covers the host screen. The image becomes visible when the workflow returns to that screen. Because the bitmap lives in the ViewModel, it's still there after a rotation.
10. Finish the session without racing navigation
Handle the end of the workflow in this order:
- In
onPublish, consume the data and start decoding. Don't pop the browser or remove the editor there. - Let the SDK close the editor, as requested by
closeTargetOnExport. - In
onSessionFinished, use the publish-received flag to request dismissal of the browse surface. - Pop the browser's tagged back-stack entry from the Activity when it observes the request.
The browse surface's own back control also calls onDismiss, which sends the same request, so the host is responsible for removing the browser in both cases. The Activity handles the request in one place:
data-slots=heading, code
data-repeat=1
src/main/java/com/example/wishesdemo/MainActivity.kt
// LiveData only delivers while the Activity is started, so the pop never runs after
// the FragmentManager has saved its state, and a pending dismiss runs on return.
viewModel.dismissRequested.observe(this) { requested ->
    if (requested) {
        supportFragmentManager.popBackStack(
            EmbedSdkWishesAndGreetingsNativeFragment.FRAGMENT_TAG,
            FragmentManager.POP_BACK_STACK_INCLUSIVE,
        )
        viewModel.onDismissHandled()
    }
}
Routing the dismissal through LiveData solves two lifecycle problems at once:
- Saved state.
LiveDatadelivers values only while the Activity is started, so the back-stack pop never runs after theFragmentManagerhas saved its state. If the request arrives while the app is in the background, it's applied when the user returns. - Rotation. The request is stored in the ViewModel, so the recreated Activity receives it.
Popping by tag is idempotent: if the browser's entry is no longer on the back stack, a repeated request does nothing, and it never pops unrelated entries.
data-slots=text
data-variant=success
ImageView with Image received. in the status view. Cancellation or invalid image data should produce a status message instead, not a fabricated success image.Resolve common integration problems
Use the failing boundary to decide what to inspect:
mavenCentral() is in your settings.gradle.kts repositories and that the version exists on GitHub Releases.ExpressEmbedSdk or Wishes configuration types don't resolveCLIENT_ID isn't setWishesSdk.kt with the client ID Adobe issued for your app.WEB_VIEW_NOT_AVAILABLESDK_INITIALIZATION_IN_PROGRESSapplicationId matches the package name Adobe registered for your client ID, and that AuthMode.DELAYED is set.UNSUPPORTED_APIeditDesign call.callbacks and onDismiss passed at launch don't capture the Activity. Keep them in a ViewModel, as in Step 4.getData() values before decoding.onSessionFinished handling and the FRAGMENT_TAG used for both the transaction and the pop.When escalating a service failure, provide the SDK version, failing step, and sanitized callback error details through your approved partner support channel. Don't send exported image payloads as diagnostic logs, and don't substitute another app's client ID to work around an unexplained failure.
What you integrated
You now have the integration boundaries for one complete Android flow:
- Your app consumes the SDK from Maven Central and retains one initialized interface.
- Your AppCompat Activity mounts the native Wishes and Greetings browser.
- The SDK opens the selected template in its editor using the same workflow configuration.
- Your ViewModel receives the published PNG, decodes it off the main thread, and exposes it to the Activity.
- Your session and dismiss handlers return to the host safely, including across rotation, without removing the editor from
onPublish.
For further lookup, use the Android SDK API reference for public classes, configuration, and callbacks, and the Android SDK release list for general release information.