Automating recurring Analytics reports
Set up recurring Analytics reports for your automated workflow with fresh metrics on a schedule. By using the Reporting API with rolling date formulas, a single report request runs without manual modification and delivers current data to your pipeline.
Use automated, recurring report data for the following:
- BI pipeline: Feed a daily or weekly KPI snapshot into a database for querying by a business intelligence tool
- Agentic readiness: Provide recurring input to an AI agent or automated analytics workflow
- Alerting: Check metrics against custom, non-statistical thresholds and trigger a system action, such as a PagerDuty incident
- ETL feed: Replace manual Workspace report exports with a programmatic feed into an existing Extract, Transform, Load (ETL) pipeline
- Consolidation: Aggregate Analytics data with other sources in a centralized reporting database
data-variant=info
data-slots=text
The endpoints described in this guide are routed through analytics.adobe.io. To use them, you must first create a client with access to the Adobe Developer Console. For more information, see Getting started with the Analytics API.
If you are new to the Analytics Reporting API, see KPI reports for an introduction to constructing report requests before using this guide. If your use case requires bulk file delivery to cloud storage with Adobe-managed scheduling, see Data Warehouse and Cloud locations APIs instead.
Advantages of automated workflows
When data feeds a system rather than a person, setting up a report pipeline has several advantages. Instead of manually constructing and sharing a scheduled report, you can script a Reporting API call for more control and reliability:
-
No human dependency: A UI scheduled report requires someone to set it up, maintain it, and notice when it breaks. The API pipeline is code; it is versioned, testable, and owned by the system.
-
Structured data delivery: UI scheduled reports deliver a formatted file (Excel, CSV, PDF) designed for human reading. The API returns clean JSON that maps directly to a database table with no parsing of formatted cells, merged headers, or summary rows.
-
Direct integration: The Report endpoint response integrates directly into your data pipeline with the same script used to run the report. A UI report requires a file to be routed, then picked up, parsed, and loaded in separate steps. This introduces extra failure points.
-
Programmatic control: You can change the date range, metrics, filters, or destination in code. A UI report requires someone to log in and reconfigure it.
-
Reliability and alerting: Failures can automatically alert your team. A broken UI scheduled report may silently stop without notice until a dashboard is obviously stale.
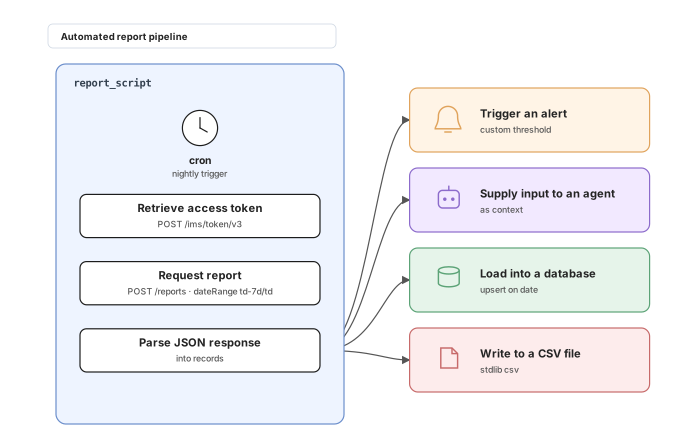
Setting up a recurring report for a pipeline includes the following steps:
-
Automating token retrieval: Authenticate each scheduled run with a new server-to-server access token
-
Building the recurring report request: Use date formulas to keep your report current on every scheduled run without modifying the request body
-
Scheduling the report call: Run the request on a recurring schedule using a Python script and cron
-
Parsing the JSON response: Parse the JSON response and route the data to your pipeline
The following diagram shows the pipeline flow as outlined above:
Automating token retrieval
By incorporating a job scheduler into a script, you can automate the retrieval of an authorization token. Manual steps in an API client are not required. Each time a scheduler triggers the script, you receive a fresh token and use it immediately for the report request in the same run. Because tokens expire after 24 hours, scripting a scheduled re-fetch at the start of every run is the recommended pattern for recurring jobs.
Your script should make the token authorization call with the following endpoint:
POST https://ims-na1.adobelogin.com/ims/token/v3
Token retrieval request and response examples
Click the Request tab in the following example to see a cURL request for this endpoint. Click the Response tab to see a successful JSON response for the request.
data-slots=heading, code
data-repeat=2
data-languages=CURL,JSON
Request
curl -X POST \
  "https://ims-na1.adobelogin.com/ims/token/v3" \
  -H "Content-Type: application/x-www-form-urlencoded" \
  -d "grant_type=client_credentials&client_id={CLIENT_ID}&client_secret={CLIENT_SECRET}&scope={SCOPES}"
Response
{
  "access_token": "eyJhbGciOiJSUzI1NiIsIng1dCI6Ik...",
  "token_type": "bearer",
  "expires_in": 86399
}
Request example details
-
The
client_idandclient_secretvalues are available in your Adobe Developer Console project under OAuth Server-to-Server. Store both as environment variables in your OS or scheduler rather than hardcoding them in your script. -
The
scopevalues required for your integration are listed in your Developer Console project. Required scopes vary depending on the Analytics API operations your integration performs. -
This is the first scripted call at the start of each scheduled run to receive a fresh token. Do not cache tokens across daily runs.
Response example details
-
The
access_tokenvalue is the bearer token used in theAuthorizationheader of each subsequent Analytics API request. -
The
expires_invalue is in seconds. A value of86399indicates the token expires in approximately 24 hours. -
The
token_typevalue is alwaysbearerfor the client credentials grant type.
Request parameters
grant_typeclient_credentials for server-to-server authenticationclient_idclient_secretscopeResponse parameters
access_tokenAuthorization: Bearer {ACCESS_TOKEN}. Note the space between the word "Bearer" and its value.token_typeexpires_inBuilding the recurring report request
Build a report request that returns the current data window on every scheduled run by using a rolling date formula in the dateRange field. The API evaluates the formula server-side, so the same request body delivers fresh data each time without modification.
If you have worked through the KPI reports guide, the structure of such a request is almost identical, except for the difference in specifying the date range.
To make the request, use the following endpoint:
POST https://analytics.adobe.io/api/{GLOBAL_COMPANY_ID}/reports
Date range formulas
Specify dateRange in globalFilters as a formula string in the format <start>/<end>. Each component combines a base unit representing the current calendar period with an optional shift modifier.
Base units:
thtdtwtmtqtyShift the base unit by appending -Nx or +Nx, where N is the number of periods and x is the unit code. Common formulas for recurring reports:
td-7d/tdtd/td+1dth-24h/thtm-1m/tmtq-1q/tqty-1y/tyConstraints:
- Date formulas are only supported in the
globalFiltersarray. They are not available for metric-level filters. - Date formulas are only available for ranked reports. They are not supported for real-time reports.
- Formulas evaluate relative to the timezone configured for your report suite. A report suite without timezone configuration returns a
400error.
Request and response examples
Click the Request tab in the following example to see a cURL request for this endpoint. Click the Response tab to see a successful JSON response for the request.
data-slots=heading, code
data-repeat=2
data-languages=CURL,JSON
Request
curl -X POST \
  "https://analytics.adobe.io/api/{GLOBAL_COMPANY_ID}/reports" \
  -H "accept: application/json" \
  -H "x-api-key: {CLIENT_ID}" \
  -H "Authorization: Bearer {ACCESS_TOKEN}" \
  -H "Content-Type: application/json" \
  -d '{
        "rsid": "examplersid",
        "globalFilters": [{"type": "dateRange", "dateRange": "td-7d/td"}],
        "metricContainer": {
          "metrics": [
            {"columnId": "0", "id": "metrics/visits"},
            {"columnId": "1", "id": "metrics/orders"},
            {"columnId": "2", "id": "metrics/revenue", "sort": "desc"}
          ]
        },
        "dimension": "variables/daterangeday",
        "settings": {"countRepeatInstances": true, "limit": 7, "page": 0}
      }'
Response
{
    "totalPages": 1,
    "firstPage": true,
    "lastPage": true,
    "numberOfElements": 7,
    "number": 0,
    "totalElements": 7,
    "columns": {
        "dimension": {
            "id": "variables/daterangeday",
            "type": "time"
        },
        "columnIds": ["0", "1", "2"]
    },
    "rows": [
        {
            "itemId": "1260524",
            "value": "May 24, 2026",
            "data": [682171, 18722, 2288544.73]
        },
        {
            "itemId": "1260523",
            "value": "May 23, 2026",
            "data": [676125, 15219, 2325169.57]
        },
        {
            "itemId": "1260522",
            "value": "May 22, 2026",
            "data": [667478, 19093, 2355620.19]
        }
    ],
    "summaryData": {
        "filteredTotals": [4618723, 134867, 15478399.06],
        "totals": [4618723, 134867, 15478399.06]
    }
}
Request example details
- The
dateRangevaluetd-7d/tdrequests the rolling 7-day window ending at the current day. The API evaluates this formula server-side relative to your report suite timezone, so the same request body returns the current window on every scheduled run. dimension: variables/daterangedaybreaks the results into one row per day.limit: 7matches the formula window, returning one row per day in the range.metrics/revenueis sorted descending ("sort": "desc"), so the highest-revenue days appear first in the response.
Response example details
- The response shows only three of seven rows for readability. Each row
dataarray aligns with thecolumnIdsorder: index0= visits, index1= orders, index2= revenue. - The
valuefield contains the human-readable date label for each row. The API resolves the date formula to actual calendar dates in the report suite timezone. summaryData.totalsprovides aggregated metric totals across all rows in the response.totalPages: 1withlastPage: trueindicates that all results fit within a single page.
Request parameters
rsidglobalFilterstype: dateRange and a date formula stringglobalFilters[].typedateRange for date range filteringglobalFilters[].dateRangetd-7d/td to define a rolling window evaluated server-side on every runmetricContainermetricContainer.metricsmetricContainer.metrics[].columnId0. Determines the index of each metric value in rows[].datametricContainer.metrics[].idmetrics/visits, metrics/orders, metrics/revenue)metricContainer.metrics[].sortasc or descdimensionvariables/daterangeday for daily breakdownssettings.countRepeatInstancestruesettings.limit50. For a 7-day formula, use 7 to return one row per daysettings.page0Response parameters
totalPagesfirstPagelastPagenumberOfElementsnumber0totalElementscolumns.dimension.idcolumns.columnIdsrows[].datarowsrows[].itemIdrows[].valuerows[].datacolumns.columnIdssummaryData.totalssummaryData.filteredTotalsScheduling the report call
Use any external scheduler to run your report script on a recurring interval. The Analytics API has no built-in scheduling requirement. The date formula in the request body determines the data window. Your scheduler determines when the script runs.
In the following example, a Python script is used to combine both API calls from this guide into a single runnable script.
Python script example
import os
import requests

CLIENT_ID = os.environ["ANALYTICS_CLIENT_ID"]
CLIENT_SECRET = os.environ["ANALYTICS_CLIENT_SECRET"]
SCOPES = os.environ["ANALYTICS_SCOPES"]
GLOBAL_COMPANY_ID = os.environ["ANALYTICS_GLOBAL_COMPANY_ID"]
REPORT_SUITE_ID = os.environ["ANALYTICS_REPORT_SUITE_ID"]


def get_access_token():
    response = requests.post(
        "https://ims-na1.adobelogin.com/ims/token/v3",
        data={
            "grant_type": "client_credentials",
            "client_id": CLIENT_ID,
            "client_secret": CLIENT_SECRET,
            "scope": SCOPES,
        },
    )
    response.raise_for_status()
    return response.json()["access_token"]


def run_report(access_token):
    body = {
        "rsid": REPORT_SUITE_ID,
        "globalFilters": [{"type": "dateRange", "dateRange": "td-7d/td"}],
        "metricContainer": {
            "metrics": [
                {"columnId": "0", "id": "metrics/visits"},
                {"columnId": "1", "id": "metrics/orders"},
                {"columnId": "2", "id": "metrics/revenue", "sort": "desc"},
            ]
        },
        "dimension": "variables/daterangeday",
        "settings": {"countRepeatInstances": True, "limit": 7, "page": 0},
    }
    response = requests.post(
        f"https://analytics.adobe.io/api/{GLOBAL_COMPANY_ID}/reports",
        headers={
            "accept": "application/json",
            "x-api-key": CLIENT_ID,
            "Authorization": f"Bearer {access_token}",
            "Content-Type": "application/json",
        },
        json=body,
    )
    response.raise_for_status()
    return response.json()


if __name__ == "__main__":
    token = get_access_token()
    data = run_report(token)
    print(f"Retrieved {len(data['rows'])} rows for the past 7 days")
Example schedule definition
Although schedule definitions vary across schedulers, most schedulers invoke the same script logic on a configured schedule.
In the following example schedule definition, cron is used to run the script daily at 08:00. To use it, open a crontab file with the crontab -e command and type:
0 8 * * * /usr/bin/python3 /opt/scripts/analytics_report.py >> /var/log/analytics_report.log 2>&1
data-variant=info
data-slots=text
0 8 * * * prefix is cron schedule syntax. The five fields are minute, hour, day of month, month, and day of week; 0 8 means 8:00, and each * means "every," so this runs at 08:00 every day.Error handling
-
Call
raise_for_status()after each request to surface non-2xx responses as exceptions. Log the full response body. The Analytics API typically includes amessagefield with a specific error description. -
Implement a retry with exponential backoff for transient errors (
429,500,503). -
A
400on the report request often indicates a misconfiguredrsidor a report suite without timezone configuration. See Date range formulas for timezone requirements.
Parsing the JSON response
The JSON response can be parsed for the purposes discussed above, including:
- Scripting synchronous extraction, evaluation, and triggering of a notification
- Supplying structured input to an agent
- Loading data into an ETL or ELT pipeline
- Writing to a CSV file
Every use case begins by parsing the JSON response into usable records with the metric values, as described in the following sections.
Inherent JSON positional alignment
Parsing the JSON relies upon understanding the inherent positional array alignment in the response. Each entry in the rows array contains one dimension value. For variables/daterangeday, one entry is shown per day, in the order of columns.columnIds, as specified in the request. For example, the Reporting API JSON response example above is already tabular in meaning, by virtue of its rows and column ordering. Taken across all rows, the positional response becomes a simple table of named values:
 date         | visits  | orders | revenue
--------------+---------+--------+-------------
 2026-05-24   |  682171 |  18722 |  2288544.73
 2026-05-23   |  676125 |  15219 |  2325169.57
 2026-05-22   |  667478 |  19093 |  2355620.19
This is the shape the parsing step produces and every downstream use consumes.
The alignment starts in your request, where each metric is assigned a column position:
"metrics": [
    {"columnId": "0", "id": "metrics/visits"},
    {"columnId": "1", "id": "metrics/orders"},
    {"columnId": "2", "id": "metrics/revenue", "sort": "desc"}
]
The response echoes those positions in columns.columnIds:
"columns": {
    "columnIds": ["0", "1", "2"]
}
Each row then returns its metric values in that same order, with no field names:
{
    "itemId": "1260524",
    "value": "May 24, 2026",
    "data": [682171, 18722, 2288544.73]
}
So for May 24, 2026, data[0] is visits, data[1] is orders, and data[2] is revenue. Once parsed, the records are ready for whatever your workflow needs. In some cases, such as a Slack alert or agentic input, you evaluate or pass the parsed values directly, rather than loading them into a destination.
Parsing with the Python standard library
Using the Python standard library, you can reshape each row into a flat record with named fields that any of the use cases above can consume:
records = [
    {
        "date": row["value"],
        "visits": row["data"][0],
        "orders": row["data"][1],
        "revenue": row["data"][2],
    }
    for row in data["rows"]
]
Triggering an alert
For anomaly-based alerting delivered to people, use Anomaly Detection and Intelligent Alerts in Adobe Analytics rather than the API. The API path suits custom, non-statistical thresholds that trigger a system action.
For custom alerting in a pipeline, include scripting logic to evaluate the data rather than load it. Extract the metric value you want to monitor, compare it against a threshold, and act when the condition is met. The following Python shows an example:
todays_revenue = records[0]["revenue"]

if todays_revenue < 2000000:
    send_alert(f"Revenue alert: {todays_revenue} is below the threshold")
The evaluation above is a standard Python conditional. No library or external service is involved. Only the notification (send_alert) reaches an outside service such as a Slack incoming webhook or a paging tool, which is specific to the service you choose and not part of the Analytics API.
If you need only a single value, you can index the response directly instead of building the full record set:
todays_revenue = data["rows"][0]["data"][2]
Supplying input to an agent
This covers scheduled, unattended staging. If an agent needs to fetch data on demand in response to a user, use an MCP server or a direct tool call rather than a scheduled pull.
For agentic use, the parsed records are the input. Because the report returns structured, labeled JSON data, an agent can consume the records as context without additional parsing. If the agent runs on the same schedule as the report, the script can pass the records to it directly. More often, the report and the agent run on different triggers, so the script writes the records to a shared location. This can be a database, cache, or file that the agent reads when it runs. For a database store, see Loading into a database. The following Python shows an example method of writing the records to a shared location:
save_records(records) # to a store the agent queries on its own trigger
The role of the Reporting API ends at producing current, structured records. The agent data store and retrieval method are part of your agent architecture, not the report request.
Loading into a database
This case suits aggregated report data. For raw, hit-level data or large-volume exports, use Data Feeds or Data Warehouse rather than the Reporting API.
Load the parsed records into your destination table to feed an ETL or Extract, Load, Transform (ELT) pipeline, where each record becomes a row in the table shown above. Because a recurring report runs on a schedule, use an upsert keyed on the date so a repeated run updates the existing row instead of creating a duplicate. The exact statement depends on your database driver and schema.
For example, in PostgreSQL an upsert keyed on the date avoids duplicate rows on repeated runs. Exact syntax varies by database:
INSERT INTO analytics_kpis (date, visits, orders, revenue)
VALUES (%s, %s, %s, %s)
ON CONFLICT (date) DO UPDATE SET
  visits  = EXCLUDED.visits,
  orders  = EXCLUDED.orders,
  revenue = EXCLUDED.revenue;
For a simpler load where duplicate protection is not needed, a data-handling library such as pandas can append the records in a single step:
import pandas as pd

pd.DataFrame(records).to_sql("analytics_kpis", your_engine, if_exists="append", index=False)
Writing to a CSV file
If your pipeline consumes a file rather than a live database connection, write the records to CSV using the standard library:
import csv
from datetime import datetime

run_date = datetime.utcnow().strftime("%Y-%m-%d")

with open(f"analytics_kpis_{run_date}.csv", "w", newline="") as f:
    writer = csv.DictWriter(f, fieldnames=["date", "visits", "orders", "revenue"])
    writer.writeheader()
    writer.writerows(records)
For bulk file delivery to cloud storage with Adobe-managed scheduling, see the Data Warehouse and Cloud Locations guides instead.
Related resources
- KPI reports guide: Introduction to building report requests with the Analytics Reporting API
- Advanced reports API guide: Working with segments, metric filters, and date range comparisons
- Getting started with the Analytics API: Authentication setup and Developer Console configuration
- Data Warehouse API endpoint guide: Bulk file export with Adobe-managed scheduling
- Cloud locations API endpoint guide: Bulk file delivery to cloud storage destinations