Adobe Campaign Standard
data-variant=info
data-slots=text
Configure the Campaign Standard extension in the Data Collection UI
- In the Data Collection UI, select the Extensions tab.
- On the Catalog tab, locate the Adobe Campaign Standard extension, and select Install.
- Provide the extension settings.
- Select Save.
- Follow the publishing process to update SDK configuration.
Configure the Campaign Standard extension
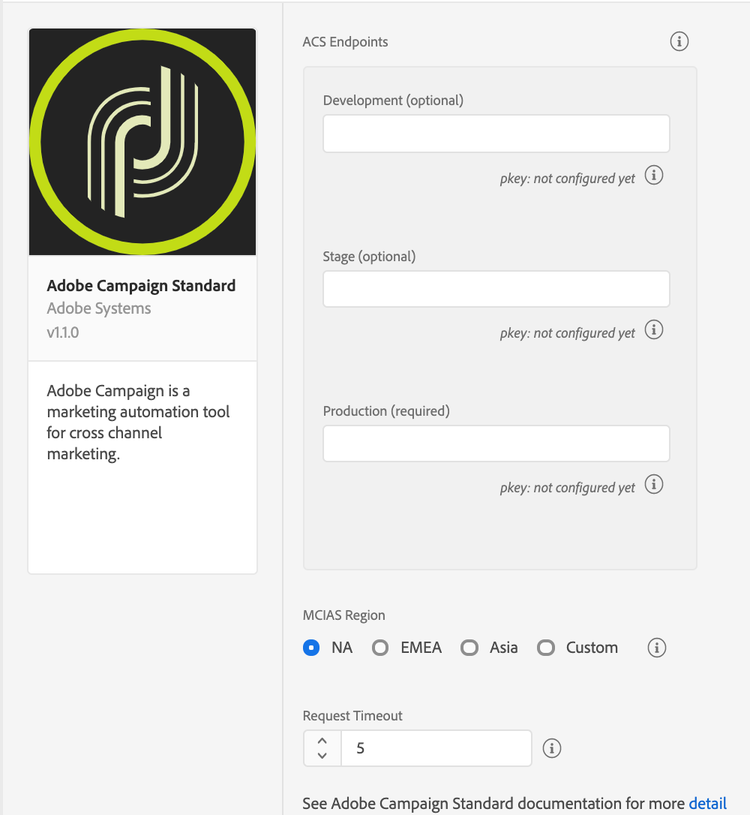
Campaign Standard endpoints
Provide endpoint URL(s) for your Campaign Standard instances. You can specify up to three unique endpoints for your development, staging, and production environments. In most cases, the server endpoint is the root URL address, such as companyname.campaign.adobe.com.
data-variant=warning
data-slots=text
http:// or https:// and cannot end with a forward slash.pKey
A unique, automatically generated identifier for a mobile app that was configured in Adobe Campaign Standard. After you configure this extension in the Data Collection UI, configure your mobile property in Campaign Standard. For more information, please read the tutorial on configuring a mobile application in Adobe Campaign.
After the configuration is successful in Campaign, the pKey is automatically generated and configured in the Campaign extension for a successful validation.
MCIAS region
Select an MCIAS region based on your customer's location or enter a custom endpoint. The SDK retrieves all in-app messaging rules and definition payloads from this endpoint.
data-variant=warning
data-slots=text
http:// or https:// and cannot end with a forward slash.Request timeout
The request timeout is the time in seconds to wait for a response from the in-app messaging service before timing out. The default timeout value is 5 seconds, and the minimum timeout value is 1 second.
data-variant=warning
data-slots=text
Add the Campaign Standard extension to your app
Remember the following information when you add the Campaign extension to your app:
data-variant=info
data-slots=text
Add MobileCore, Campaign Standard and Profile extensions as dependencies to your project.
Include Campaign Standard extension as an app dependency
Android Kotlin
Add the required dependencies to your project by including them in the app's Gradle file.
implementation(platform("com.adobe.marketing.mobile:sdk-bom:3.+"))
implementation("com.adobe.marketing.mobile:campaign")
implementation("com.adobe.marketing.mobile:core")
implementation("com.adobe.marketing.mobile:identity")
implementation("com.adobe.marketing.mobile:lifecycle")
implementation("com.adobe.marketing.mobile:signal")
implementation("com.adobe.marketing.mobile:userprofile")
data-variant=warning
data-slots=text
Android Groovy
Add the required dependencies to your project by including them in the app's Gradle file.
implementation platform('com.adobe.marketing.mobile:sdk-bom:3.+')
implementation 'com.adobe.marketing.mobile:campaign'
implementation 'com.adobe.marketing.mobile:core'
implementation 'com.adobe.marketing.mobile:identity'
implementation 'com.adobe.marketing.mobile:lifecycle'
implementation 'com.adobe.marketing.mobile:signal'
implementation 'com.adobe.marketing.mobile:userprofile'
data-variant=warning
data-slots=text
iOS CocoaPods
Add the required dependencies to your project using CocoaPods. Add following pods in your Podfile:
use_frameworks!
target 'YourTargetApp' do
  pod 'AEPCampaign', '~> 5.0'
  pod 'AEPCore', '~> 5.0'
  pod 'AEPIdentity', '~> 5.0'
  pod 'AEPLifecycle', '~> 5.0'
  pod 'AEPSignal', '~> 5.0'
  pod 'AEPUserProfile', '~> 5.0'
end
Initialize Adobe Experience Platform SDK with Campaign Standard Extension
Next, initialize the SDK by registering all the solution extensions that have been added as dependencies to your project with Mobile Core. For detailed instructions, refer to the initialization section of the getting started page.
Using the MobileCore.initialize API to initialize the Adobe Experience Platform Mobile SDK simplifies the process by automatically registering solution extensions and enabling lifecycle tracking.
Android Kotlin
data-variant=warning
data-slots=text
import com.adobe.marketing.mobile.LoggingMode
import com.adobe.marketing.mobile.MobileCore
...
import android.app.Application
...

class MainApp : Application() {
  override fun onCreate() {
    super.onCreate()
    MobileCore.setLogLevel(LoggingMode.DEBUG)
    MobileCore.initialize(this, "ENVIRONMENT_ID")
  }
}
Android Java
data-variant=warning
data-slots=text
import com.adobe.marketing.mobile.LoggingMode;
import com.adobe.marketing.mobile.MobileCore;
...
import android.app.Application;
...
public class MainApp extends Application {
  @Override
  public void onCreate(){
    super.onCreate();
    MobileCore.setLogLevel(LoggingMode.DEBUG);
    MobileCore.initialize(this, "ENVIRONMENT_ID");
  }
}
iOS Swift
data-variant=warning
data-slots=text
// AppDelegate.swift
import AEPCore
import AEPServices
...

final class AppDelegate: NSObject, UIApplicationDelegate {
  func application(_: UIApplication, didFinishLaunchingWithOptions _: [UIApplication.LaunchOptionsKey: Any]? = nil) -> Bool {
    MobileCore.setLogLevel(.debug)
    MobileCore.initialize(appId: "ENVIRONMENT_ID")
    ...
  }
}
iOS Objective-C
data-variant=warning
data-slots=text
// AppDelegate.m
#import "AppDelegate.h"
@import AEPCore;
@import AEPServices;
...
@implementation AppDelegate
- (BOOL)application:(UIApplication *)application didFinishLaunchingWithOptions:(NSDictionary *)launchOptions {
  [AEPMobileCore setLogLevel: AEPLogLevelDebug];
  [AEPMobileCore initializeWithAppId:@"ENVIRONMENT_ID" completion:^{
      NSLog(@"AEP Mobile SDK is initialized");
  }];
  ...
  return YES;
}
@end
Set up tracking
To initialize the SDK and set up tracking, see the initialize the SDK and set up tracking tutorial.
Android
Set up in-app messaging
To learn how to create an in-app message using Adobe Campaign, see the tutorial on preparing and sending an in-app message.
Set up local notifications
To set up local notifications in Android, update the AndroidManifest.xml file:
<receiver android:name="com.adobe.marketing.mobile.LocalNotificationHandler"/>
To configure the notification icons that the local notification will use, see the configuring notification icons section within the Mobile Core.
IOS
No additional setup is needed for iOS in-app messaging and local notifications.
Set up push messaging
To enable push messaging with Adobe Campaign, call setPushIdentifer to send the push identifier that is received from the Apple Push Notification Service (APNS) or Firebase Cloud Messaging Platform (FCM) to the Adobe Identity service. For more information about the setPushIdentifer API, see the setPushIdentifier section of the Adobe Identity API guide.
For more information about setting up your iOS app to connect to APNS and retrieve a device token that will be used as a push identifier, see the tutorial on registering your app with APNs. For more information about setting up your Android app to connect to FCM and retrieve a device registration token that will be used as a push identifier, see the tutorial on setting up a Firebase Cloud Messaging client app on Android.
data-variant=info
data-slots=text
Android Java
data-slots=heading, code
data-repeat=1
Example
FirebaseInstanceId.getInstance().getInstanceId()
        .addOnCompleteListener(new OnCompleteListener<InstanceIdResult>() {
            @Override
            public void onComplete(@NonNull Task<InstanceIdResult> task) {
                if (!task.isSuccessful()) {
                    return;
                }
                // Get new Instance ID token
                String registrationID = task.getResult().getToken();
                // Log and toast
                System.out.println("Received new registration token: " + registrationID);
                // invoke the API to send the push identifier to the Identity Service
                MobileCore.setPushIdentifier(registrationID);
            }
});
iOS simulators do not support push messaging.
iOS Swift
data-slots=heading, code
data-repeat=1
Example
func application(_ application: UIApplication, didRegisterForRemoteNotificationsWithDeviceToken deviceToken: Data) {
  // Set the deviceToken that the APNS has assigned to the device
  MobileCore.setPushIdentifier(deviceToken: deviceToken)
  //...
}
iOS Objective-C
data-slots=heading, code
data-repeat=1
Example
- (void) application:(UIApplication *)application didRegisterForRemoteNotificationsWithDeviceToken:(NSData *)deviceToken {
  // Set the deviceToken that the APNS has assigned to the device
  [AEPMobileCore setPushIdentifier:deviceToken];
  //...
}
Tracking local and push notification message interactions
User interactions with local or push notifications can be tracked by invoking the collectMessageInfo API. After the API is invoked, a network request is made to Campaign that contains the message interaction event.
data-variant=warning
data-slots=text
collectMessageInfo API. For more specific details, please read the tutorials on implementing local notification tracking and configuring push tracking within the Adobe Campaign documentation.Android Java
- messageInfo is a map that contains the delivery ID, message ID, and action type for a local or push notification for which there were interactions. The delivery and message IDs are extracted from the notification payload.
data-slots=heading, code
data-repeat=2
Syntax
public static void collectMessageInfo(final Map<String, Object> messageInfo)
Example
@Override
protected void onResume() {
  super.onResume();
  handleTracking();
}

// handle notification open and click tracking
private void handleTracking() {
  Intent intent = getIntent();
  Bundle data = intent.getExtras();
  HashMap<String, Object> userInfo = null;

  if (data != null) {
    userInfo = (HashMap)data.get("NOTIFICATION_USER_INFO");
  } else {
    return;
  }

  // Check if we have notification user info.
  // If it is present, this view was opened based on a notification.
  if (userInfo != null) {
    String deliveryId = (String)userInfo.get("deliveryId");
    String broadlogId = (String)userInfo.get("broadlogId");

    HashMap<String, Object> contextData = new HashMap<>();

    if (deliveryId != null && broadlogId != null) {
      contextData.put("deliveryId", deliveryId);
      contextData.put("broadlogId", broadlogId);

      // Send Click Tracking since the user did click on the notification
      contextData.put("action", "2");
      MobileCore.collectMessageInfo(contextData);

      // Send Open Tracking since the user opened the app
      contextData.put("action", "1");
      MobileCore.collectMessageInfo(contextData);
    }
  }
}
iOS Swift
- messageInfo is a dictionary that contains the delivery ID, message ID, and action type for a local or push notification for which there were interactions. The delivery and message IDs are extracted from the notification payload.
data-slots=heading, code
data-repeat=2
Syntax
static func collectMessageInfo(_ messageInfo: [String: Any])
Example
// Handle notification interaction from background or closed
func userNotificationCenter(_ center: UNUserNotificationCenter, didReceive response: UNNotificationResponse, withCompletionHandler completionHandler: @escaping () -> Void) {
  DispatchQueue.main.async(execute: {
    let userInfo = response.notification.request.content.userInfo
    var broadlogId:String = (userInfo["_mId"] ?? userInfo["broadlogId"]) as! String
    var deliveryId:String = (userInfo["_dId"] ?? userInfo["deliveryId"]) as! String

    if (broadlogId.count == 0 || deliveryId.count == 0) {
      return
    }
    // Send Click Tracking since the user did click on the notification
    MobileCore.collectMessageInfo([
      "broadlogId": broadlogId,
      "deliveryId": deliveryId,
      "action": "2"
    ])
    // Send Open Tracking since the user opened the app
    MobileCore.collectMessageInfo([
      "broadlogId": broadlogId,
      "deliveryId": deliveryId,
      "action": "1"
    ])
  })
}
iOS Objective-C
- messageInfo is a dictionary that contains the delivery ID, message ID, and action type for a local or push notification for which there were interactions. The delivery and message IDs are extracted from the notification payload.
data-slots=heading, code
data-repeat=2
Syntax
+ (void) collectMessageInfo:(NSDictionary<NSString *,id> * _Nonnull)
Example
// Handle notification interaction from background or closed
-(void)userNotificationCenter:(UNUserNotificationCenter *)center didReceiveNotificationResponse:(UNNotificationResponse *)response withCompletionHandler:(void(^)(void))completionHandler{
  dispatch_async(dispatch_get_main_queue(), ^{
    NSDictionary *userInfo = response.notification.request.content.userInfo;
    NSString *broadlogId = userInfo[@"_mId"] ?: userInfo[@"broadlogId"];
    NSString *deliveryId = userInfo[@"_dId"] ?: userInfo[@"deliveryId"];

    if(!broadlogId.length || !deliveryId.length){
      return;
    }

    // Send Click Tracking since the user did click on the notification
    [AEPMobileCore collectMessageInfo:@{
      @"broadlogId" : broadlogId,
      @"deliveryId": deliveryId,
      @"action": @"2"
    }];
    // Send Open Tracking since the user opened the app
    [AEPMobileCore collectMessageInfo:@{
      @"broadlogId" : broadlogId,
      @"deliveryId": deliveryId,
      @"action": @"1"
    }];
  });
}
Deleting mobile properties in the Data Collection UI
data-variant=warning
data-slots=text
In the Data Collection UI, if you delete your mobile property, review your mobile property status in the Campaign Standard extension and ensure that the property displays an updated Deleted in Launch status. For more information about deleting a property, please read the delete a property section within the Data Collection UI documentation.
To remove the corresponding mobile app in Campaign Standard, select Remove from ACS. For more information, see the section on deleting your tags-enabled mobile application.
data-variant=warning
data-slots=text
Handling clickthrough destinations included in Campaign in-app messages
A destination URL can be added to in-app messages that are delivered from Adobe Campaign. The destination can be a website URL such as https://www.adobe.com or a deep link such as campaigndemoapp://signupactivity?paidaccount=true which can be used to direct the user to a specific area of your app.
data-variant=info
data-slots=text
UIService provides a new API setURIHandler for safer loading of in-app URIs. More information regarding the Android security vulnerability can be seen at the Google support article Remediation for Intent Redirection Vulnerability. The following Android example has been updated to use these newly added API.Handling in-app message website URLs on Android
Website URL's are handled without any additional action by the app developer. If an in-app message is clicked through and contains a valid URL, the device's default web browser will redirect to the URL contained in the in-app notification payload. The location of the URL differs for each notification type:
- The
urlkey is present in the alert message payload - The
urlis present in the query parameters of a fullscreen message button (data-destination-url) - The
adb_deeplinkkey is present in the local notification payload - The
urikey is present in the push notification payload
Handling in-app message deep links on Android
To handle deep links in the notification payload, you need to set up URL schemes in the app. For more information about setting URL schemes for Android, please read the tutorial on creating deep links to app content. Once the desired activity is started by the newly added intent filter, the data present in the deep link can be retrieved. After that point, any further actions based on the data present in the deep link can be made.
Android Java
@Override
public void onCreate(Bundle savedInstanceState) {
    super.onCreate(savedInstanceState);
    setContentView(R.layout.main);

    Intent intent = getIntent();
    String action = intent.getAction();
    Uri data = intent.getData();

    Map<String, Intent> urlToIntentMap = new HashMap<>();
    // add url string to Intent object mappings
    // e.g. urlToIntentMap.put("https://validUrl.com", new Intent());
    if (data != null) {
      ServiceProvider.getInstance().getUriService().setUriHandler(new URIHandler() {
        @Override
        public Intent getURIDestination(String uri) {
          return urlToIntentMap.get(uri);
        }
      });
    }
}
Handling in-app message app links on Android
Android app links were introduced with Android OS 6.0. They are similar to deep links in functionality, although they have the appearance of a standard website URL. The intent filter previously set up for deep links is modified to handle http schemes and verification of the app link needs to be set up on Google Search Console.
For more information on the additional verification setup needed, please read the tutorial on verifying Android app links. The resulting app link can be used to redirect to specific areas of your app if the app is installed or redirect to your app's website if the app isn't installed. For more information on Android app links, please read the guide on handling Android app links.
Handling alert or fullscreen notification website URLs on iOS
Website URL's included in alert or fullscreen messages are handled without any additional action by the app developer. If an alert of fullscreen message is clicked through and contains a valid URL, the Safari browser will be used to load the URL contained in the notification payload. The location of the URL differs for each notification type:
- The
urlkey is present in the alert message payload - The
urlis present in the query parameters of a fullscreen message button (data-destination-url) - The
adb_deeplinkkey is present in the local notification payload - The
urikey is present in the push notification payload
Handling local notification website URLs on iOS
Swift
The website URL in the local notification response can be loaded using the UrlService's openUrl method.
func userNotificationCenter(_ center: UNUserNotificationCenter, didReceive response: UNNotificationResponse, withCompletionHandler completionHandler: @escaping () -> Void) {
    DispatchQueue.main.async(execute: {
        let userInfo = response.notification.request.content.userInfo
        let urlString = userInfo["adb_deeplink"] as? String
        if (urlString?.count ?? 0) != 0 {
            if let url = URL(string: urlString ?? "") {
              ServiceProvider.shared.urlService.openUrl(url)
            }
        }
        completionHandler()
    })
}
Objective-C
The website URL in the local notification response can be loaded using the openURLcompletionHandler: instance method.
-(void)userNotificationCenter:(UNUserNotificationCenter *)center didReceiveNotificationResponse:(UNNotificationResponse *)response withCompletionHandler:(void(^)(void))completionHandler{
    dispatch_async(dispatch_get_main_queue(), ^{
      NSDictionary *userInfo = response.notification.request.content.userInfo;
      NSString *urlString = userInfo[@"adb_deeplink"];
      if(urlString.length){
          [[UIApplication sharedApplication] openURL:[NSURL URLWithString: urlString] options:@{} completionHandler:^(BOOL success) {
            NSLog(@"Open %@: %d",urlString,success);
        }];
            }
        completionHandler();
        });
}
Handling push notification website URLs on iOS
Swift
The website URL in the push notification response can be loaded using the UrlService's openUrl method.
func application(_ application: UIApplication, didReceiveRemoteNotification userInfo: [AnyHashable : Any], fetchCompletionHandler completionHandler: @escaping (UIBackgroundFetchResult) -> Void) {
    DispatchQueue.main.async(execute: {
        let urlString = userInfo["uri"] as? String
        if (urlString?.count ?? 0) != 0 {
            if let url = URL(string: urlString ?? "") {
                ServiceProvider.shared.urlService.openUrl(url)
            }
        }
        completionHandler(UIBackgroundFetchResultNoData)
    })
}
Objective-C
The website URL in the push notification can be loaded using the openURLcompletionHandler: instance method.
- (void)application:(UIApplication *)application didReceiveRemoteNotification:(NSDictionary *)userInfo
fetchCompletionHandler:(void (^)(UIBackgroundFetchResult result))completionHandler {
    dispatch_async(dispatch_get_main_queue(), ^{
      NSString *urlString = userInfo[@"uri"];
      if(urlString.length){
          [[UIApplication sharedApplication] openURL:[NSURL URLWithString: urlString] options:@{} completionHandler:^(BOOL success) {
            NSLog(@"Open %@: %d",urlString,success);
        }];
            }
        completionHandler(UIBackgroundFetchResultNoData);
    });
}
Handling local or push notification deep links on iOS
When a local or push notification is clicked through, the didReceiveNotificationResponse instance method is called with the notification response being passed in as a parameter. For more information, see the Apple developer docs at userNotificationCenterwithCompletionHandler:.
The deep link URL can be retrieved from the response object passed into the handler method. An example for retrieving the deep link URL and loading web links is provided below. The retrieved URL can then be parsed to aid with app navigation decision making. For more information about handling deep links and setting URL schemes for iOS, see the tutorial on defining a custom URL scheme for your app.
Swift
func userNotificationCenter(_ center: UNUserNotificationCenter, didReceive response: UNNotificationResponse, withCompletionHandler completionHandler: @escaping () -> Void) {
    DispatchQueue.main.async(execute: {
        let userInfo = response.notification.request.content.userInfo
        let urlString = userInfo["adb_deeplink"] as? String
        let urlString2 = userInfo["uri"] as? String
        if (urlString?.count ?? 0) != 0 {
            // handle the local notification deep link (parse any data present in the deep link and/or redirect to a desired area within the app)
        } else if (urlString2?.count ?? 0) != 0 {
            // handle the push notification deep link (parse any data present in the deep link and/or redirect to a desired area within the app)
        }
        completionHandler()
    })
}
Objective-C
-(void)userNotificationCenter:(UNUserNotificationCenter *)center didReceiveNotificationResponse:(UNNotificationResponse *)response withCompletionHandler:(void(^)(void))completionHandler{
    dispatch_async(dispatch_get_main_queue(), ^{
      NSDictionary *userInfo = response.notification.request.content.userInfo;
      NSString *urlString = userInfo[@"adb_deeplink"];
      NSString *urlString2 = userInfo[@"uri"];
      if(urlString.length){
            // handle the local notification deep link (parse any data present in the deep link and/or redirect to a desired area within the app)
            }else if(urlString2.length){
        // handle the push notification deep link (parse any data present in the deep link and/or redirect to a desired area within the app)
      }
        completionHandler();
        });
}
Handling in-app message universal links on iOS
Universal links are available for devices on iOS 9.0 or later. They can be used to redirect to specific areas of your app if the app is installed or redirect to your app's website if the app isn't installed. For more information, see the guide on allowing apps and websites to link to your content.
Universal links are typically used from outside your installed app. For example, a universal link would be used from a link present on a website or a link included in an email message. iOS will not open a universal link if it determines that the link is being opened from within the app it links to. For more information on this limitation, see the "Preparing Your App to Handle Universal Links" section within the documentation on supporting universal links. If a universal link is included as a Campaign clickthrough destination, the link must be handled by the app developer in a similar fashion as a deep link. More information can be seen in the handling alert or fullscreen notification deep links on iOS and handling local or push notification deep links on iOS sections.
Customizing the frequency of registration requests sent to Campaign
The frequency of registration requests sent to Campaign are reduced starting with Campaign Standard Android extension version 1.0.7 and iOS extension version 1.0.6. The default registration delay is seven days since the last successful registration. This registration delay can be configured to provide more flexibility on when to send a registration request.
data-variant=warning
data-slots=text
Android Java
data-slots=heading, code
data-repeat=1
Example
MobileCore.updateConfiguration(new HashMap<String, Object>() {
  {
    put("campaign.registrationDelay", 30); // number of days to delay sending a registration request.
    put("campaign.registrationPaused", false); // boolean signaling if registration requests should be paused
  }
});
iOS Swift
data-slots=heading, code
data-repeat=1
Example
var config = [AnyHashable: Any]()
config["campaign.registrationDelay"] = 30 // number of days to delay sending a registration request.
config["campaign.registrationPaused"] = false // boolean signaling if registration requests should be paused
MobileCore.updateConfiguration(config)
iOS Objective-C
data-slots=heading, code
data-repeat=1
Example
NSMutableDictionary *config = [@{} mutableCopy];
config[@"campaign.registrationDelay"] = @30; // number of days to delay sending a registration request.
config[@"campaign.registrationPaused"] = [NSNumber numberWithBool:NO]; // boolean signaling if registration requests should be paused
[AEPMobileCore updateConfiguration:config];
Giving a value of 0 when setting campaign.registrationDelay will send a registration request on every launch event. This is the previous behavior seen before the registration request reduction enhancement was added.
Using a bundled image asset within a full page, large modal, or small modal in-app message
A bundled image asset may be specified on the Campaign Standard UI to be used as a primary image or as a fallback image in the case where a specified remote image URL is inaccessible. The bundled image should be specified on the Campaign Standard UI with the file name and file extension. For example, in the Bundled Image text entry field on the Campaign Standard UI, a JPEG file with the file name example can be provided in the following format:
example.jpg
The specified bundled image must then be included with your app when it is built. To do so:
Android
The image must be placed in your app's `assets` directory. This directory is found in the `src/main/` directory of the app. If the directory is not present, it can be created following a `src/main/assets` directory structure.
IOS
Add the image file to your project by going to Xcode's `File > Add Files to "Your App Name"...` menu and locating the image file that will be bundled with the app. Ensure that the targets that will be using the image file are checked in the `Add to targets` selection menu.
Configuration keys
To update SDK configuration programmatically, use the following information to change your Campaign Standard configuration values. For more information, see the Configuration API reference.
campaign.timeoutcampaign.mciascampaign.servercampaign.pkeybuild.environment__dev__campaign.pkey__dev__campaign.server__stage__campaign.pkey__stage__campaign.servercampaign.registrationDelaycampaign.registrationPaused