Add multiple panels
A UXP plugin can expose multiple panels for separate tasks, such as a main workspace and a settings view. Each panel appears as its own menu item in the host application and has its own entrypoint, size constraints, and lifecycle.
This guide builds a two-panel plugin in which the first panel opens the second. Both panels initially share one HTML document and JavaScript context. A later section shows how to load the second panel's markup from a separate file.
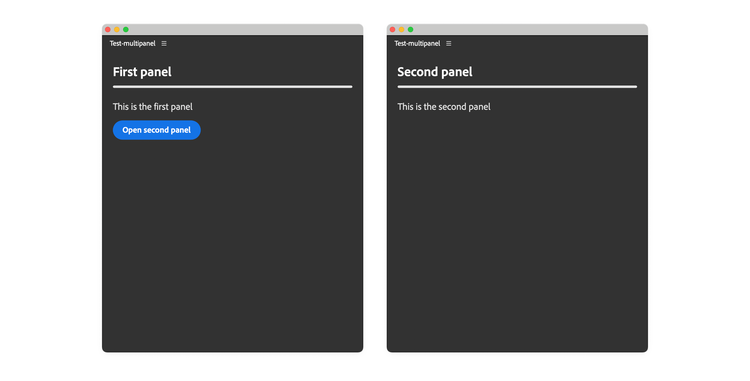
How multiple panels work
Building a multi-panel plugin requires four pieces:
- Declare one panel entrypoint for each panel in
manifest.json. - Create a separate content container for each panel.
- Register lifecycle hooks that attach the correct content when a panel opens.
- Use the Plugin Manager when one panel needs to open another programmatically.
Before you begin
data-variant=info
data-slots=heading, text
ipc (inter-plugin communication) permission. The complete manifest in the next step includes it.data-variant=warning
data-slots=heading, text
hide() lifecycle hook is not reliable in every host. In Premiere, for example, hiding a panel may not trigger its hide() callback. Do not depend on hide() for essential cleanup, and check your target host's release notes for current behavior.1. Declare the panel entrypoints
In manifest.json, declare one entrypoint for each panel and enable the IPC permission used for programmatic panel control:
{
  "id": "multi-panel-demo",
  "name": "Multi Panel Demo",
  "version": "1.0.0",
  "main": "index.html",
  "host": { "app": "premierepro", "minVersion": "25.6.0" },
  "manifestVersion": 5,
  "requiredPermissions": {
    "ipc": { "enablePluginCommunication": true }
  },
  "entrypoints": [
    {
      "id": "uxp-first-panel",
      "type": "panel",
      "label": { "default": "First Panel" },
      "minimumSize": { "width": 430, "height": 500 },
      "preferredDockedSize": { "width": 230, "height": 300 }
    },
    {
      "id": "uxp-second-panel",
      "type": "panel",
      "label": { "default": "Second Panel" },
      "minimumSize": { "width": 430, "height": 500 },
      "preferredDockedSize": { "width": 230, "height": 300 }
    }
  ]
}
Both panels now appear under Window > UXP Plugins > Multi Panel Demo.
2. Add the panel markup
In index.html, create a wrapper for each panel. Give the second wrapper an id so its lifecycle hook can find and attach it later:
<!DOCTYPE html>
<html>
<head>
  <script src="main.js"></script>
  <link rel="stylesheet" href="style.css" />
</head>
<body>
  <!-- First panel content -->
  <div class="wrapper">
    <sp-heading>First Panel</sp-heading>
    <sp-divider size="L"></sp-divider>
    <sp-body>
      This is the first panel.
    </sp-body>
    <sp-button id="open-second-panel">Open Second Panel</sp-button>
  </div>

  <!-- Second panel content -->
  <div class="wrapper" id="second-panel">
    <sp-heading>Second Panel</sp-heading>
    <sp-divider size="L"></sp-divider>
    <sp-body>
      This is the second panel.
    </sp-body>
  </div>
</body>
</html>
The first panel's content remains in the document body. The second panel's content is moved into the root node supplied to its show() hook.
data-variant=info
data-slots=text
id in index.html does not need to match the panel entrypoint id in manifest.json. The wrapper identifies a DOM element; the entrypoint ID identifies a UXP panel.3. Register the lifecycle hooks
Use the panel lifecycle hooks in main.js to attach the second panel's content when the host shows it. Store the plugin ID during create() so the first panel can find the current plugin through pluginManager:
const { entrypoints, pluginManager } = require("uxp");

// Get reference to the second panel container
const secondPanel = document.querySelector("#second-panel");
let pluginId;

entrypoints.setup({
  plugin: {
    create() {
      pluginId = this.id;
      console.log("Plugin created:", pluginId);
    },
  },
  panels: {
    "uxp-first-panel": {
      create() { console.log("First panel created") },
      show() {
        console.log("First panel shown");
        // The first panel content is already in the document body.
      },
    },
    "uxp-second-panel": {
      create() { console.log("Second panel created") },
      show(body) {
        body.appendChild(secondPanel);
        console.log("Second panel shown");
      },
      hide(body) {
        // Do not rely on this hook for essential cleanup in every host.
        body.removeChild(secondPanel);
        console.log("Second panel hidden");
      },
    },
  },
});

// Add button handler to open the second panel via IPC
document.querySelector("#open-second-panel")
  .addEventListener("click", () => {
    const me = [...pluginManager.plugins].find(
      (plugin) => plugin.id === pluginId
    );
    me?.showPanel("uxp-second-panel");
});
When the second panel opens, UXP passes its root node to show(body). The handler appends secondPanel to that root. The button in the first panel then finds the current plugin and calls showPanel() with the second entrypoint's ID. See Communicate between plugins for more about the Plugin Manager.
data-variant=info
data-slots=text
Share state between panels
Panels backed by the same HTML document also share a JavaScript context. They can exchange state through shared variables, function calls, or events without using IPC.
Load panel markup from another file
For larger panels, keep each panel's markup in a separate file. Fetch the second panel's HTML, then inject it into the wrapper before the panel opens:
data-slots=heading, code
data-repeat=3
data-languages=HTML, HTML, JavaScript
index.html
<!DOCTYPE html>
<html>
<head>
  <script src="main.js"></script>
  <link rel="stylesheet" href="style.css" />
</head>
<body>
  <!-- First panel content -->
  <div class="wrapper">
    <sp-heading>First Panel</sp-heading>
    <sp-divider size="L"></sp-divider>
    <sp-body>
      This is the first panel.
    </sp-body>
    <sp-button id="open-second-panel">Open Second Panel</sp-button>
  </div>

  <!-- Second panel wrapper -->
  <div class="wrapper" id="second-panel">
    <!-- nothing here yet -->
  </div>
</body>
</html>
second-panel.html
<!-- This is what used to be inside the second panel's <div> wrapper -->
<sp-heading>Second Panel</sp-heading>
<sp-divider size="L"></sp-divider>
<sp-body>
  This is the second panel.
</sp-body>
main.js
const { entrypoints, pluginManager } = require("uxp");

// Get reference to the second panel container
const secondPanel = document.querySelector("#second-panel");

// Fetch the second panel's HTML file and inject the content into the DOM
fetch("./second-panel.html")
  .then(response => response.text())
  .then(html => {
    secondPanel.innerHTML = html;
    // Add event listeners for the second panel here
    // or any other JavaScript code you need
  });

let pluginId;
entrypoints.setup({ /* ... */ });

// Everything else is the same as in the previous example...
The manifest.json is unchanged from the previous example.
The manifest and lifecycle setup remain the same. This pattern keeps index.html smaller as each panel grows more complex.