Connector Playground
Connector Playground is the development environment for Adobe Express Translate Connectors. Use it to configure your connector through a form builder, generate a valid manifest.json, and test your service end-to-end from inside Adobe Express without a production deployment.
What Connector Playground does
Connector Playground lets you:
- Start and manage named connector sessions with cloud persistence
- Define connector metadata and endpoint configuration through a guided form builder
- Generate a
manifest.jsonautomatically as you fill in the form - Validate your manifest and confirm that your service endpoints are reachable
- Connect your service and test it live in the Adobe Express Translate panel
Access
Enable the Connector Playground toggle
Connector Playground is available automatically to enterprise Adobe accounts with a Developer or Administrator role. Personal Adobe accounts must request access using the Connector interest form before the Playground becomes available.
Once your account has access, open the Playground directly:
First-time launch: Developer Terms of Use
The first time you launch Connector Playground, a Developer Terms of Use (DTOU) dialog appears. You must review and accept the Adobe Express Connector Developer Terms of Use to continue. After you accept, the dialog does not appear again for subsequent sessions.
data-slots=heading, text
data-variant=info
If the direct URL does not open the Playground automatically, you can navigate to it manually:
data-slots=heading, list
data-repeat=1
data-summary=Find the Connector Playground manually
-
Steps:
- Sign in to Adobe Express with your enterprise Adobe account, or the personal account approved through the Connector interest form.
- Click the Add-ons icon in the left rail to open the Add-ons panel.
- Select the Your add-ons tab and scroll to the bottom of the panel to find the Add-on Development section.
- Enable the Connector Playground toggle.
Playground UI overview
When open, Connector Playground runs as a panel docked at the bottom of Adobe Express.
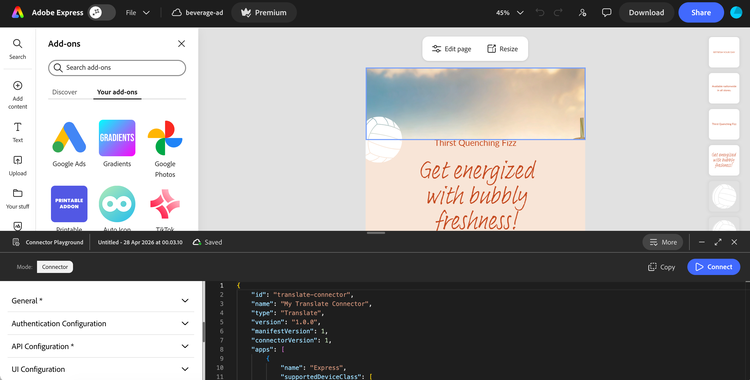
It can be minimized to a pill in the bottom bar when you need more of the editor in view.
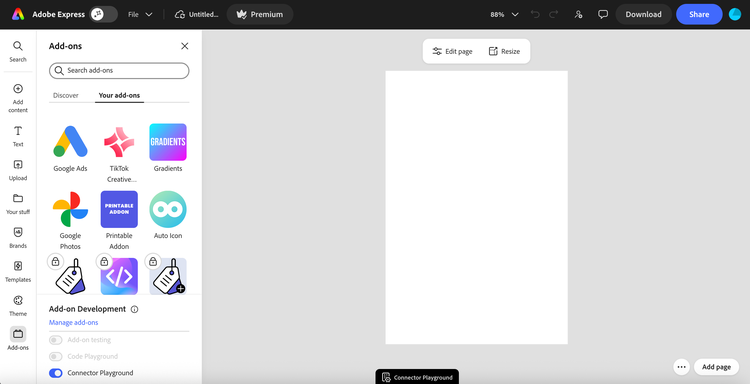
Click the pill tab to reopen the Playground from its minimized state. You can also expand the Playground to full view using the Expand button in the top-right corner.
The Playground UI has three main areas. For top-right controls (More, Minimize, Expand, Close, Copy, and Connect), see Playground Controls.
Title bar
The title bar runs across the top of the Playground and shows:
- Connector Playground: the Playground mode label and icon
- Session name: the editable name of the current session (for example, "Untitled - 07 Apr 2026 at 09.51.39"). Click the name to rename it.
- Saved: a status indicator that confirms your session configuration is saved to the cloud
Form builder panel (left)
The collapsible form builder on the left is the primary authoring surface. As you fill in fields, the manifest JSON on the right updates in real time. The four sections are:
- General: connector identity fields (
id,name,type,version, and app targets) - Authentication Configuration: the authentication type for your connector and its required fields
- API Configuration: endpoint URLs, HTTP methods, headers, body, path parameters, query parameters, and per-endpoint authentication toggle
- UI Configuration: Translate panel controls, form input definitions, data sources, and labels
Manifest JSON panel (right)
The right panel displays the manifest JSON generated from your form builder inputs. This panel is read-only: you cannot paste or edit JSON directly. All changes must go through the form builder.
Form builder
The form builder is the only way to configure your connector in the Playground. It produces a valid manifest from your inputs without requiring you to write or edit JSON directly.
Walkthrough: Configure your connector
Fill in the four sections in order. The manifest JSON panel on the right updates in real time as you type.
-
In the General section, enter your connector Connector ID, Connector Name, Connector Type (
Translate), and Version. Theapps,manifestVersion, andconnectorVersionfields are set automatically. -
In the Authentication Configuration section, select your auth type: None, OAuth 2.0 PKCE, or API Key. Fill in the required fields for your choice. The auth type you select here applies to every endpoint where you enable Use authentication in the next step.
data-slots=heading, text
data-variant=info
http://localhost URLs may work in Chrome and Edge as a development convenience, but they are not portable: Safari blocks them outright, and browser mixed-content rules can vary across versions and Adobe Express environments. Treat any http://localhost success as best effort, not as a supported path. OAuth authorizationUrl and tokenUrl values almost always require HTTPS, both for Adobe Express and for your authorization server.The reliable way to test the Playground against a service running on your machine is to expose it over HTTPS. Common options:
- A tunneling tool such as ngrok, Cloudflare Tunnel, or
cloudflared, each of which gives you a public HTTPS URL that forwards to your local port. - A local HTTPS reverse proxy with a trusted certificate, for example mkcert paired with Caddy or nginx.
Enter the HTTPS URL the tunnel or proxy provides (for example, https://your-subdomain.ngrok-free.app/locales) in the API Configuration form. Use the same hostname for authorizationUrl and tokenUrl if you are configuring OAuth 2.0 PKCE.
-
In the API Configuration section, add an entry for each endpoint your service implements. Enter the full URL and HTTP method for each, and enable Use authentication on any endpoint that should include credentials. At minimum, add entries for
localesandtranslate. -
In the UI Configuration section, set the entrypoint Title and add your form inputs:
- Locale picker (required): Input ID
targetLocale, Input TypeMultiSelectPicker, Data SourceAPI, API endpointlocales. - Tone picker (optional): Input ID
tone, Input TypePicker, Data SourceAPI, API endpointtones. Omit if your service does not support tones. The tone picker only appears in the Translate panel after the user selects at least one locale, matching the behavior of the native Adobe Express Translate panel.
- Locale picker (required): Input ID
-
Resolve any validation errors flagged with a red underline before proceeding. Hover over any underlined field to read the specific error message.
-
Select Connect. The Playground validates the manifest and confirms each endpoint is reachable. A green success toast confirms your connector is live in the Translate panel.
For full field-level details on each section, see the subsections below.
General section
Configure the top-level identity fields for your connector. The form uses human-readable labels that map to the corresponding manifest keys shown below:
nametype"Translate".versionmajor.minor.patch format (for example, 1.0.0).idThe apps, manifestVersion, and connectorVersion fields are set automatically by the Playground and do not appear as editable fields. See Top-level identity fields in the Manifest Schema Reference for their values and constraints.
Authentication Configuration section
The Authentication Configuration section sets the auth method for your entire connector. The choice you make here applies to every endpoint where you enable the Use authentication toggle in the API Configuration section. You cannot use different authentication types for different endpoints.
Select an Authentication Type from the dropdown:
Authorization header. Use for local development, network-protected services, or custom auth outside the manifest.$apiKey placeholder in each endpoint's headers in the API Configuration section below. Development and testing only: the key is stored in plain text in your manifest and is not approved for production. See Endpoint Setup: authentication options for what's approved for production.OAuth 2.0 PKCE fields (required when OAuth 2.0 PKCE is selected):
audience for Auth0 or resource for Azure AD).The OAuth 2.0 PKCE fields are mapped to the corresponding API Configuration section fields:
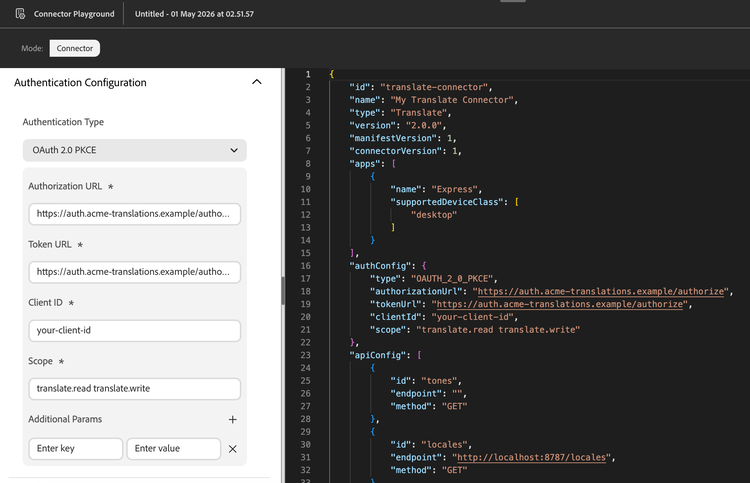
API Key field (required when API Key is selected):
authConfig.apiKey and injected wherever $apiKey appears as a header value in your endpoint configuration in the API Configuration section. Stored in plain text in your manifest, which is distributed to client devices: do not paste a production secret here. Use a key scoped to the minimum permissions required, and rotate it if it's ever exposed. Plain API Key is supported in the Playground for development and end-to-end testing; for production, use OAuth 2.0 PKCE or Secure API Key. See Endpoint Setup.When None is selected, no additional fields are shown. authConfig is omitted from the generated manifest entirely.
Secure API Key
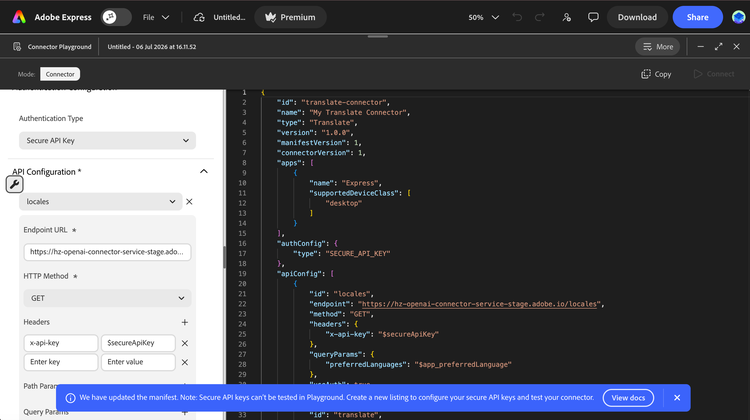
When Secure API Key is selected, no key input field appears. authConfig becomes { "type": "SECURE_API_KEY" } automatically. You then manually add $secureApiKey as the header value for any authenticated endpoint in the API Configuration section, the same way you would add $apiKey for a plain API Key connector.
Selecting Secure API Key from the Authentication Type dropdown also triggers a toast reminding you that Secure API Key connectors cannot be tested end to end in the Playground, and disables the Connect button for the rest of the session.
data-slots=heading, text
data-variant=warning
Recommended flow:
- Configure and test your connector with API Key in the Playground until the end-to-end flow works as expected.
- Once testing is complete, switch Authentication Type to Secure API Key. This regenerates
authConfigand clears the plain key value. - Select More > Download code to save the manifest.
- Upload that manifest through the submission portal. Creating a listing, private, internal, or public, is what assigns and registers your connector ID with Adobe.
- Follow the registration and handoff steps in Register your Secure API Key with Adobe to complete setup with the Adobe team.
For help choosing an authentication type and implementing token validation in your service, see Endpoint Setup.
API Configuration section
Configure the endpoints Adobe Express calls during the translation workflow. Use the endpoint dropdown at the top of the section to switch between your configured endpoints. Select the + icon to add a new endpoint entry, or the X to remove one.
For each endpoint, configure:
GET or POST. Only these two methods are accepted.:paramName format. The value replaces the placeholder in the endpoint URL before the request is sent.useAuth: true in the manifest.Dynamic value prefixes in Query Params, Headers, Body, and Path Params values:
$app_preferredLanguagefr-FR). Use this on your /locales and /tones endpoints so labels are returned in the user's language."preferredLanguage": "$app_preferredLanguage"The Translate connector type requires apiConfig entries with id values of "locales" and "translate". Entries for "health", "tones", and "feedback" are optional but recommended. For the full list of field constraints and endpoint requirements, see the Manifest Schema Reference.
data-slots=heading, text
data-variant=info
locales and tones can drive panel pickerslocales and tones API endpoints can populate form input pickers in the Translate panel. You can still define endpoints with other ids (for example categories), and your service may call them on its own, but their responses are not sent in the /translate request and cannot be bound to a picker. Support for additional parameters will be added on a per-partner basis as the allow list expands. If you need this for your integration, contact express-connectors-support@adobe.com.data-slots=text
data-variant=info
UI Configuration section
The UI Configuration section defines how Adobe Express renders the Translate panel controls for your connector. For Translate connectors, uiConfig is required.
The section has two top-level fields, followed by one or more form input cards:
uiConfig.description.uiConfig.entrypoints[].label.Each form input card defines one control in the Translate panel. Use the + icon to add an input, or the X to remove one. Each card contains:
targetLocale exactly (validated at Connect time). The tone picker must use tone exactly: any other id is silently ignored by the Translate panel and the picker will not render, even though Connect validation will still pass. No two inputs within the same entrypoint can share the same id.Picker (single-select) or MultiSelectPicker (multi-select). Both require a data source. Use MultiSelectPicker for the locale picker and Picker for the tone picker.Static or API.$api_ prefix is added automatically in the manifest.attributes.required: true.attributes.readonly: true.attributes.maxItems.Locale picker (required): Add a form input with Input ID targetLocale and Input Type MultiSelectPicker to let users translate to multiple locales at once. Set the Data Source Type to API and select your locales endpoint, or use Static to define a fixed list of locales inline. The Translate panel will not render without a valid targetLocale form input.
Tone picker (optional): Add a form input with Input ID tone and Input Type Picker. Set the Data Source Type to API and select your tones endpoint, or use Static to define tones inline. Omit the tone picker entirely if your service does not support tones.
data-slots=heading, text
data-variant=info
Adobe Express renders the Translate panel UI based on your uiConfig. Your /locales and /tones endpoint responses populate the picker options at runtime. For the expected response shapes, see Endpoint Setup.
data-slots=image, heading
data-repeat=2
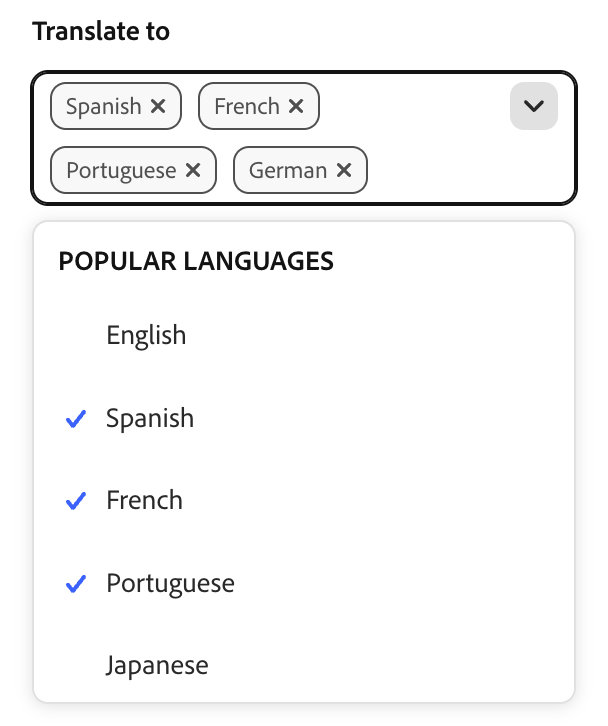
MultiSelectPicker component populated with grouped categories from your /locales response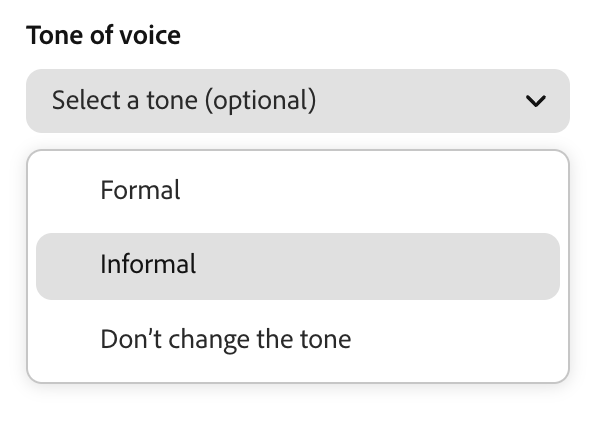
Picker component populated from your /tones responseThe Connect loop
Connect does not validate Secure API Key connectivity. It only works against services using None, OAuth 2.0 PKCE, or API Key. If your connector uses Secure API Key, skip Connect and go straight to More > Download code once you've tested with API Key. See Secure API Key above.
Connect is the primary action in the Playground. Selecting it validates your manifest and connects your local service to Adobe Express for end-to-end testing. Most of your development time in the Playground will follow this loop: adjust form inputs, Connect, test in the Translate panel, then repeat. After the first successful connect, the button is relabeled Reconnect and runs the same validate-and-connect flow whenever you change your configuration.
What Connect does
When you select Connect, the Playground:
- Validates the manifest against the connector schema. If validation fails, errors are shown before any network requests are made.
- Checks that each configured service endpoint is reachable. If your connector uses OAuth 2.0 PKCE, an authorization dialog opens at this point so you can log in and grant access before endpoint checks proceed.
- If any endpoint is unreachable, displays a red badge indicating how many errors were found and a red toast notification that the endpoint tests failed.
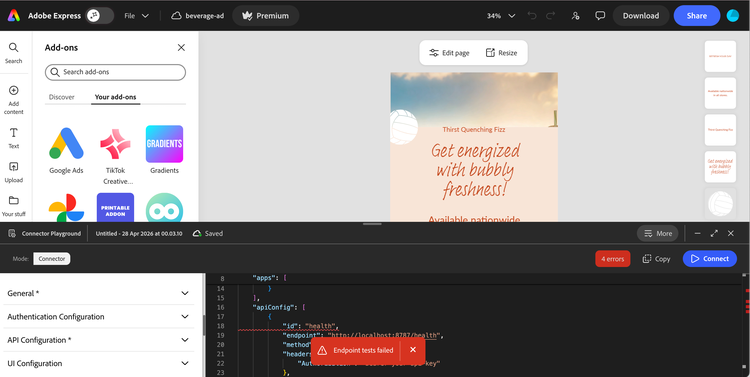
Errors surface in two places:
- In the UI: invalid or unreachable fields are flagged with a red squiggly line. Scroll through the form to find them and hover over any underlined field to read the specific error message.
- In the browser console: all Playground activity is logged to your browser's developer tools with a
playgroundprefix. Open the console to inspect raw request and response details when errors are not obvious from the UI alone.
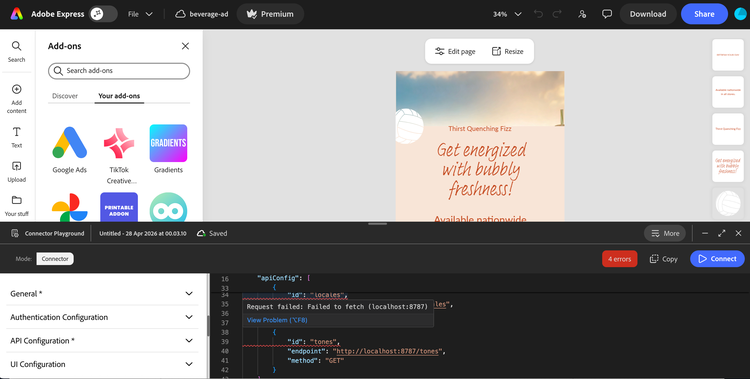
If a manifest validation error is detected, it will also be flagged with a red badge and inline error message.
data-slots=heading, text, image
data-variant=tip
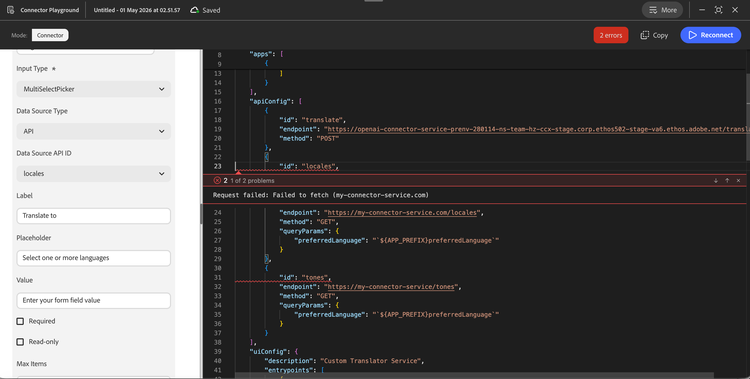
-
Once all errors are resolved and all endpoints are reachable, Connect shows a green success toast:
"You are connected, you should now be able to choose your service in the Translate panel."
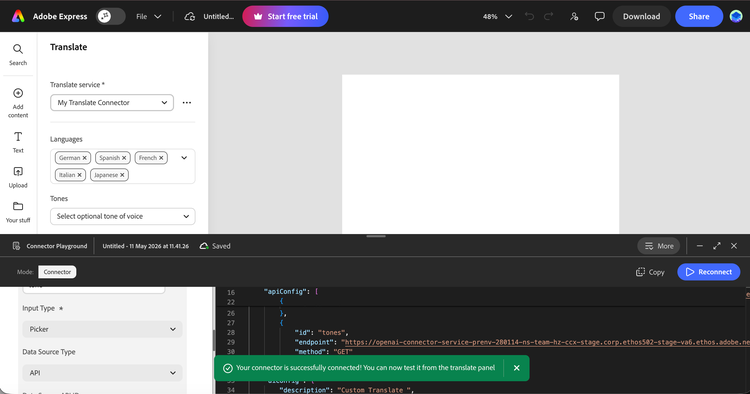
- Your connector service is now available in the Translate panel for testing.
Testing in the Translate panel
After a successful connection, minimize the Connector Playground using the minus (-) button in the upper right corner, then open the Translate panel in Adobe Express.
To open the Translate panel, click Edit Page in the editor and select the Translate icon as shown below:
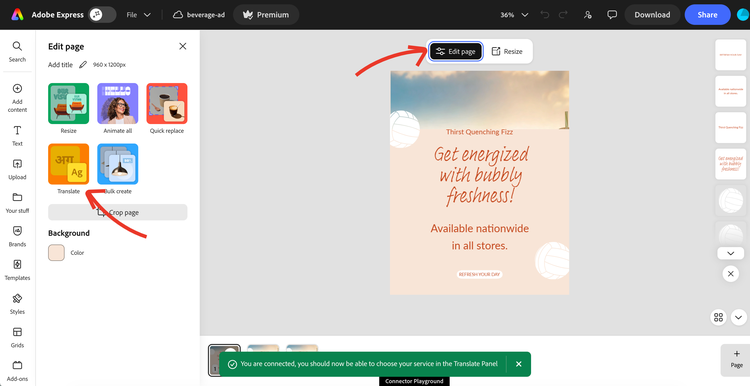
Your connector appears in the Translation service dropdown marked with an "In development" icon to distinguish it from production services.
data-slots=image, heading
data-repeat=1
data-isReversed=true
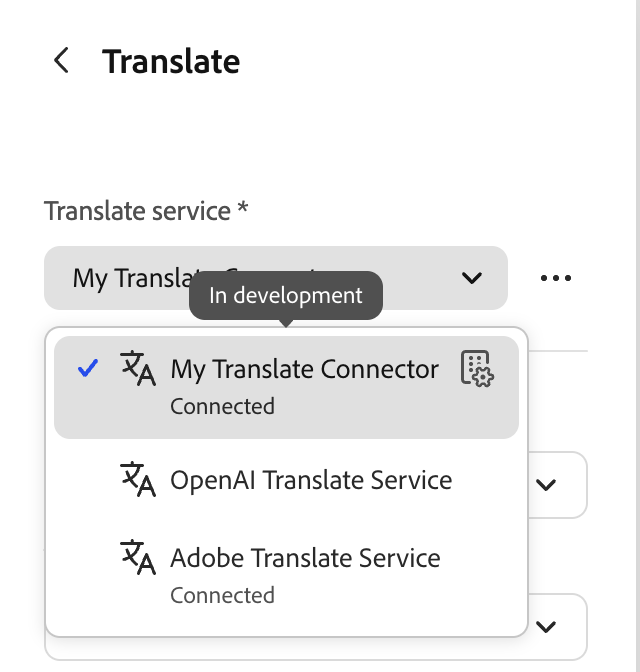
Select your service, verify that the locale and tone pickers are populated correctly, and click Translate to run a test translation.
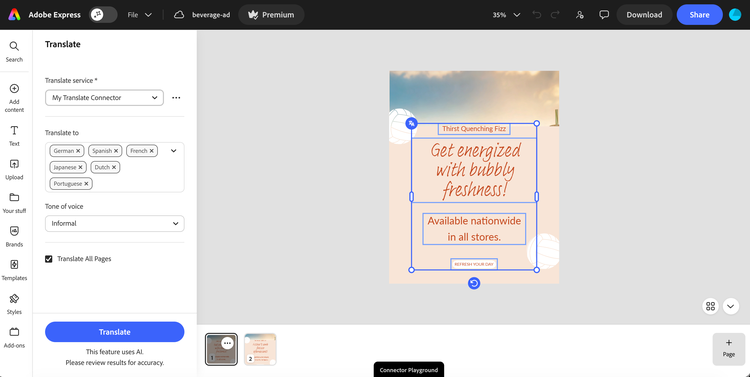
Verify:
- The locale picker is populated with the locales returned by your
/localesendpoint. If your endpoint returns acategoryfield on each locale, options are grouped by category in the picker. - If the tone picker was configured, it is populated with the values from your
/tonesendpoint. - Locale and tone labels are correct and readable.
- After translation completes, Adobe Express creates one translated page per target locale in the correct order.
- When multiple target locales are selected using
MultiSelectPicker, Adobe Express sends one/translaterequest per locale. Plan your service for concurrent requests and ensure response times are acceptable at that scale.
data-slots=heading, text
data-variant=info
/locales and /tones responses in memory for the current session. If you update your service (for example, add or remove locales) and the picker still shows the old options after reconnecting, do a hard reload of Adobe Express (Cmd+Shift+R / Ctrl+Shift+R), then select Connect again. The fresh page load clears the in-memory cache and forces a new call to your endpoints.Translated pages output
After translation completes, Adobe Express creates one new page per selected target locale, in the order the locales were selected. The example below shows the source page followed by six translated pages (German, Spanish, French, Japanese, Dutch, and Portuguese) generated from a single Translate action with six locales selected in the MultiSelectPicker.
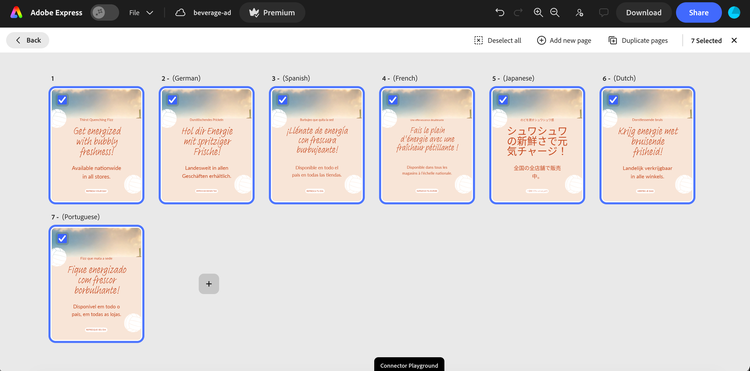
Use the Playground console output (visible in your browser's developer tools, prefixed with playground) to debug request and response behavior if anything looks wrong.
Disconnect behavior
- Closing the Playground automatically disconnects your local connector session. The session configuration is saved and can be resumed, but the connector is no longer active in the Translate panel.
- Selecting Disconnect from the Translate panel disconnects the connector and returns the Playground to the Connect state. Use this to reset the connection without closing the Playground.
Common reasons for failure
curl before reconnectingFor more details and diagnostic steps, see the Troubleshooting guide.
Playground Controls
Top-right controls
More menu
Select More in the top-right corner to access session and utility options:
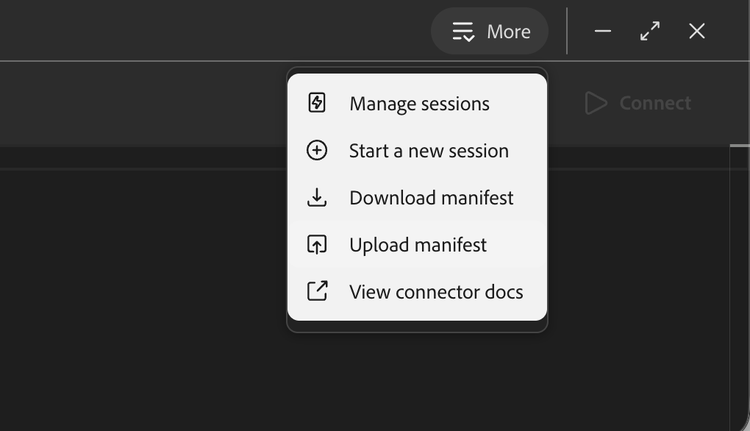
manifest.json for your current session.manifest.json to load into the current session. See Upload a manifest below.Upload a manifest
Use More > Upload manifest to load an existing manifest.json into your current Playground session instead of rebuilding it field by field in the form builder. This is useful when you already have a manifest from a previous session, a teammate, or the submission portal and want to continue editing it in the Playground.
-
Select More > Upload manifest.
-
Choose a
manifest.jsonfile from your local file system in the file picker that opens. -
A Replace manifest confirmation dialog appears, warning that your current manifest will be replaced with the uploaded file. Select Continue to proceed, or Cancel to keep your current manifest.
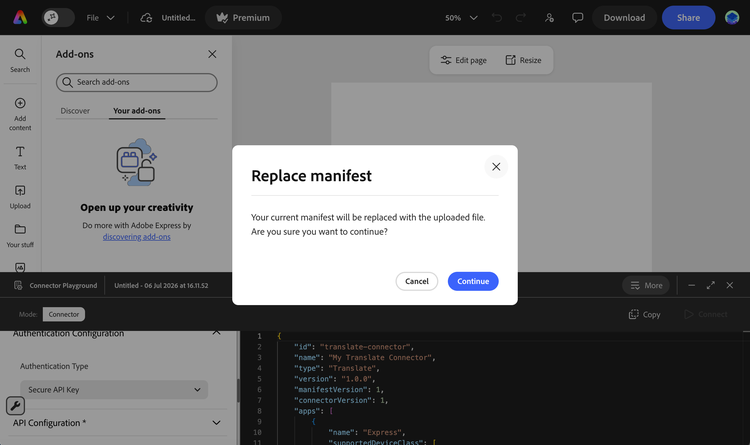
-
Once confirmed, the Playground shows a dialog indicating it's validating the uploaded manifest, then repopulates the form builder with its values.
-
A green toast confirms the manifest was updated successfully.
If the uploaded manifest uses Secure API Key authentication, the Playground also shows the info toast described in Secure API Key and disables Connect, since selecting Secure API Key always disables end-to-end testing regardless of how the manifest was loaded.
If the uploaded file fails manifest validation, the Playground surfaces the same inline error indicators described in The Connect loop instead of replacing the current session.
Sessions
Connector Playground supports multiple named sessions with cloud persistence. Each session stores a complete connector configuration independently.
- Cloud persistence: sessions are saved automatically as you make changes. The Saved indicator in the title bar confirms the latest state is stored.
- Renaming: click the session name in the title bar to rename it. Use a descriptive name to distinguish sessions when you have multiple connector configurations.
- Switching sessions: use More > Manage session to view all saved sessions and switch between them. Only Connector Playground sessions appear in this view.
- Starting fresh: use More > Start a new session to create a new blank session without affecting existing ones.
data-slots=heading, text
data-variant=warning
manifest.json locally. This ensures you can restore your configuration even if the session is removed.