Submit your Connector
When your connector is tested and ready, you have three ways to distribute it through Adobe Express. This page helps you pick the right path, walks through the shared steps to access Your integrations, and gives you a single lookup for every submission form field. Each path also has its own step-by-step guide.
Choose your listing type
data-slots=heading, text
data-variant=info
You can publish more than one path for the same connector over time. For example, share a private link with testers first, then promote the connector to a public listing.
Before you submit
Confirm these basics before you start a submission:
-
Sign in with the right account. Your account type and role determine which paths are available:
- Personal Adobe account: Must first request access using the Connector interest form. Once approved, you can create private share links and public listings. Internal listings are not available.
- Enterprise Adobe account with Administrator or Developer role: Automatic access to private share links and internal listings. Public listing also requires approval through the Connector interest form.
- Enterprise Adobe account without Administrator or Developer role: Blocked from all submission paths before reaching the submission UI. Contact your organization's Adobe administrator to request the role. If you're not sure who that is, see How do I contact my org administrator?
-
Test your connector. Validate it in Connector Playground and check the manifest against the connector manifest schema.
-
Decide on distribution. Use the table above to choose between a private share link, an internal listing, or a public listing.
-
Prepare your assets. Every path needs a 144x144 px icon, a connector manifest JSON file, and a connector name. Internal and public listings also need full listing copy (summary, description, help URL), 1 to 5 screenshots at 1360x800 px, a publisher profile, and trader details. Public listings additionally need monetization details, and an AI usage disclosure if your connector uses generative AI. See the Listing field reference for every field.
-
Configure your Global API Key, if applicable. If your connector uses Secure API Key authentication, configure your key as a Global API Key credential from your connector's Settings tab. This is required before any listing type (private link, internal, or public) will actually work, not just before public review. See Register your Secure API Key with Adobe.
Access your integrations
All three paths start from the same place in Adobe Express. Complete these steps once, then continue to the guide for your chosen path.
Step 1: Open the Add-ons panel
- Sign in to Adobe Express with the account you plan to publish from. See Before you submit for account type and role requirements for each submission path.
- Select Add-ons in the left navigation, or open https://express.adobe.com/add-ons directly.
Step 2: Enable Add-on development
Turn on the Add-on development toggle in the top-right corner, just below the banner.
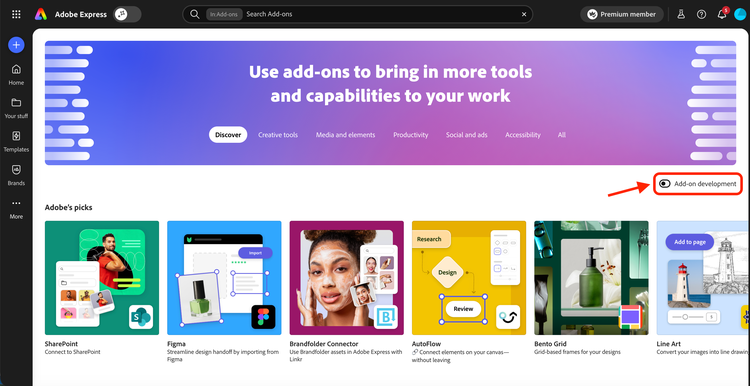
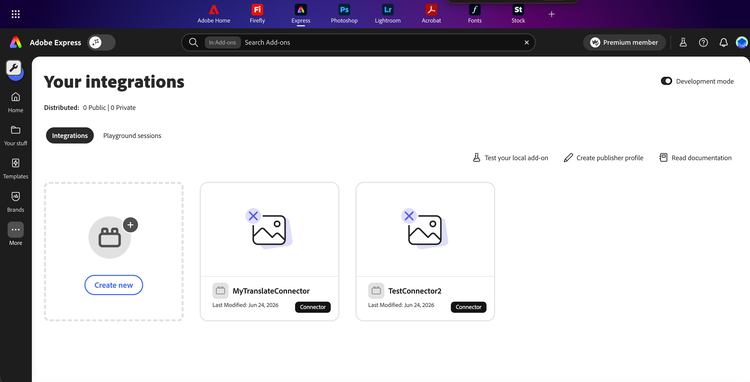
Adobe Express switches to the Your integrations view, where you manage your add-on and connector integrations and the Connector option becomes available in the new integration dialog.
Step 3: Create or select your integration
To create a new connector integration:
- From Your integrations, click Create new.
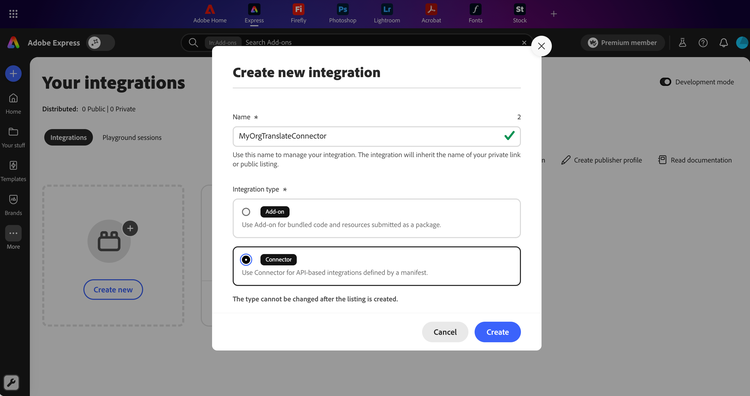
- In the Create new integration dialog, enter a Name (25 characters or less). Tab out of the field to validate uniqueness. A green checkmark confirms the name is available.
- Under Integration type, select Connector.
- Click Create.
If your connector integration already exists, select it from the list of integrations instead.
Step 4: Note your Connector URL
Open the Settings tab to view your connector's unique subdomain URL, and click Copy to copy it to your clipboard. You'll need to add it to the allow-list of any service providers your connector communicates with.
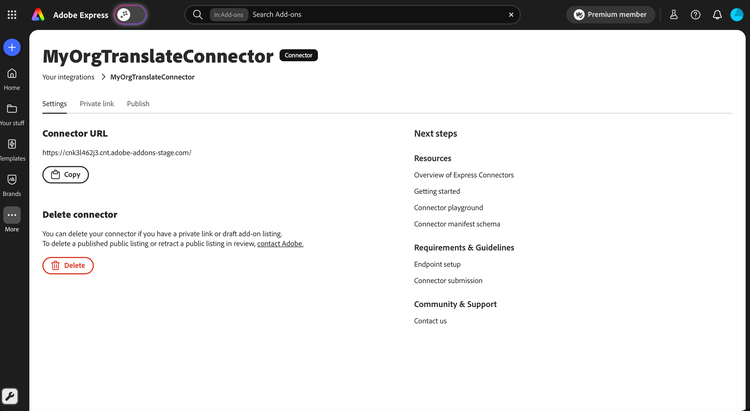
The first segment of this URL, before the first dot, is your connector's Connector ID (for example, cnk3l462j3 in https://cnk3l462j3.cnt.adobe-addons.com). Adobe Express generates it automatically as soon as you create the integration, and it stays the same across any private share link, internal listing, or public listing you later create for it. If your connector uses Secure API Key authentication, you'll need this Connector ID to register your key with Adobe: just paste the full URL you copied here, since you don't need to pull out the ID yourself. Adobe derives it from the URL you share.
Note: This Connector ID generated as part of the URL is different from the id field in your connector manifest.
What happens after you publish
What happens next depends on the path you chose:
- Private share link: The share link is generated and copied to your clipboard right away. Anyone who has the link can install the connector in Adobe Express. Later, you can copy the link again, upload a new manifest to ship updates to everyone who has it, promote the connector to a public listing, or delete the link to revoke access.
- Internal listing: The connector publishes to your Adobe enterprise organization without Adobe review. It appears as an option in the Translate service dropdown for users signed in to your organization. Later, you can ship updates by uploading a new manifest under the listing.
- Public listing: Public listing has two separate approval stages. First, public listing distribution itself is gated for every account, enterprise or personal: if it isn't enabled for your account yet, choosing a public listing opens a Request access to public listing dialog, and clicking Request access takes you to the Connector interest form. If you already submitted the form, no further action is needed while your request is under review. Once you're approved, you can create and submit a public listing, which starts the second stage: Adobe reviews the connector itself, typically in 5 to 10 days, and emails you when the review is complete. Approval does not automatically make the connector available to users. Adobe enables it only for the enterprises you designate by contacting Adobe after approval, and only Adobe Express users signed in with an enterprise account in one of those enterprises can access it. See After Adobe approves your listing for the required steps. Later, you can update the listing or release new versions by reopening it in Your integrations. Updates go through Adobe review again.
Register your Secure API Key with Adobe
If your connector uses Secure API Key authentication (authConfig.type: "SECURE_API_KEY"), it needs an additional registration step with Adobe: configuring your manifest and backend isn't enough on its own. Secure API Key authentication cannot be tested through the Connector Playground, so you register and validate the key from your connector's Settings tab instead.
data-slots=text
data-variant=warning
Configure your Global API Key
- Build and test your connector using API Key in the Connector Playground. The Playground can only validate connectivity end to end with API Key; Secure API Key is available in the dropdown for manifest generation only.
- Once testing is complete, switch Authentication Type to Secure API Key in the Playground and download the manifest. See Connector Playground: Secure API Key for the exact steps. You're now ready to use this manifest when creating your connector listing.
- Create or open your connector listing using this manifest: follow Step 1 through Step 3 to open Your integrations, then create or select your connector integration and upload the manifest under Version details.
- Open the Settings tab for your connector integration and find the Connector credentials section.
- Click Add credential, select API key, and click Next.
- Enter your key or secret in the API key / secret field and click Save. The value is encrypted and never exposed in your application code; you won't be able to view it again after saving, but you can replace or delete it later.
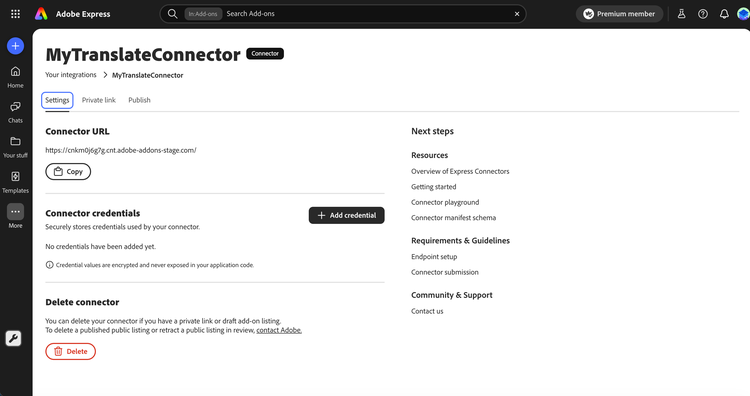
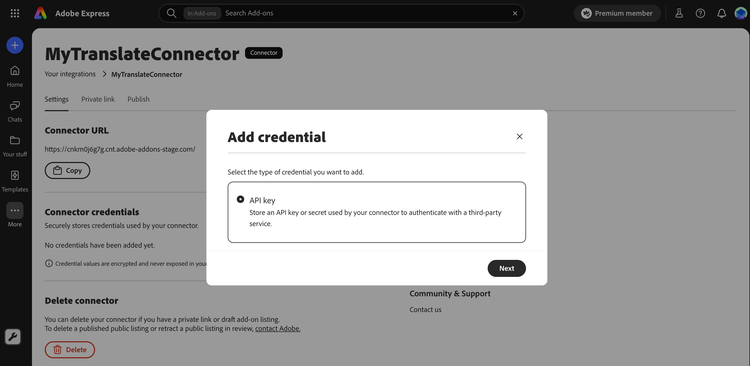
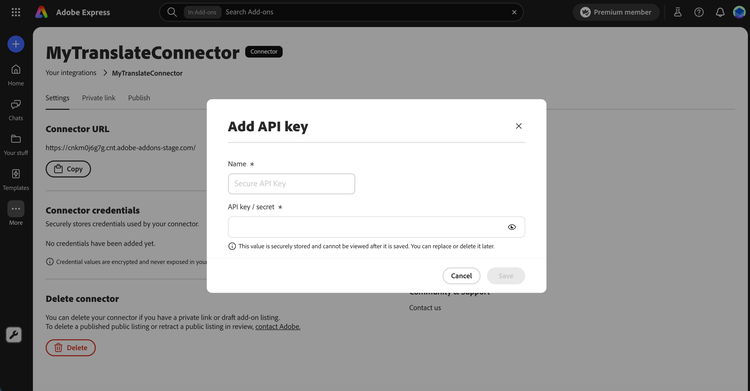
Adobe Express routes Secure API Key requests through the bridge with your credential injected as soon as you save it, no confirmation email required. To update or remove the key later, return to Connector credentials and use the edit or delete action.
Configure org-based API key
An administrator for the enterprise can find the organization ID (also called the IMS Org ID) in the Adobe Admin Console. Alternatively, any Adobe Express user signed in to that enterprise can find the IMS Org ID in browser DevTools: open the Application tab, select Session storage > https://express.adobe.com/, choose the key prefixed adobeid_ims_profile/, and look for the ownerOrg value.
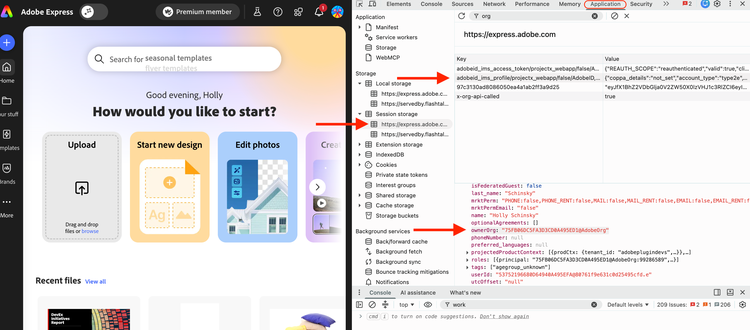
Either the organization name or the organization ID works when you share this information with Adobe or with reviewers. Adobe can resolve one from the other.
Listing field reference
Use this section as a lookup while you complete the submission form for your chosen path. The Applies to column shows which paths collect each field. A private share link collects only the Connector icon, Connector name, Connector manifest, and Release notes fields. Internal and public listings collect most of the fields below; a few, such as Support email address, End User License Agreement (EULA), AI usage details, and monetization details, are public-only. Check the Applies to column for each field.
Listing details
Version details
.json file. Must be valid JSON and conform to the connector manifest schema.Publisher profile
Applies to internal and public listings, first submission only. After submission, the profile is locked. To update it later, contact the Adobe Express Translate Connectors team.
Trader details
Applies to internal and public listings, for EU compliance. In accordance with the European Union Digital Services Act, you must provide Trader details for your listing to be visible to Adobe Express users in the EU. Selecting No keeps the listing hidden from EU users. Trader details are locked after submission; contact Adobe to update them later.
AI usage details
Applies to public listings. Answer Yes to the entry question if your connector uses generative AI to reveal the rest of the section; answer No to skip it. Adobe rejects connectors that generate illegal or policy-violating content.
Monetization details
Applies to public listings. Review the connector monetization guidelines before completing this section.
Asset quick reference
Troubleshoot common issues
Use this section as a lookup for submission errors across all three paths. The Applies to column shows which paths can hit each issue.
.zip instead of a .json file. Add-ons upload a .zip; connectors upload the manifest .json directly..json file.