Getting Started with Adobe Express Translate Connectors
Review prerequisites, download resources, set up the starter project, and verify Playground access before building your connector.
What you need to build a connector
Building and distributing a connector involves three distinct components:
- A backend service that conforms to the API spec. Your service implements the five Translate connector HTTP endpoints (
/health,/locales,/tones,/translate,/feedback) and returns responses that match the schema defined in the Translate Connector API Reference. This is the primary thing you need to build. The starter project gives you a working scaffold to start from. - Connector Playground to configure your manifest and test locally. The Playground is a browser-based tool inside Adobe Express. You use it to fill in your connector details through a form builder, generate a
manifest.json, and connect to your running service for end-to-end testing. - A distribution path to deliver the connector to users. Once your connector is tested, you submit it from Your integrations in Adobe Express. Three paths are supported: an internal listing for users in your enterprise organization, a public listing reviewed by Adobe and enabled for the users and organizations you designate, or a private share link for targeted testers. See Submit your Connector to compare the options and pick the right one. Internal listings require an enterprise Adobe account; personal Adobe accounts can't publish internal listings.
Prerequisites
Before you continue, confirm you have the following:
-
Account access to build and submit connectors. Access depends on your account type:
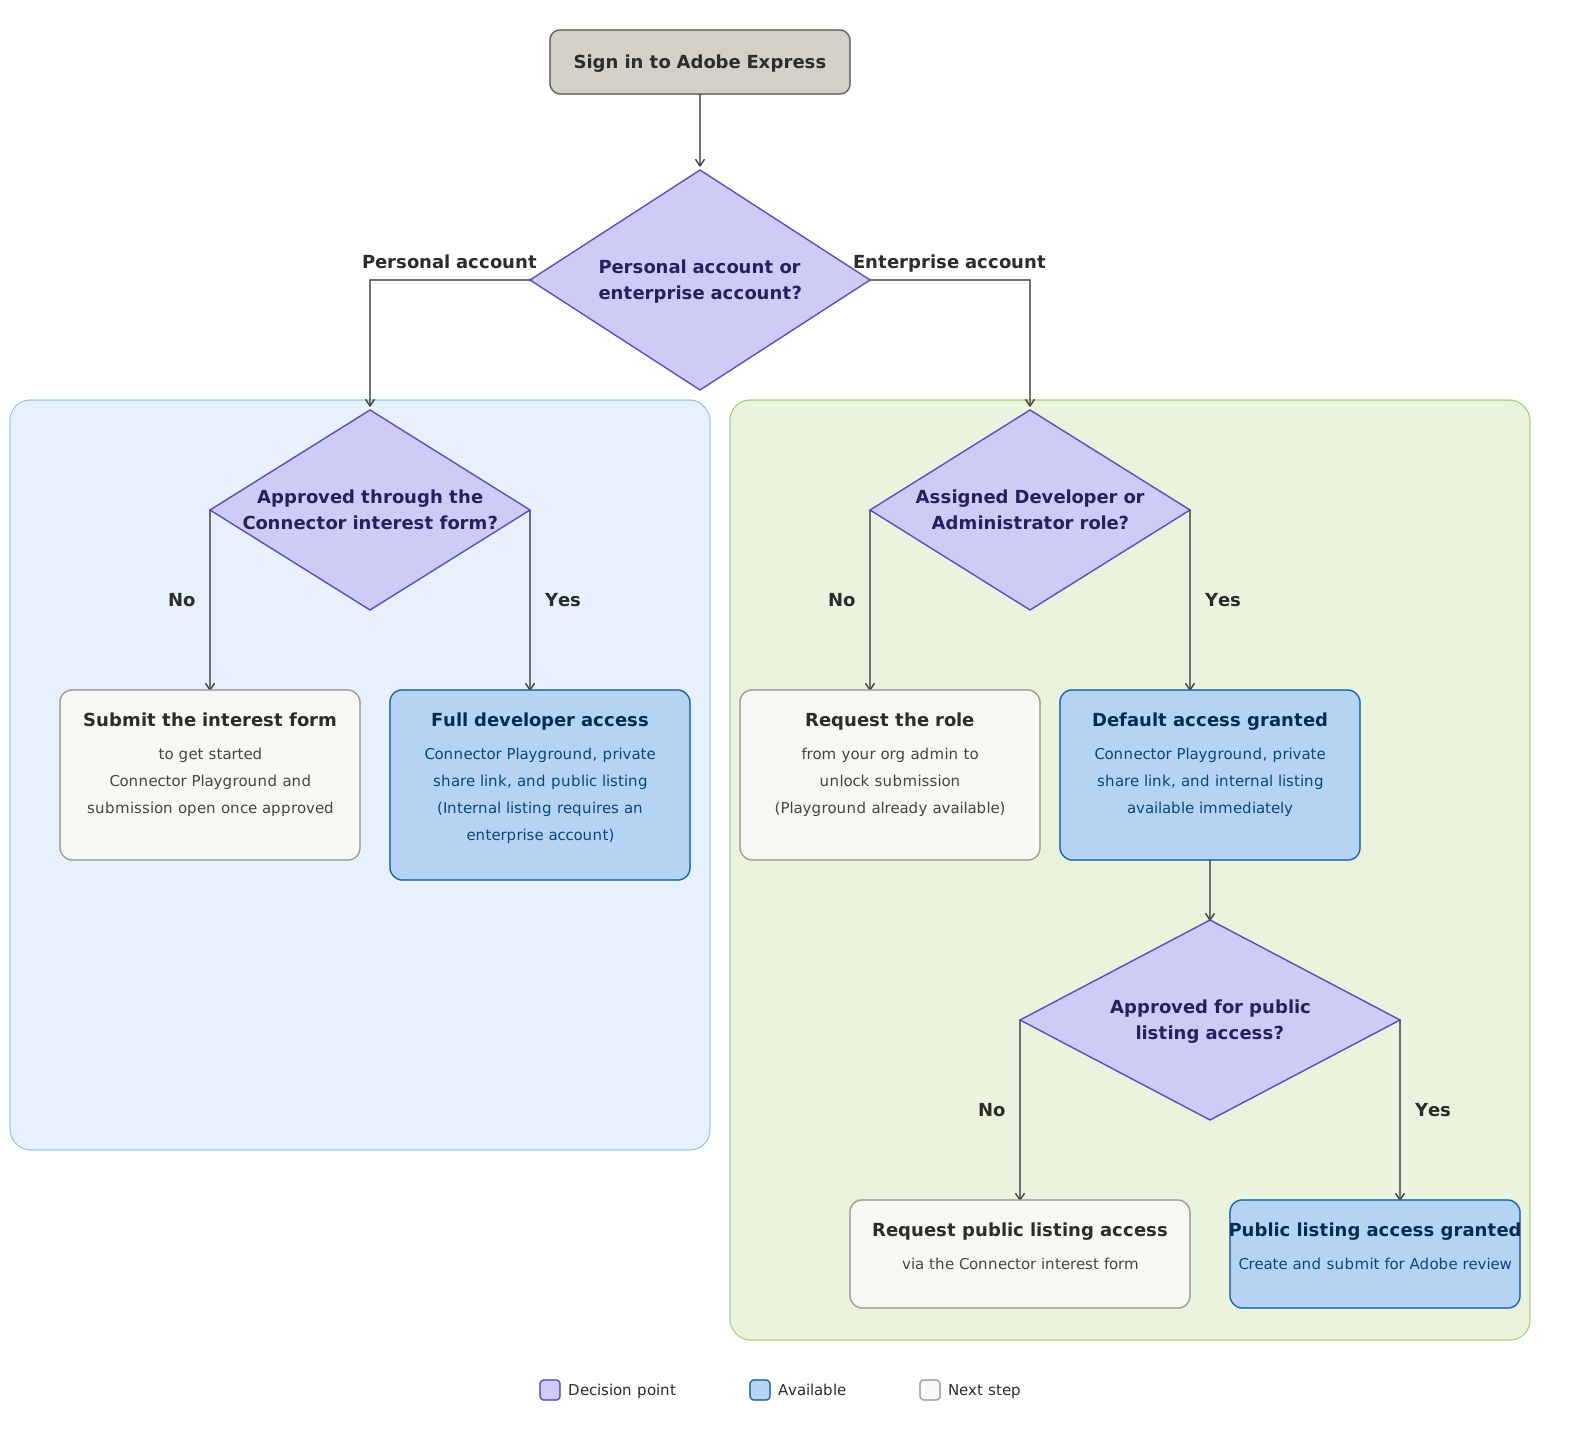
- Enterprise Adobe account: Developer or Administrator role holders get access to the Connector Playground and connector submission for private share links and internal listings by default. Public listing requires approval through the Connector interest form.
- Personal Adobe account: Approval through the Connector interest form is required before you can access the Connector Playground or the submission flow. Public listing is also gated through the same interest form approval process.
-
A Developer or Administrator role assigned to your Adobe enterprise account by your organization's Adobe administrator. This role is required to enable Add-on Development mode in Adobe Express, which gives you access to the Connector Playground. If you do not have this role, request it from your admin before continuing. If you are unsure who your administrator is, see How do I contact my org administrator?.
-
Node.js 18.8.0 or later, required to run the TypeScript starter project. You can implement your connector in any language, but the starter project requires Node.js.
Account access at a glance
What your Adobe Express account can access depends on its type, role, and whether it's been approved through the Connector interest form:
data-slots=heading, text
data-variant=info
Developer Resources
Three downloadable resources are provided to help you build your connector.
npm install && npm run serve, and start building. The SDK type definitions are bundled inside with no registry access required.data-slots=heading,text
Choose a hosting path
You can host your Translate connector service yourself, or let Adobe host it for you as serverless actions on Adobe I/O Runtime. Both paths implement the same five HTTP endpoints and work identically with the Connector Playground, the manifest, and the Translate panel.
- Self-hosted. Use the
translate-connector-standalone.zipstarter from the table above, on any infrastructure you manage. Continue to Use the Starter Project below. - Adobe-hosted. Use the App Builder Template, the
translate-connector-compatibility-servicestarter that deploys to Adobe I/O Runtime through the Adobe I/O CLI. No self-hosted infrastructure or HTTPS tunnel required.
The prerequisites and Playground access steps on this page apply to both paths. The rest of this page walks through the self-hosted starter. If you're hosting on Adobe I/O Runtime, see App Builder Template instead.
Use the Starter Project
The starter project is the fastest way to get a working connector service running locally before you integrate your own translation logic. Download translate-connector-standalone.zip from the table above, then:
-
Unzip and install dependencies:
npm install -
Build and start the server (default port: 8787):
npm run serve -
Verify the service is running:
curl http://localhost:8787/healthExpected response:
{"message":"OK"}
Open src/server.ts to implement your translation logic. The file contains a MyTranslateConnector class with all five endpoint methods already stubbed. Locate each TODO comment and replace the stub response with a call to your translation service API.
The starter project also includes built-in auth scaffolding. Set the AUTH_TYPE environment variable to none (default), api_key, or bearer to test each authentication mode locally before configuring it in the Playground.
The starter project includes CORS support via the cors middleware. This is required when testing with the Connector Playground, since Adobe Express makes requests from the browser to your local service. Your curl tests will work without it since curl is not affected by CORS. If you build your own service in a different language or framework, see Enable CORS for Playground testing before connecting.
data-slots=heading, text
data-variant=warning
http://localhost URLs may work in Chrome and Edge but are not portable, and Safari blocks them outright. Before connecting, expose your local service over HTTPS using a tunneling tool such as ngrok or Cloudflare Tunnel, or a local HTTPS reverse proxy with a trusted certificate (for example, mkcert paired with Caddy or nginx). Enter the HTTPS URL the tunnel or proxy provides in the API Configuration form. For deployed environments, a publicly trusted TLS certificate is required. See HTTPS Requirements for full details.Verify Connector Playground Access
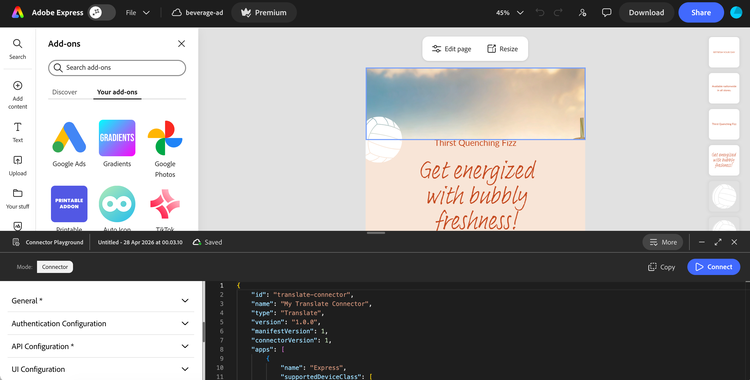
The Connector Playground is the tool you will use to configure your connector, generate the manifest, and test end-to-end once your service is running.
If you have a Developer or Administrator role on an enterprise Adobe account, or your personal account has been approved through the Connector interest form, open the Playground directly:
This URL opens Adobe Express and launches the Connector Playground automatically. On first launch, review and accept the Adobe Express Connector Developer Terms of Use (DTOU) to continue.
data-slots=heading, text
data-variant=info
If the Go URL does not open the Playground automatically, you can navigate to it manually:
data-slots=heading, list
data-repeat=1
data-summary=Find the Connector Playground manually
-
Steps:
- Sign in to Adobe Express with your enterprise Adobe account, or the personal account approved through the Connector interest form.
- Click the Add-ons icon in the left rail to open the Add-ons panel.
- Select the Your add-ons tab and scroll to the bottom of the panel until you see the Add-on Development section.
- Enable the Connector Playground toggle.
- First time only: A Developer Terms of Use dialog appears. Review and accept the Adobe Express Connector Developer Terms of Use (DTOU) to continue.
Next Steps
With your resources downloaded and Playground access verified, follow this order:
- Implement your service endpoints. Build the five HTTP endpoints defined in the API specification and choose your authentication method. See Endpoint Setup for authentication options, TypeScript response shape examples, and pre-Playground testing with
curl. - Configure your connector in the Playground. Once your service is running, use the form builder in the Connector Playground to configure your connector and generate the manifest. See Connector Playground for a full walkthrough.
- Verify the end-to-end flow. Confirm each endpoint matches the API contract, the connector loads and connects in the Playground, and the Translate panel behaves as expected. See Test Your Service for the recommended testing order,
curlchecks, and error-handling verification.