App Builder Translation Template
Deploy a Translate connector for Adobe Express as serverless actions on Adobe I/O Runtime, using the App Builder starter template.
What is Adobe App Builder
Adobe App Builder is a serverless application platform for extending Adobe products, deploying your code as actions to Adobe I/O Runtime with no infrastructure to provision or manage. For Translate connectors, it's one of two supported hosting paths, the Connector Playground, manifest schema, and Translate panel all work the same way either way. See What Is App Builder? for a deeper look at the platform.
Standalone vs App Builder
aio app deploy)npm run serve, plus a tunnel for HTTPS Playground testingaio app dev with no tunnel requiredFor the standalone path, see Getting Started and Endpoint Setup. The rest of this page assumes you are using the App Builder template.
Prerequisites
Before you continue, confirm you have the following:
-
Node.js 20 or later, required by the template (
engines.nodeis>=20). -
Adobe I/O CLI, installed globally:
npm install -g @adobe/aio-cli -
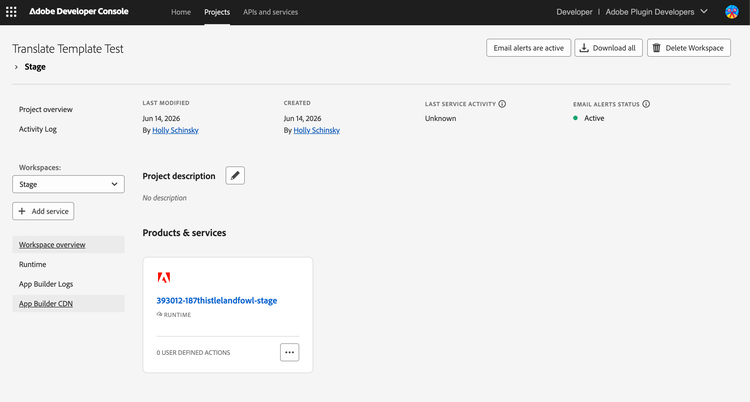
An App Builder project in Adobe Developer Console with at least a Stage workspace. Creating the project is covered below. If your organization doesn't have App Builder enabled, or you don't see Create project from template, see How to Get Access to App Builder.
-
Connector Playground access, the same prerequisite as every Translate connector. See Getting Started.
App Builder concepts
Two distinct artifacts are both called a "template" in App Builder, and conflating them is the most common source of confusion when getting started:
- Developer Console project template. Selected in Adobe Developer Console when you click Create project from template and choose App Builder. This creates the cloud-side project shell, default Stage and Production workspaces, and the Adobe I/O Runtime namespace your actions will deploy into. You do not write any code in this step.
- Local code template. A project like
translate-connector-compatibility-servicethat you download, customize, and deploy with the AIO CLI. This is the code you actually edit.
The Developer Console step creates the cloud-side environment. The local code step creates the code that runs in that environment. They are independent steps and you do them in that order.
Create an App Builder project in Developer Console
- Open Adobe Developer Console.
- Select your organization from the org switcher.
- Click Create project and choose Project from template, then select App Builder.
- Name the project and save. Stage and Production workspaces are created automatically.
The project URL in the browser address bar follows this pattern:
https://developer.adobe.com/console/projects/{orgId}/{projectId}/workspaces/{workspaceId}/details
Note the {orgId} and {projectId} segments. You will use them in the AIO CLI commands in the next section.
Get the template
Download and unzip translate-connector-compatibility-service.zip, then install dependencies from inside the unzipped folder:
npm install
Connect the template to your project
Connect the local template to your Developer Console project so the CLI knows where to deploy. Use the aio console selection commands to choose the org, project, and workspace, then run aio app use --global --merge --no-input to write the configuration into your local project.
Run the commands below from inside the translate-connector-compatibility-service folder you just unzipped.
aio auth login

aio console org select <org-id>

aio console project select <project-id>

aio console workspace select Stage

aio app use --global --merge --no-input
The aio app use --global --merge --no-input command reads the org, project, and workspace you selected through aio console and writes two files into the project root:
.aiocontains project metadata: org, project, workspace IDs and details..envcontains runtime credentials, includingAIO_runtime_authandAIO_runtime_namespace.
To verify the context is set correctly, run aio where. It should print your org, project, and workspace.
data-slots=heading, text
data-variant=warning
.env to source control.env file holds live Adobe I/O Runtime credentials. The template's .gitignore already excludes it. Do not remove that exclusion and do not paste .env contents into chat tools, screenshots, or pull requests.For more on the CLI and App Builder onboarding, see:
Template structure
The template ships with a small set of files. Group them by what you should and should not change.
translate-connector-compatibility-service/
├── app.config.yaml
├── ext.config.yaml
├── extension-manifest.json
├── manifests/
│   ├── manifest-noauth.json
│   └── manifest-oauth.json
├── scripts/
│   └── oauth-pkce-test.sh
└── src/
    ├── actions/
    │   ├── auth.ts
    │   ├── feedback.ts
    │   ├── health.ts
    │   ├── locales.ts
    │   ├── locales-secure.ts
    │   ├── tones.ts
    │   ├── translation.ts
    │   └── translation-secure.ts
    └── types/
        ├── index.ts
        └── translate-connector-sdk.ts
Configuration files
These files describe the Runtime package and action layout. Do not rename the required actions.
app.config.yamldefines the Runtime package, action names, runtime version, memory, and env var inputs. The action nameslocalesandtranslateare required by the connector API contract and must not be renamed. It also wires the OAuth-securedlocales-secureandtranslate-secureactions, withAUTH0_ISSUERandAUTH0_AUDIENCEinputs, see OAuth-secured action variants below.ext.config.yamlandextension-manifest.jsoncarry extension metadata. Leave them as-is.
The snippet below is trimmed to the two required actions. The actual file also defines health, tones, feedback, and the OAuth-secured locales-secure/translate-secure actions using the same pattern:
application:
    actions: actions
    runtimeManifest:
        packages:
            translation:
                license: Apache-2.0
                actions:
                    locales:
                        function: src/actions/locales.ts
                        web: "yes"
                        runtime: nodejs:22
                        inputs:
                            LOG_LEVEL: info
                        annotations:
                            require-adobe-auth: false
                            final: true
                            memory: 2048MB
                    translate:
                        function: src/actions/translation.ts
                        web: "yes"
                        runtime: nodejs:22
                        inputs:
                            LOG_LEVEL: info
                        annotations:
                            require-adobe-auth: false
                            final: true
                            memory: 2048MB
Required actions
You must implement these actions for the connector to function:
src/actions/locales.tsreturns the locales your service supports. Update theSUPPORTED_LOCALESarray.src/actions/translation.tsperforms the translation. Replace the mockitems.mapstub with calls to your translation API.
OAuth-secured action variants
If your manifest uses OAuth 2.0 PKCE, use these instead of the plain locales/translate actions:
src/actions/locales-secure.tsandsrc/actions/translation-secure.tsare OAuth-protected copies oflocales.ts/translation.ts. Each callsverifyAuth()first and returns401if the token is missing or invalid.src/actions/auth.tsexports the sharedverifyAuth()helper. It validates the incomingAuthorization: Bearer <token>header against your identity provider's JWKS endpoint and checks the token's issuer, audience, and expiry.- The provider is configured through the
AUTH0_ISSUERandAUTH0_AUDIENCEinputs inapp.config.yaml. Despite theAUTH0_prefix,verifyAuth()performs standard OIDC/JWKS validation and works with any provider that exposes a.well-known/jwks.jsonendpoint (Auth0, Okta, Azure AD, and others). You can rename the inputs to match your provider, just update the matchingparams.AUTH0_ISSUER/params.AUTH0_AUDIENCEreads inauth.ts.
Once you decide which mode you're shipping, delete what you don't need: the plain locales/translate actions if you require OAuth, or locales-secure.ts, translation-secure.ts, and auth.ts if you don't. See Use the OAuth-secured action variants for how these fit into the two-layer auth model.
Optional actions
You can keep, customize, or delete any of these:
src/actions/health.tsis recommended. The Connector Playground endpoint tester uses it to verify reachability, and it returns aHealthResponse(defined intranslate-connector-sdk.d.ts).src/actions/tones.tsis needed only if your service supports tone of voice. It follows the same pattern aslocales.ts, returning aTonesResponsebuilt from aSUPPORTED_TONESarray.src/actions/feedback.tsis recommended for collecting user feedback signals. It validatestypeandreasonagainst theFeedbackType,FeedbackPositiveReason, andFeedbackNegativeReasonenums, then returns aFeedbackResponse.
To remove an optional action, delete its .ts file and remove its corresponding entry block from app.config.yaml.
Sample manifests and test scripts
manifests/manifest-noauth.jsonis a working manifest for the no-auth path. ItsapiConfigpoints at the plainlocales/translateactions withuseAuth: false.manifests/manifest-oauth.jsonis a working manifest for the OAuth 2.0 PKCE path. ItsauthConfigpoints at an Auth0 tenant, and itsapiConfigpoints atlocales-secure/translate-securewithuseAuth: true.scripts/oauth-pkce-test.shruns the full Authorization Code + PKCE exchange from the command line, outside Adobe Express, so you can confirm your OAuth setup end-to-end before connecting the Connector Playground. See Use the OAuth-secured action variants below.
These sample manifests are bundled with the template for reference, not files the Connector Playground consumes directly. The Playground generates its own manifest.json through the form builder; use these as a model for the authConfig/apiConfig shape that pairs with each action pair.
Type definitions
Do not modify these files. They keep your action responses aligned with the connector API contract.
src/types/translate-connector-sdk.tsprovides SDK types for every request and response shape. The schema matches the publishedtranslate-connector-sdk.d.ts.src/types/index.tsprovidesActionParamsandActionResponse<T>wrappers used by Runtime action signatures.
Configure environment variables
Pass secrets and configuration to actions at deploy time using the input + env var pattern.
In app.config.yaml, reference env vars under inputs:
inputs:
    LOG_LEVEL: info
    MY_TRANSLATION_API_KEY: $MY_TRANSLATION_API_KEY
The $ prefix tells the AIO CLI to read the value from .env at deploy time. In .env:
MY_TRANSLATION_API_KEY=your-key-here
Inside an action, read the value from params:
const apiKey = params.MY_TRANSLATION_API_KEY as string;
data-slots=heading, text
data-variant=warning
app.config.yaml or in any source file. Use the $VARIABLE reference pattern in app.config.yaml and store the actual values in .env. .env must remain ignored by git.Implement your translation logic
Each action follows the same pattern: receive params, do work, return an ActionResponse<T> whose body matches the connector API schema. The starter ships with stub responses that you replace with real calls to your translation provider.
Update the supported locales
Open src/actions/locales.ts and replace the entries in SUPPORTED_LOCALES with the locales your service actually supports. The shape comes from the SDK Locale type and is identical to the standalone API contract. The shipped file starts with a placeholder list (en-US, fr-FR, de-DE, it-IT, es-ES, th-TH), the trimmed example below just illustrates the pattern:
import { LocalesResponse, Locale } from "../types/translate-connector-sdk";
import { ActionResponse } from "../types";

type LocalesActionResponse = ActionResponse<LocalesResponse>;

const SUPPORTED_LOCALES: Locale[] = [
    { code: "fr-FR", label: "French" },
    { code: "de-DE", label: "German" },
    { code: "es-ES", label: "Spanish (Spain)" }
];

export async function main(): Promise<LocalesActionResponse> {
    return {
        statusCode: 200,
        body: { locales: SUPPORTED_LOCALES }
    };
}
Replace the translation stub
In src/actions/translation.ts, the stub maps each input string to a tagged copy of itself:
const result: TranslationResponse["result"] = items.map((item: string) => `[${targetLocale}] ${item}`);
Replace that line with a real call to your translation API. The params object contains any environment variables you wired up through app.config.yaml inputs (for example, params.MY_TRANSLATION_API_KEY). The example below is a complete implementation using fetch, not code from the template, your actual call depends on your translation provider's API or SDK:
import { TranslationResponse, TranslationRequest, ErrorCode } from "../types/translate-connector-sdk";
import { ActionParams, ActionResponse } from "../types";

type TranslationActionResponse = ActionResponse<TranslationResponse>;

export async function main(params: ActionParams): Promise<TranslationActionResponse> {
    const { sourceLocale, targetLocale, items } = params as unknown as TranslationRequest;

    if (!sourceLocale || !targetLocale || !items?.length) {
        return {
            statusCode: 400,
            body: {
                errorCode: ErrorCode.BAD_REQUEST,
                errorMessage: "Missing required parameters",
                result: []
            }
        };
    }

    const apiKey = params.MY_TRANSLATION_API_KEY as string;
    const upstream = await fetch("https://api.example.com/translate", {
        method: "POST",
        headers: {
            "Content-Type": "application/json",
            Authorization: `Bearer ${apiKey}`
        },
        body: JSON.stringify({ sourceLocale, targetLocale, items })
    });

    if (!upstream.ok) {
        return {
            statusCode: 200,
            body: {
                errorCode: ErrorCode.GENERIC_ERROR,
                errorMessage: `Upstream returned ${upstream.status}`,
                result: []
            }
        };
    }

    const data = (await upstream.json()) as { translations: string[] };

    return {
        statusCode: 200,
        body: { result: data.translations }
    };
}
For the full schema each action must return, see the Translate Connector API Reference.
Authentication
Authentication for an App Builder Translate connector splits into two completely separate concerns. Frame them this way to avoid mixing them up:
- Who is allowed to call your Runtime action?
- How does your action authenticate outbound to your translation provider?
These operate at different layers and are configured independently.
Layer 1: Who can call your Runtime action
The require-adobe-auth annotation in app.config.yaml is a Runtime gateway setting. It controls whether Adobe I/O Runtime requires a valid Adobe IMS token on the incoming request before passing it to your action code.
The template ships with require-adobe-auth: false. Leave it that way for an Express Translate Connectors integration. Adobe Express calls your Runtime action URL the same way it calls any connector endpoint, using the credential type configured in your manifest (OAuth 2.0 PKCE, plain API key, or none). Setting require-adobe-auth: true would require the caller to hold a valid Adobe IMS token, which is not part of the Express Connectors auth flow, some other Adobe I/O Runtime integrations set it to true when the caller is itself an Adobe product running in an IMS context, but Express Connectors always calls on behalf of an end user through connector-level auth instead.
Layer 2: How your action authenticates to your translation service
This is the auth work you actually need to implement. Your Runtime action receives a request from Adobe Express, then makes an outbound call to your translation API. To authenticate that outbound call:
- Store your translation API credentials in
.env. - Reference them in
app.config.yamlunderinputsusing the$VARIABLEpattern. - Read them in your action via
params.MY_API_KEY. - Send them as headers or query parameters on the outbound request to your translation service.
This is entirely independent of the Runtime require-adobe-auth setting. Adobe Express never sees your translation API credentials, they stay server-side in Runtime.
How Adobe Express authenticates to your connector
The connector-level auth model from Endpoint Setup applies here the same way, whether your connector runs on Runtime action URLs or a self-hosted service. When you configure auth in the Connector Playground (OAuth 2.0 PKCE, Plain API Key, or None), Adobe Express attaches those credentials to every request it sends to your connector endpoints.
Inside your action, the credential arrives on the request headers and is available via params.__ow_headers?.authorization. Validate it the same way you would in a self-hosted service.
Use the OAuth-secured action variants
If your manifest uses OAuth 2.0 PKCE, don't hand-roll token validation, the template already ships a working implementation.
import { verifyAuth } from "./auth";

export async function main(params: ActionParams): Promise<LocalesActionResponse> {
    const auth = await verifyAuth(params);
    if (!auth.ok) {
        return {
            statusCode: auth.status,
            body: { locales: [], errorCode: ErrorCode.UNAUTHORIZED, errorMessage: auth.message }
        };
    }
    // ...proceed with the authenticated request
}
verifyAuth() (in src/actions/auth.ts) reads the Authorization header from params.__ow_headers, fetches your identity provider's JWKS, and verifies the token's signature, issuer, audience, and expiry. locales-secure.ts and translation-secure.ts call it as the first line of main(), so no unauthenticated request reaches your translation logic.
Point AUTH0_ISSUER and AUTH0_AUDIENCE (in app.config.yaml) at your identity provider, for example https://your-tenant.us.auth0.com/ and your API identifier. The names are Auth0-flavored, but the validation logic is standard OIDC/JWKS and works with Okta, Azure AD, or any provider that exposes a .well-known/jwks.json endpoint.
data-slots=heading, text
data-variant=info
scripts/oauth-pkce-test.sh to exercise the full Authorization Code + PKCE exchange from the command line: it generates a code verifier and challenge, opens your provider's login page, exchanges the returned code for a token, and calls a -secure action with it. A 200 response confirms your issuer, audience, and verifyAuth() configuration all agree before you wire up the Playground.Use manifests/manifest-oauth.json as a working reference for the authConfig/apiConfig shape that pairs with these actions, and manifests/manifest-noauth.json for the no-auth equivalent.
data-slots=heading, text
data-variant=info
Local development
Start a local dev server with:
aio app dev
aio app dev runs your actions locally on your own machine for fast iteration. It does not deploy anything to Adobe I/O Runtime. Actions are served at URLs like:
http://localhost:9080/api/v1/web/translation/locales
data-slots=heading, text
data-variant=info
aio app dev runs locally; aio app run and aio app deploy run hostedaio app dev for local development only. To push your actions to Adobe I/O Runtime instead, see Deploy to Adobe I/O Runtime.You can exercise each action with curl:
curl http://localhost:9080/api/v1/web/translation/health

curl http://localhost:9080/api/v1/web/translation/locales

curl http://localhost:9080/api/v1/web/translation/tones

curl -X POST http://localhost:9080/api/v1/web/translation/translate \
  -H "Content-Type: application/json" \
  -d '{
    "sourceLocale": "en-US",
    "targetLocale": "fr-FR",
    "items": ["Hello, world!"]
  }'

curl -X POST http://localhost:9080/api/v1/web/translation/feedback \
  -H "Content-Type: application/json" \
  -d '{ "type": "Positive", "reason": "AccurateTranslation" }'
CORS is not a concern during aio app dev testing because the Runtime gateway handles cross-origin headers for web actions. This is one operational difference from the standalone starter, which requires CORS middleware for browser-based Playground testing.
For the same curl patterns applied end-to-end against the deployed service, see Test Your Service.
Deploy to Adobe I/O Runtime
You've already selected a workspace with aio console workspace select (see App Builder concepts). Deploy to it:
aio app deploy
aio app run is an alternative to aio app deploy for this headless (backend-only) template: it deploys the package to Runtime, prints using remote actions, and watches your files to redeploy on change. Neither command starts a localhost server, both push your actions to https://{namespace}.adobeioruntime.net/....
Deploy to a different workspace explicitly:
aio app deploy --workspace Production
List deployed actions and their public URLs:
aio runtime action list
Deployed action URLs follow this pattern:
https://{namespace}.adobeioruntime.net/api/v1/web/{package}/{action}
Where {namespace} is the value of AIO_runtime_namespace in your .env (for example, 393012-187thistlelandfowl-stage), {package} is translation, and {action} is locales, translate, tones, feedback, or health.
data-slots=heading, text
data-variant=info
Connect to the Connector Playground
After deploying, use the deployed Runtime action URLs as your endpoint URLs in the Connector Playground. The Playground does not care whether your endpoints are a self-hosted service or App Builder Runtime URLs.
- Open the Connector Playground.
- In the API Configuration section, enter the deployed Runtime URL for each endpoint. The
localesaction URL goes in the Locales endpoint field, thetranslateaction URL in the Translate field, and so on. - Configure your auth type in the Playground to match how your action validates incoming credentials. See Authentication above.
- Use the Playground endpoint tester to verify each action responds correctly before generating the manifest.
- Generate and save your manifest.
After endpoint URLs are configured, the rest of the connector workflow, manifest generation, end-to-end testing, and submission, is identical to the standalone path. See Connector Playground and Test Your Service.
Troubleshooting
aio: command not foundnpm install -g @adobe/aio-cliaio app use <file> fails with must be objectaio app use cannot parse. Use the aio console org/project/workspace select commands followed by aio app use --global --merge --no-input instead. See Connect the template to your project.aio where shows no org, project, or workspace after running aio app use --globalaio console org select, aio console project select, and aio console workspace select first, then re-run aio app use --global --merge --no-input..env exists and that AIO_runtime_auth and AIO_runtime_namespace are populated. Re-run aio app use --global --merge --no-input if either is missing.401 from the Connector Playgroundaio runtime action list and that the URL in the Playground is HTTPS.For connector-specific issues that are not App Builder related, see Troubleshooting.