Getting started guide
Get started and create your first Adobe InDesign Script.
In this guide, we will cover the basics of InDesign scripting, and create a simple InDesign script using UXP that creates a new document, adds a text frame, and enters text in the text frame.
UXP Scripting in InDesign
UXP Scripts should be written in JavaScript, and the file should be saved as <filename>.idjs. Saving the script as .idjs enables the UXP engine in InDesign and executes the script as UXP script.( .jsx will execute as normal ExtendScript)
Installing scripts
Installing an InDesign script is easy: add the script file to the scripts folder so that it shows up in the Scripts panel. inside the Scripts folder in your InDesign application folder (/Applications/Adobe\ InDesign\ 2023\ (Prerelease-Debug)/Scripts). (Create the Scripts folder if it does not already exist.) Note: this may require admin access.
Alternately, put the script inside the Scripts Panel folder in your preferences folder. Your preferences folder is at:
Windows: C:\Users\<username>\AppData\Roaming\Adobe\InDesign\Version 18.0\<locale>\Scripts
Mac: /Users/<username>/Library/Preferences/Adobe InDesign/Version 18.0/<locale>/Scripts
Above, <username> is your user name and <locale> references your location and language, for example, en_US.
Once the script is in the folder, it appears on the Scripts panel inside InDesign. To display the panel, choose Window > Utilities > Scripts.
You can also put aliases/shortcuts to scripts (or folders containing scripts) in the Scripts Panel folder, and they will appear in the Scripts panel.
To run a specific script when InDesign starts, put it inside a folder named "Startup Scripts" inside the Scripts folder (create this folder if it does not already exist).
Running a script
To run a script, display the Scripts panel (choose Window > Utilities > Scripts), then double-click the script name in the Scripts panel. Many scripts display user-interface items (like dialog boxes or panels) and display alerts if necessary.
We can also right-click on the script name and then click on run in drop-down menu.

Using the scripts panel
The InDesign Scripts panel is the easiest and best way to run most InDesign scripts. If the panel is not already visible, you can display it by choosing Window > Utilities > Scripts.
To edit a script shown in the Scripts panel, select the script and choose Edit Script from the Scripts panel menu. Alternatively, you can hold down the Option (Mac OS) or Alt (Windows) key and double-click the script's name. This opens the script in the editor you defined for the script file type.
To open the folder containing a script shown in the Scripts panel, select the script and choose Reveal in Finder (Mac OS) or Reveal in Explorer (Windows). Alternatively, you can hold down the Command (Mac OS) or Ctrl-Shift (Windows) keys and double-click the script's name. The script folder opens in the Finder (Mac OS) or Explorer (Windows).
Your first UXP script
Below, we will create our first hello-world UXP InDesign script.
Our script will creates a new document, adds a text frame, and enters text in the text frame. This demonstrates how to do the following:
- Create a new document.
- Create a text frame on a specific page.
- Add text to a text frame.
- Start a text editor and enter the following script:
Copied to your clipboard//HelloWorld.idjs//An InDesign UXPScript////Creates a new document, adds a text frame,//resizes the text frame and adds text.var myDocument = app.documents.add();var myTextFrame = myDocument.pages.item(0).textFrames.add();/*Set the geometric bounds (the location of the top, left, bottom, and right edges) of the text frame. In this step, the script uses measurement overrides ("p" for picas) to ensure the text frame is the correct size, regardless of your default measurement units. The locations are provided as a list, or array, of values; each scripting language has a slightly different way of creating an array. */myTextFrame.geometricBounds = ["6p", "6p", "24p", "24p"];//Add text to the text frame by setting the proporty of the content to a string myTextFrame.contents = "Hello World!";
Save the script as a plain-text file with the .idjs file extension to the Scripts Panel folder. To run the script, double-click the script name in the Scripts panel.
Congratulations! You have now created your first InDesign script. Below goes over how to add more features to it.
Adding features to our Hello World script
In the following guide we will build upon the initial hello-world script we created above.
Our updated script will demonstrates how to do the following:
- Get the active document.
- Use a function (or handler in AppleScript).
- Get the page dimensions and page margins of the active document.
- Resize a text frame.
- Change the formatting of the text in the text frame.
Make sure you have the Hello World document open-this script relies on objects we created in that script. If you closed the document without saving it, simply run the HelloWorld.jsx script again to make a new document.
Either open the ImprovedHelloWorld.jsx tutorial script or perform the following steps to create the script:
- Enter the following JavaScript in a new text file
Copied to your clipboard//Improved HelloWorld.idjs//An InDesign UXP Script////Enter the name of a font on your system, if necessary.var myFont = app.fonts.item("Arial");var myDocument = app.activeDocument;var myPage = myDocument.pages.item(0);//Get page width and page height using the function "myGetBounds".var myBounds = myGetBounds(myDocument, myPage);var myTextFrame = myPage.textFrames.item(0);//Resize the text frame to match the publication margins.myTextFrame.geometricBounds = myBounds;var myParagraph = myTextFrame.paragraphs.item(0);//Change the font, size, and alignment.myParagraph.appliedFont = myFont;myParagraph.pointSize = 48;myParagraph.justification = Justification.centerAlign;function myGetBounds(myDocument, myPage){var myPageWidth = myDocument.documentPreferences.pageWidth;var myPageHeight = myDocument.documentPreferences.pageHeightif(myPage.side == PageSideOptions.leftHand){var myX2 = myPage.marginPreferences.left;var myX1 = myPage.marginPreferences.right;}else{var myX1 = myPage.marginPreferences.left;var myX2 = myPage.marginPreferences.right;}var myY1 = myPage.marginPreferences.top;var myX2 = myPageWidth - myX2;var myY2 = myPageHeight - myPage.marginPreferences.bottom;return [myY1, myX1, myY2, myX2];}
Save the script as a plain text file with the file extension .idjs in the Scripts Panel folder.
Once you've opened or created the script file, you can run the script from the InDesign Scripts panel.
Once you've opened or created the script file, you can run the script from the InDesign Scripts panel.
Obviously, our "Hello World!" script would not be very useful in your daily work, but it has shown you the basics of InDesign scripting. In the following section, we'll show a script that does a bit more, and that demonstrates scripting techniques you're likely to use in your own scripts.
While you can use an InDesign script at any point in your production process, we will start by creating a script that starts at the same point you do: We'll create a new document, set page margins, and define and apply master pages. The following figure shows a block diagram that represents the objects we'll work with.
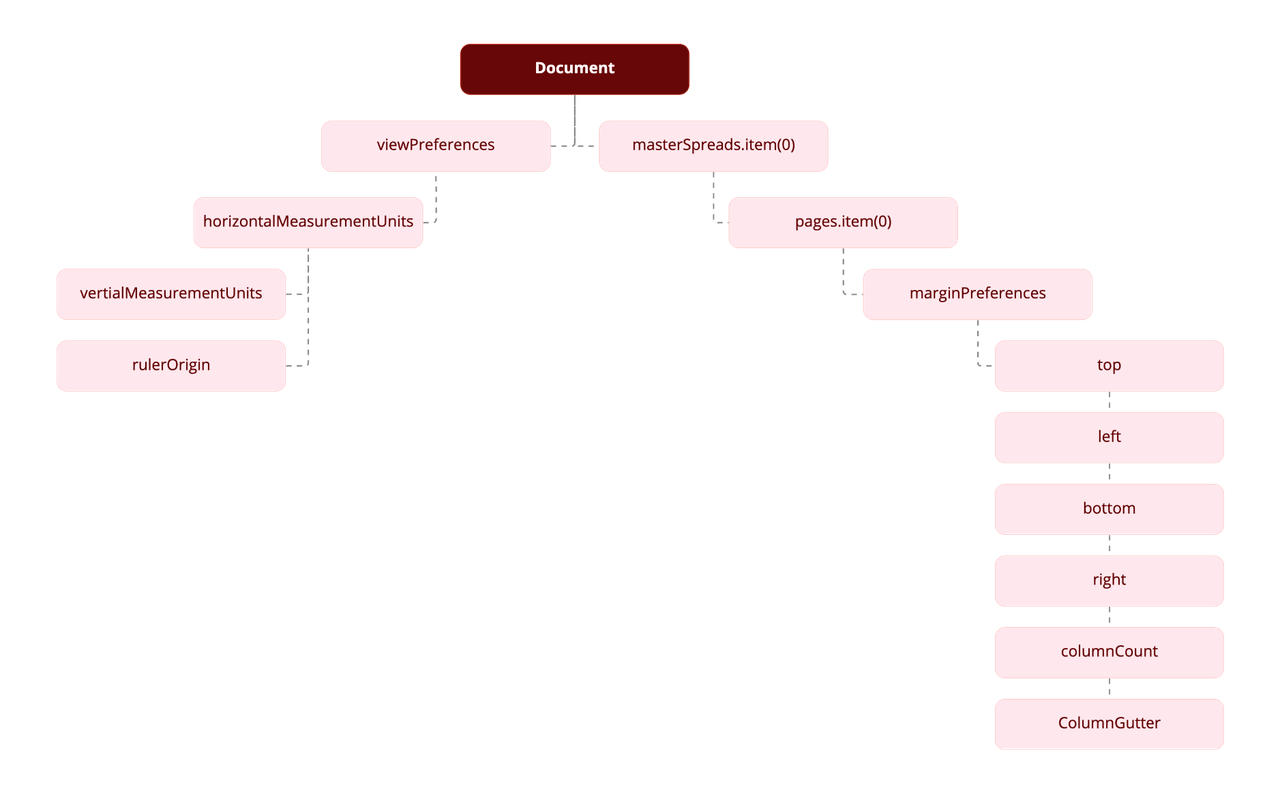
In this section, we will look at the DocumentTemplate tutorial script. We'll break the script into a series of blocks; each block demonstrates a specific area or task in InDesign scripting.
The objects in the object model generally correspond to the names of controls in the user interface, as shown in the following diagram:
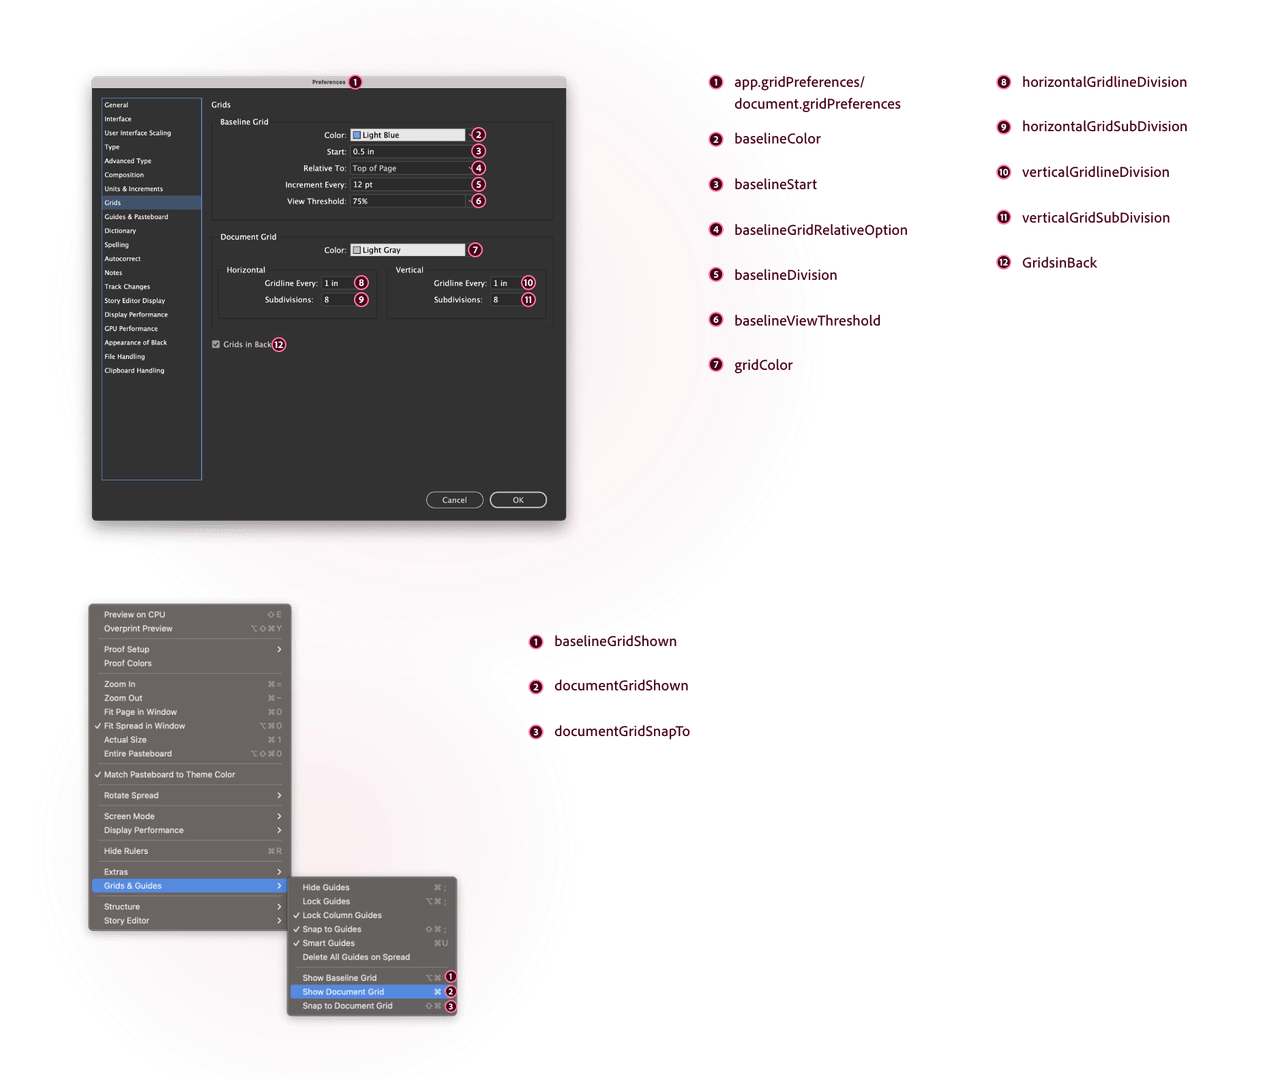
In the following sections, we'll discuss each functional area in the DocumentConstruction script. Open this script in the script editor for the language of your choice if you would like to follow along.
Setting up measurement units and master spread margins
The following script fragment shows how to create a new document and set the margins of the first master spread.
Copied to your clipboard//Create a new document.var myDocument = app.documents.add();//Set the measurement units and ruler origin.myDocument.viewPreferences.horizontalMeasurementUnits = MeasurementUnits.points;myDocument.viewPreferences.verticalMeasurementUnits = MeasurementUnits.points;myDocument.viewPreferences.rulerOrigin = RulerOrigin.pageOrigin;//Get a reference to the first master spread.var myMasterSpread = myDocument.masterSpreads.item(0);//Get a reference to the margin preferences of the first page in the master spread.var myMarginPreferences = myMasterSpread.pages.item(0).marginPreferences;//Now set up the page margins and columns.myMarginPreferences.left = 84;myMarginPreferences.top = 70;myMarginPreferences.right = 70;myMarginPreferences.bottom = 78;myMarginPreferences.columnCount = 3;myMarginPreferences.columnGutter = 14;//Page margins and columns for the right-hand page.var myMarginPreferences = myMasterSpread.pages.item(1).marginPreferences;myMarginPreferences.left = 84;myMarginPreferences.top = 70;myMarginPreferences.right = 70;myMarginPreferences.bottom = 78;myMarginPreferences.columnCount = 3;myMarginPreferences.columnGutter = 14;
Adding a baseline grid
Now that we have a master spread set up, we will add a baseline grid. Here is a block diagram that shows the relationship between the objects we'll be working with:
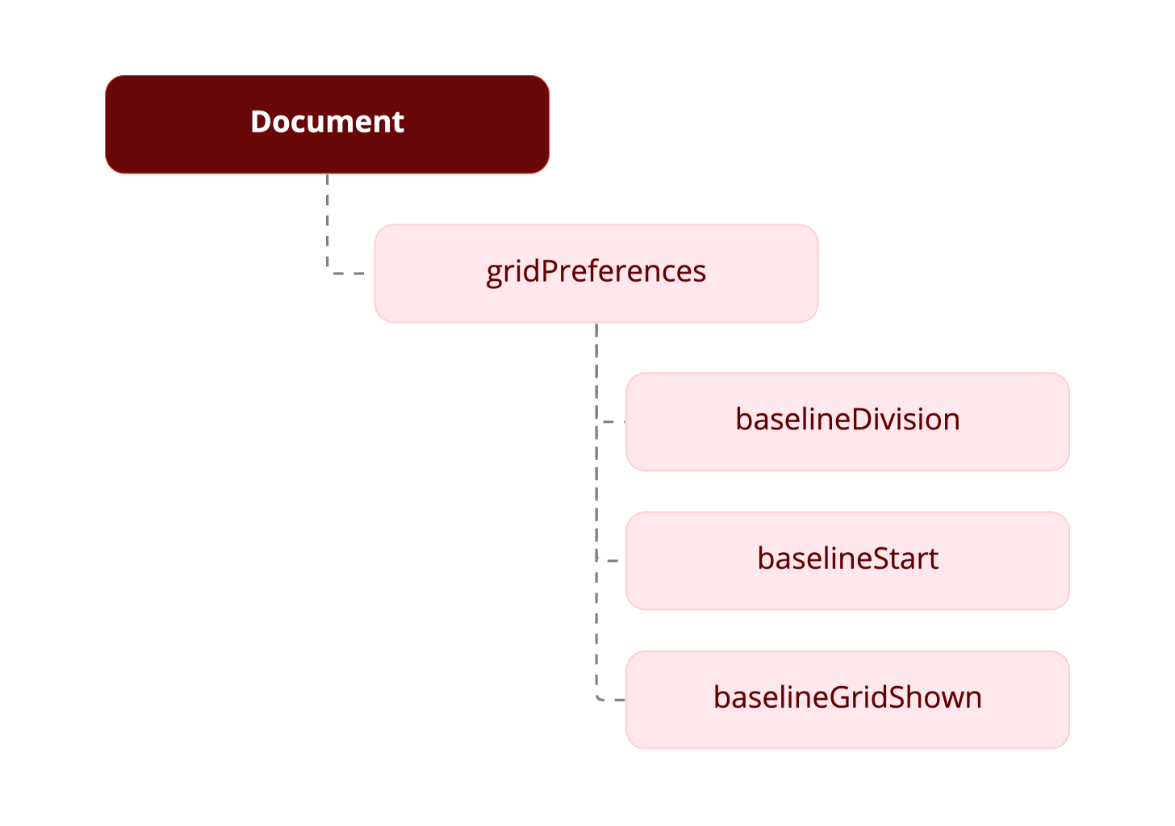
Copied to your clipboardvar myGridPreferences = myDocument.gridPreferences;myGridPreferences.baselineDivision = 14;myGridPreferences.baselineStart = 70;myGridPreferences.baselineGridShown = true;
Adding master page items
Next, we add two text frames to the master pages. These frames will contain the auto-page-number special character and will be positioned at the bottom of the page.
In the "Hello World" example, we created a text frame and specified its position and size using the geometric bounds property-an array containing the top, left, bottom, and right coordinates for the frame. The coordinates correspond to the corners of the frame, just as they would appear in the Control panel. The geometric bounds are: top = 728, left = 70, bottom = 742, and right = 528, as shown in the following two figures:
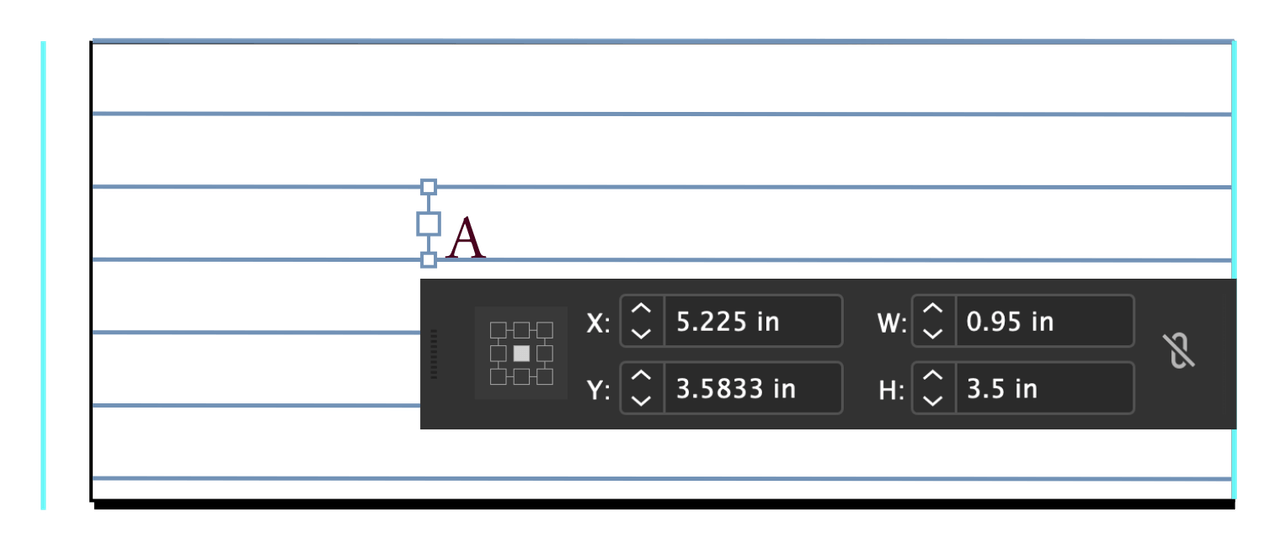
Copied to your clipboardvar myMasterSpread = myDocument.masterSpreads.item(0);var myLeftPage = myMasterSpread.pages.item(0);var myRightPage = myMasterSpread.pages.item(1);var myLeftFooter = myLeftPage.textFrames.add();myLeftFooter.geometricBounds = [728, 70, 742, 528];myLeftFooter.textFramePreferences.firstBaselineOffset = FirstBaseline.leadingOffset;myLeftFooter.contents = SpecialCharacters.autoPageNumber;myLeftFooter.parentStory.characters.item(0).pointSize = 11;myLeftFooter.parentStory.characters.item(0).leading = 14;var myRightFooter = myRightPage.textFrames.add();myRightFooter.geometricBounds = [728, 84, 742, 542];myRightFooter.textFramePreferences.firstBaselineOffset = FirstBaseline.leadingOffset;myRightFooter.contents = SpecialCharacters.autoPageNumber;myRightFooter.parentStory.characters.item(0).pointSize = 11;myRightFooter.parentStory.characters.item(0).leading = 14;myRightFooter.parentStory.characters.item(0).justification = Justification.rightAlign;
Adding master text frames
Next, we add master text frames. The following block diagram shows the objects and properties we'll be working with:
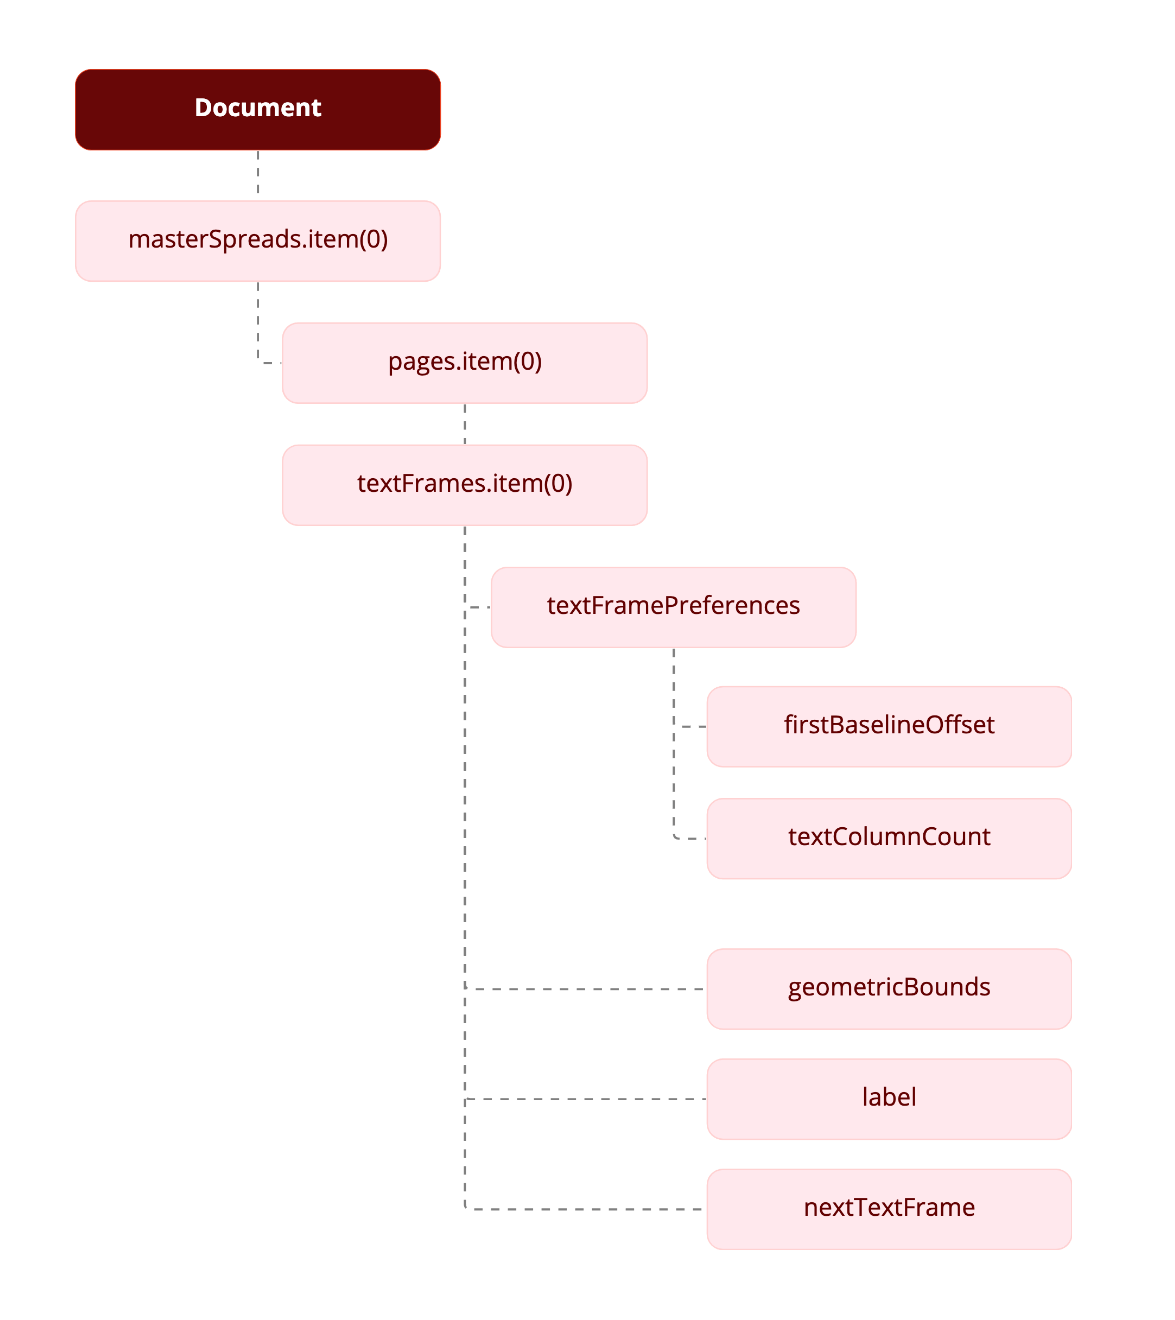
Copied to your clipboardvar myLeftPage = myMasterSpread.pages.item(0);var myRightPage = myMasterSpread.pages.item(1);var myLeftTextFrame = myLeftPage.textFrames.add();myLeftTextFrame.geometricBounds = [70, 70, 714, 528];myLeftTextFrame.textFramePreferences.firstBaselineOffset = FirstBaseline.leadingOffset;myLeftTextFrame.textFramePreferences.textColumnCount = 3;myLeftTextFrame.textFramePreferences.textColumnGutter = 14;//Add a label to make the frame easier to find later on.myLeftTextFrame.label = "BodyTextFrame";var myRightTextFrame = myRightPage.textFrames.add();myRightTextFrame.geometricBounds = [70, 84, 714, 542];myRightTextFrame.textFramePreferences.firstBaselineOffset = FirstBaseline.leadingOffset;myRightTextFrame.textFramePreferences.textColumnCount = 3;myRightTextFrame.textFramePreferences.textColumnGutter = 14;//Add a label to make the frame easier to find later on.myRightTextFrame.label = "BodyTextFrame";//Link the two frames using the nextTextFrame property.myLeftTextFrame.nextTextFrame = myRightTextFrame;
Overriding master page items and adding text
Next, we override one of the master text frames we created and add text.
Copied to your clipboardvar myTextFrame = myDocument.masterSpreads.item(0).pages.item(1).textFrames.item(0).override(myDocument.pages.item(0));//Add text by setting the contents of an insertion point to a string.//In JavaScript, "\r" is a return character.myTextFrame.insertionPoints.item(0).contents = "Headline!\r";
Adding and applying a paragraph style
Our headline looks plain, so we will format it in a paragraph style. To do that, we must create the paragraph style. The following diagram shows the objects and properties we will work with:
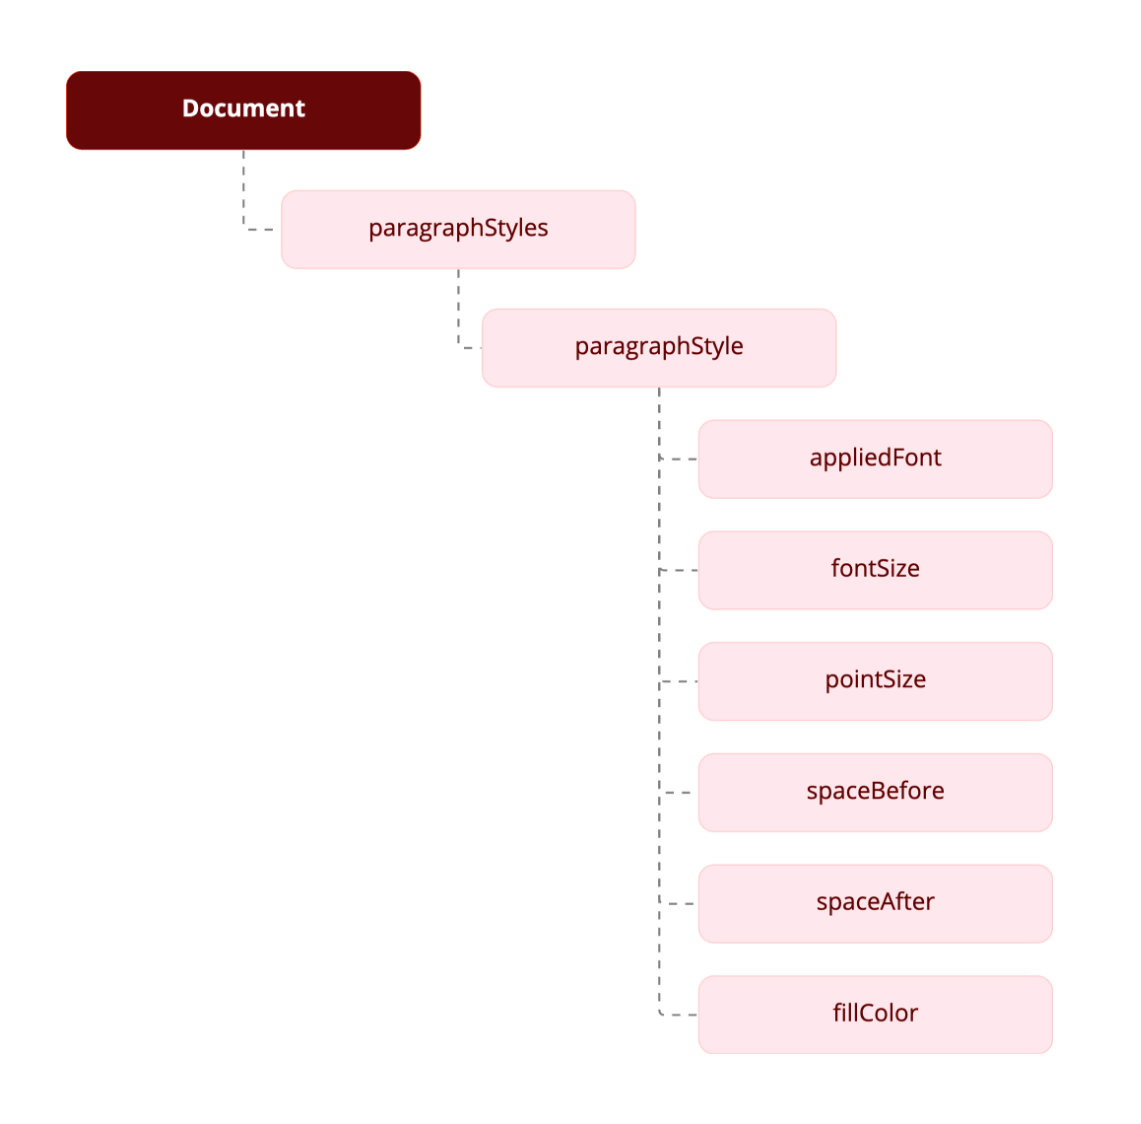
Copied to your clipboard//First, check to see if the paragraph style already exists.var myParagraphStyle = myDocument.paragraphStyles.item("Heading 1");try {var myName = myParagraphStyle.name;}catch (myError){//The paragraph style did not exist, so create it.myParagraphStyle = myDocument.paragraphStyles.add({name:"Heading 1"});}//We'll need to create a color. Check to see if the color already exists.var myColor = myDocument.colors.item("Red");try {myName = myColor.name;}catch (myError){//The color did not exist, so create it.myColor = myDocument.colors.add({name:"Red", model:ColorModel.process,colorValue:[0,100,100,0]});}//Now set the formatting of the paragraph style.myParagraphStyle.appliedFont = "Arial";myParagraphStyle.fontStyle = "Bold";myParagraphStyle.pointSize = 24;myParagraphStyle.spaceAfter = 24;myParagraphStyle.spaceBefore = 24;myParagraphStyle.fillColor = myDocument.colors.item("Red");//Apply the style to the paragraph.myDocument.pages.item(0).textFrames.item(0).paragraphs.item(0).applyParagraphStyle(myParagraphStyle, true);//You could also use://myDocument.pages.item(0).textFrames.item(0).paragraphs.item(0).appliedParagraphStyle = myParagraphStyle;
Placing a text file
Next, we import a text file. We add the text after the headline in the first text frame on the first page. The script displays a dialog box that you can use to select the text file to import.
Copied to your clipboard//Display a standard open file dialog box to select a text file.const uxpfs = require('uxp').storage;const ufs = uxpfs.localFileSystem;var myTextFile = await ufs.getFileForOpening();//If a text file was selected, and if you didn't press Cancel,//place the text file at the first insertion point after the headline.if((myTextFile != "")&&(myTextFile != null)){myTextFrame.insertionPoints.item(-1).place(myTextFile);}
Placing a graphic
Placing a graphic is like importing a text file. Again, the script displays a dialog box that you can use to select the graphic to place. When we place the graphic, InDesign returns a reference to the graphic itself rather than to the frame containing the graphic. To get a reference to the frame, use the parent property of the graphic. Once we have that reference, we can apply an object style to the frame.
Copied to your clipboard//Display a standard open file dialog box to select a graphic file.var myGraphicFile = await ufs.getFileForOpening();//If a graphic file was selected, and if you didn't press Cancel,//place the graphic file on the page.if((myGraphicFile != "")&&(myGraphicFile != null)){var myGraphic = myDocument.pages.item(0).place(myGraphicFile);//Since you can place multiple graphics at once, the place method//returns an array. To get the graphic you placed, get the first//item in the array (JavaScript arrays start with item 0).myGraphic = myGraphic[0];//Create an object style to apply to the graphic frame.var myObjectStyle = myDocument.objectStyles.item("GraphicFrame");try {var myName = myObjectStyle.name;}catch (myError){//The object style did not exist, so create it.myObjectStyle = myDocument.objectStyles.add({name:"GraphicFrame"});}myObjectStyle.enableStroke = true;myObjectStyle.strokeWeight = 3;myObjectStyle.strokeType = myDocument.strokeStyles.item("Solid");myObjectStyle.strokeColor = myDocument.colors.item("Red");//The frame containing the graphic is the parent of the graphic.var myFrame = myGraphic.parent;myFrame.applyObjectStyle(myObjectStyle, true);//Resize the frame to a specific size.myFrame.geometricBounds = [0,0,144,144];//Fit the graphic to the frame proportionally.myFrame.fit(FitOptions.proportionally);//Next, fit frame to the resized graphic.myFrame.fit(FitOptions.frameToContent);var myBounds = myFrame.geometricBounds;var myGraphicWidth = myBounds[3]-myBounds[1];//Move the graphic frame.var myPageWidth = myDocument.documentPreferences.pageWidth;var myTopMargin = myDocument.pages.item(0).marginPreferences.top;myFrame.move([myPageWidth-myGraphicWidth, myTopMargin]);//Apply a text wrap to the graphic frame.myFrame.textWrapPreferences.textWrapMode = TextWrapModes.BOUNDING_BOX_TEXT_WRAP;myFrame.textWrapPreferences.textWrapOffset = [24, 12, 24, 12];}
Congratulations! You've now created your first advanced InDesign script.