Development best practices
The following best practices, which, focus on webhooks and secure communication, help developers create extensibility applications in Adobe Commerce.
Secure webhook communication using OAuth credentials
Since the webhook URL is easily accessible, it is important to secure it. The following steps outline recommended best practices for secure communication between App Builder and Adobe Commerce.
After configuring OAuth credentials in Adobe Commerce webhooks subscription, the required headers Authorization and x-gw-ims-org-id for OAuth authentication are automatically added to the webhook calls from Adobe Commerce to your App Builder application. The Bearer token in the Authorization header is generated and cached so it can be reused for subsequent calls until it expires.
Step 1: Generate OAuth credentials from Developer Console
Retrieve the client secret, client ID, and organization ID from the Adobe Developer Console to authenticate the webhook calls from Adobe Commerce to your App Builder application.
Navigate to your project and select Stage.
In the Credentials section of the left-navigation pane, select OAuth Server-to-Server. The client and organization IDs are displayed.
Click Retrieve Client Secret and make a note of the client secret. This will only be displayed once. These credentials are required when configuring the integration in Commerce.
Step 2: Configure OAuth in Adobe Commerce
Configure OAuth in PaaS
PaaS onlyAdd developerConsoleOauth to your hook configuration in the webhooks.xml file.
Copied to your clipboard<method name="plugin.magento.out_of_process_shipping_methods.api.shipping_rate_repository.get_rates" type="after"><hooks><batch name="one"><hook name="add_shipping_rates" url="{env:APP_BUILDER_URL}/add-shipping-rates-dps" method="POST" timeout="5000" softTimeout="1" priority="300" required="true"><developerConsoleOauth><clientId>52625ea6402148d0be11989c7024de84</clientId><clientSecret>p8e-12345-678910</clientSecret><orgId>12345@AdobeOrg</orgId></developerConsoleOauth><fields><field name="rateRequest" /></fields></hook></batch></hooks></method>
Instead of hardcoding the OAuth credentials in the webhooks.xml file, you can also use environment variables to enhance security. Use the following syntax to reference environment variables:
Copied to your clipboard<developerConsoleOauth><clientId>{env:CLIENT_ID}</clientId><clientSecret>{env:CLIENT_SECRET}</clientSecret><orgId>{env:ORG_ID}</orgId></developerConsoleOauth>
Configure OAuth in ACCS
SaaS onlyLog in to the Commerce Admin and navigate to System > Webhook Subscriptions. Select the webhook you want to configure.
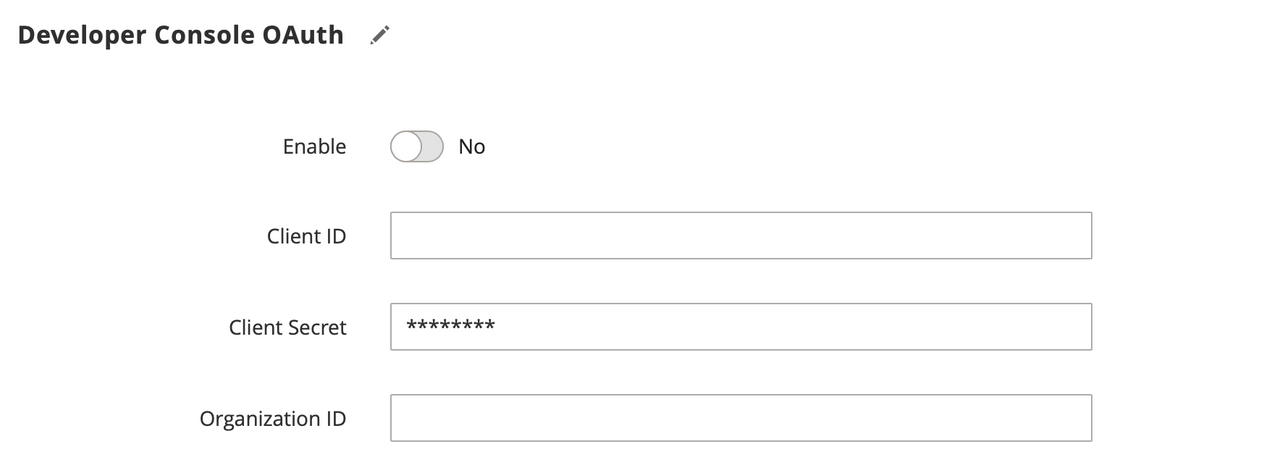
Expand the Developer Console OAuth section, enable it, and enter the values for the Client ID, Client Secret, and Organization ID fields. These values must match the credentials you retrieved from the Developer Console in Step 1.

Configure OAuth through API
You can provide OAuth credentials when subscribing to a webhook through the API. For more information, see the developerConsoleOauth field in the Subscribe to a webhook endpoint.
Copied to your clipboard{"webhook": {....,"developer_console_oauth": {"client_id": "3117813-735byzantiumduck-stage","client_secret": "p8e-12345","org_id": "12345@AdobeOrg"}}}
Step 3: Enable Adobe Authentication in App Builder
In your App Builder project code, open the app.config.yaml file and set require-adobe-auth to true. Then, rebuild and deploy the project using the following command:
Copied to your clipboardaio app deploy
Step 4: Test the secure webhook call
You can now test the webhook from Adobe Commerce by adding a product. The calls are securely authenticated using the configured OAuth credentials.
Redeploy changes
After making changes to your App Builder project, you need to redeploy the application using the following steps to ensure that the changes take effect:
If you have made changes to the action code, run the following commands:
Copied to your clipboardaio app build
If you have multiple actions in your project and want to deploy only a specific action you modified, run the following command to rebuild and redeploy only the specified action.
Copied to your clipboardaio app deploy --action=webhook/product-update
Retrieve an action URL
To get the URL of an action you created, run:
Copied to your clipboardaio runtime action get testwebhook --url
Webhook troubleshooting and debugging tips
For detailed webhook logs, navigate to System > Webhook Logs in the Admin.
If there are configuration errors in the webhook setup for this specific use case, when a product is added to the catalog, the Commerce UI will display the message Cannot perform the operation due to an error. This can occur if hook fields are configured incorrectly.
To rule out an issue with the App Builder code, you can use the aio app dev command to generate the action URL, which should point to localhost. Then test the action code with the payload using the curl command or a REST API testing tool, such as Postman. If the action executes successfully outside of Commerce, the issue is likely a configuration error within the Commerce instance.
App Builder configuration considerations
If you set web: 'no' in the app-config.yaml file, the action will be treated as a non-web action, which means:
- The action will not have a public HTTP endpoint.
- It cannot be invoked directly by external systems (such as Adobe Commerce).
- It is only accessible internally within Adobe I/O Runtime, such as through events or other actions.
If a webhook in Adobe Commerce is configured to call this non-web action, it will fail silently or throw a generic error. For example, when trying to add and save a product in the Commerce Admin UI, you will see the following error message:
Cannot perform the operation due to an error.
This error occurs because Commerce cannot reach the non-web action endpoint.
To resolve this error for any action triggered by a Commerce webhook, make sure to define it as a web action by setting web: 'yes' in the app-config.yaml file. This ensures the action is exposed through a public URL and can be properly invoked by Adobe Commerce.
For further assistance or inquiries, please post your question in the #app-builder-community.

