Development Tools
This section provides a set of guides to help you in the development stage of your add-on.
Add-on Development mode
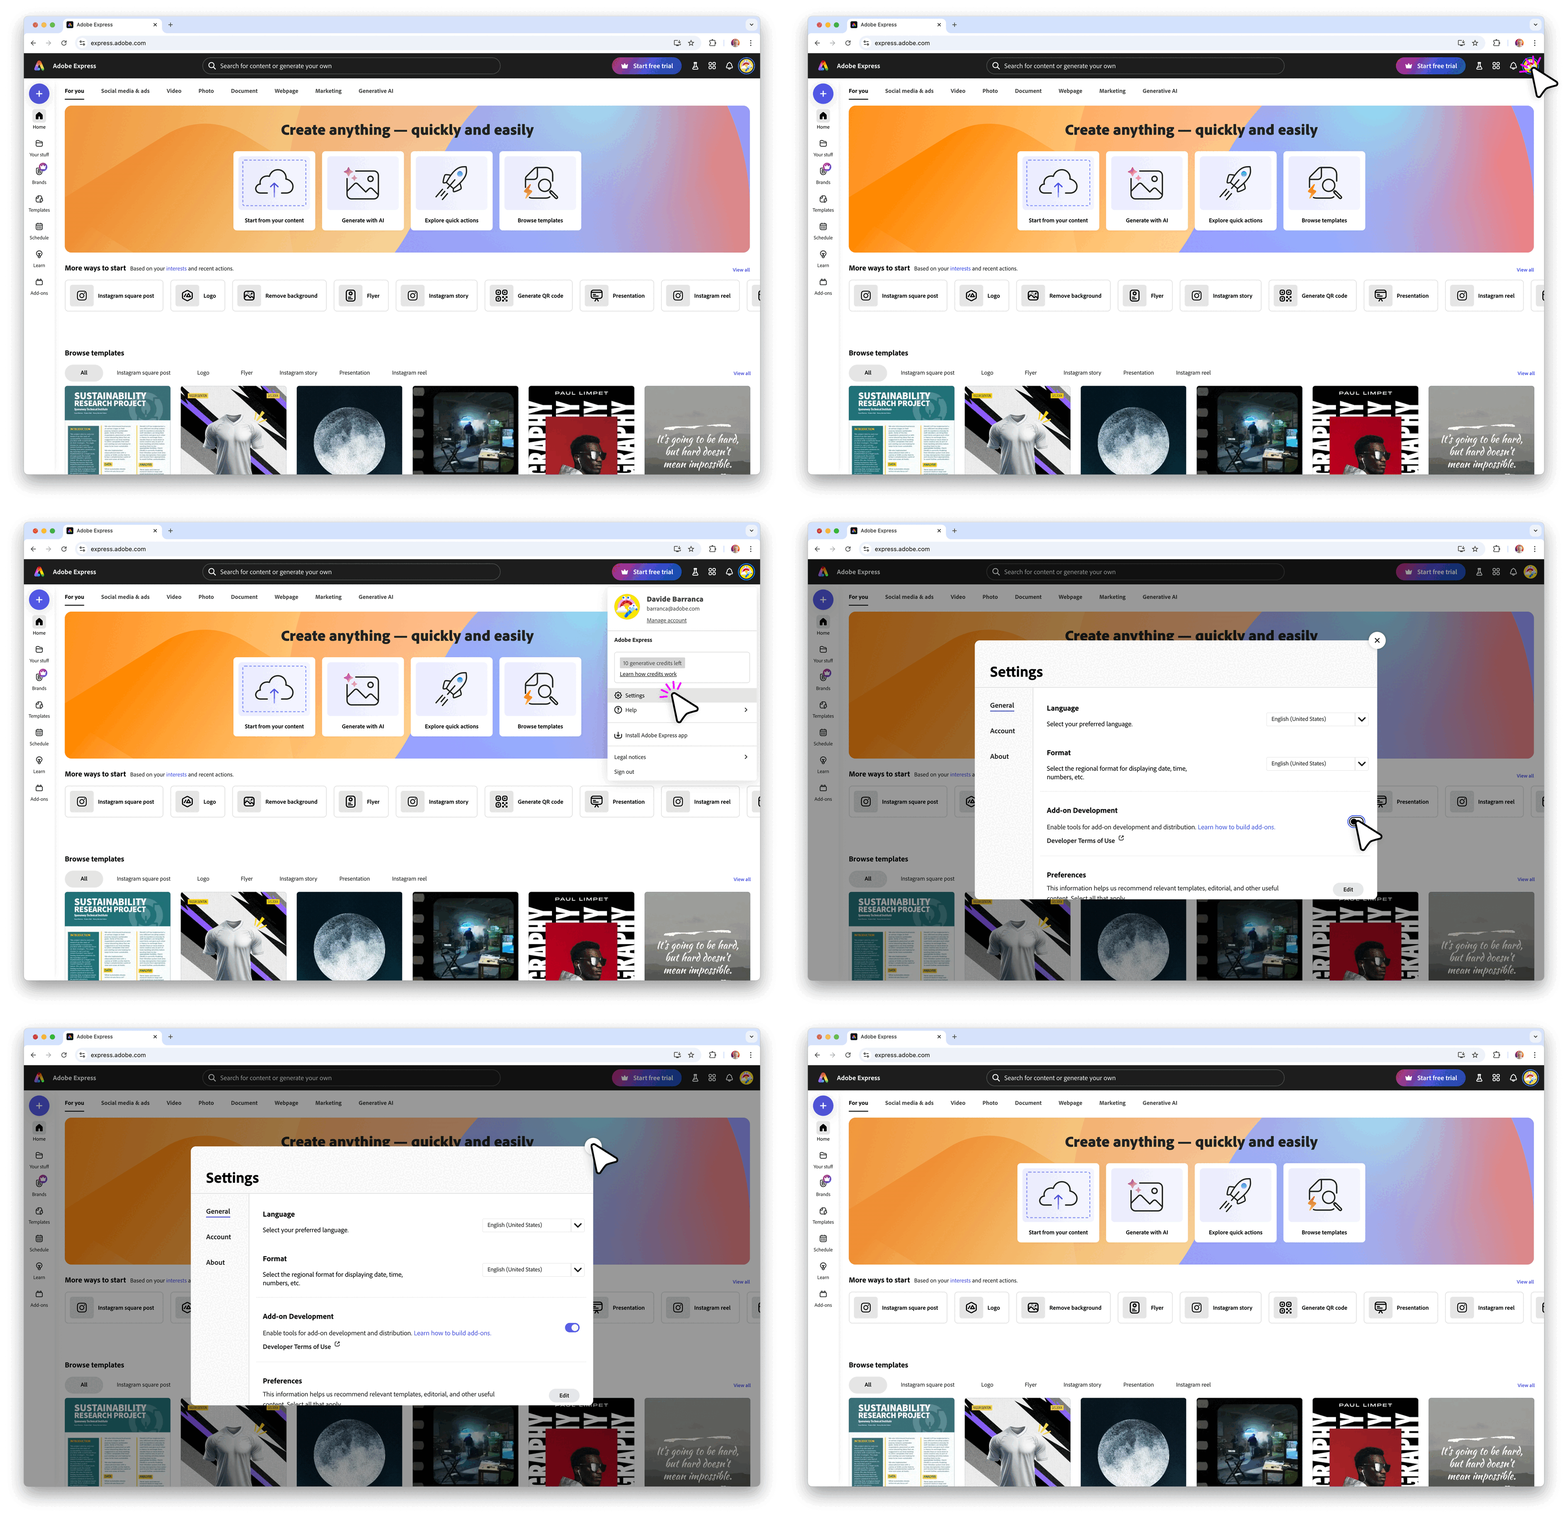
A pre-requisite for local development is to have enabled the Add-on Development mode in Adobe Express; open it in the browser, see the following animation for instructions, or expand the details below for a step-by-step guide.

Click to view a list of steps to enable the Development Mode
- Click the avatar icon in the top right corner of Adobe Express, then the gear icon to open the Settings.
- Enable Add-on Development if it's not already enabled. You might need to read the Developer Terms of Use first.
- Close the Settings dialog.
Using the CLI
The add-on CLI (Command Line Interface) is the main tool that enables you to develop, test, and package add-ons for our platform. With the add-on CLI, you can create a new add-on project, build and test your add-on locally, and package your add-on for distribution.
Here are some key features of the add-on CLI:
- Project creation: The add-on CLI provides a command to create a new add-on project with a basic file structure and configuration.
- Local development: The add-on CLI includes a built-in server that allows you to test your add-on locally before deploying it to our platform.
- Live reloading: The add-on CLI watches your project files for changes and automatically reloads the server when a change is detected.
- Packaging: The add-on CLI provides a command to package your add-on for distribution, including creating a ZIP file that can be uploaded to our platform.
CLI create options
The table below shows the list of arguments that can be specified with the CLI create command (ie: npx @adobe/create-ccweb-add-on):
| Argument | Optional | Default Value | Description |
|---|---|---|---|
add-on-name | No | Name of the add-on. A new add-on project with this argument will be created in the user's current working directory. | |
template | Yes | none, you will be prompted from the CLI | The template to use for creating the add-on. |
verbose | Yes | false | Setting this argument enables the verbose flag on the underlying operations. |
For instance, the following command would specify all possible arguments:
Copied to your clipboardnpx @adobe/create-ccweb-add-on my-addon --template react-typescript --verbose
See the templates section for the currently supported template values.
npx is an npm package runner that can execute packages without installing them explicitly. If needed, please run this command to clear the npx cache to ensure the latest version of the CLI is invoked.
Copied to your clipboardnpx clear-npx-cachenpx @adobe/create-ccweb-add-on my-addon
The above may prove useful when updated versions of the CLI are released. If you want to read each individual CLI command manual page, run them via npx with the --help flag, for example:
Copied to your clipboardnpx @adobe/ccweb-add-on-scripts start --help
start script options
The table below shows a list of arguments that can be specified with the start script on your add-on project, which starts up the add-on in a local server:
| Argument | Optional | Default Value | Description |
|---|---|---|---|
src | Yes | src | Directory where the source code and assets for the add-on is present. |
use | Yes | Transpiler/bundler to be used. For example, webpack. | |
port | Yes | 5241 | Local development server port. |
verbose | Yes | false | Setting this argument enables the verbose flag on the underlying operations. |
For instance, to specify a port of 8080 instead, use the following command:
Copied to your clipboardnpm run start -- --port 8080
To specify you want to use webpack AND port 8080:
Copied to your clipboardnpm run start -- --use webpack --port 8080
The extra arguments are unnecessary unless you do not want to use a transpiler/bundler or use the default port of 5241. Also, note that all of the templates other than the javascript template are pre-configured to use webpack by default and the --use webpack is automatically added when you run the build and start commands. Take a look at the scripts property in the package.json of those templates and you will see the following:
Copied to your clipboard"scripts": {"clean": "ccweb-add-on-scripts clean","build": "ccweb-add-on-scripts build --use webpack","start": "ccweb-add-on-scripts start --use webpack"}
Templates
The add-on CLI contains built-in, pre-configured templates to allow you to create an add-on project based on your favorite development stack in the quickest possible manner. There are currently five base template options based on popular web development trends. The table below summarizes the templates and their associated frameworks.
| Template | Framework |
|---|---|
javascript | JavaScript |
swc-javascript | JavaScript with Spectrum Web Components support |
swc-typescript | TypeScript with Spectrum Web Components support |
react-javascript | React with JavaScript |
react-typescript | React with TypeScript |
As well as the following five template options, which include support for the Document Sandbox APIs:
| Template | Description |
|---|---|
javascript-with-document-sandbox | JavaScript with Document Sandbox support. |
swc-javascript-with-document-sandbox | JavaScript and Spectrum Web Components with Document Sandbox support. |
swc-typescript-with-document-sandbox | TypeScript and Spectrum Web Components with Document Sandbox support. |
react-javascript-with-document-sandbox | React and JavaScript with Document Sandbox support. |
react-typescript-with-document-sandbox | React and TypeScript with Document Sandbox support. |
You can supply any of the above template names after the --template parameter:
Copied to your clipboardnpx @adobe/create-ccweb-add-on <add-on-name> --template <template>
For instance, the following is an example of a command that will create an add-on based on the react-javascript template:
Copied to your clipboardnpx @adobe/create-ccweb-add-on helloworld-react-js --template react-javascript
and below is how you could specify the react-javascript-with-document-sandbox template:
Copied to your clipboardnpx @adobe/create-ccweb-add-on helloworld-react-js-doc-sandbox --template react-javascript-with-document-sandbox
No template parameter
The template parameter is optional, and the CLI will prompt you to choose from a list of template options if it's excluded. For instance, if you use just the base CLI command:
npx @adobe/create-ccweb-add-on <add-on-name>
you will see the following prompt from the CLI:

which shows the five base template options to choose from, followed by a prompt to ask if you want to add the Document Sandbox support once you choose the base template.

You will also see a message in the CLI output notifying you of which template the project was scaffolded with for reference:

Please note that to use Spectrum Web Components in your add-on's UI, Webpack is required. All templates, except for the javascript and javascript-with-document-sandbox templates, are pre-configured to use Webpack by default.
If you don't want to use TypeScript or React, please refer to this sample add-on as an example of a JavaScript/Webpack project with Spectrum Web Components support.
When the scaffolding is complete, you will see the following message, prompting you to navigate to the newly created project directory and start the local development scripts:

Manifest
A manifest.json file is required in every add-on project. The manifest provides details including important metadata about your add-on and how it should behave. Be sure to consult the manifest schema reference to ensure that your manifest.json file is properly formatted and includes all of the necessary properties and values.
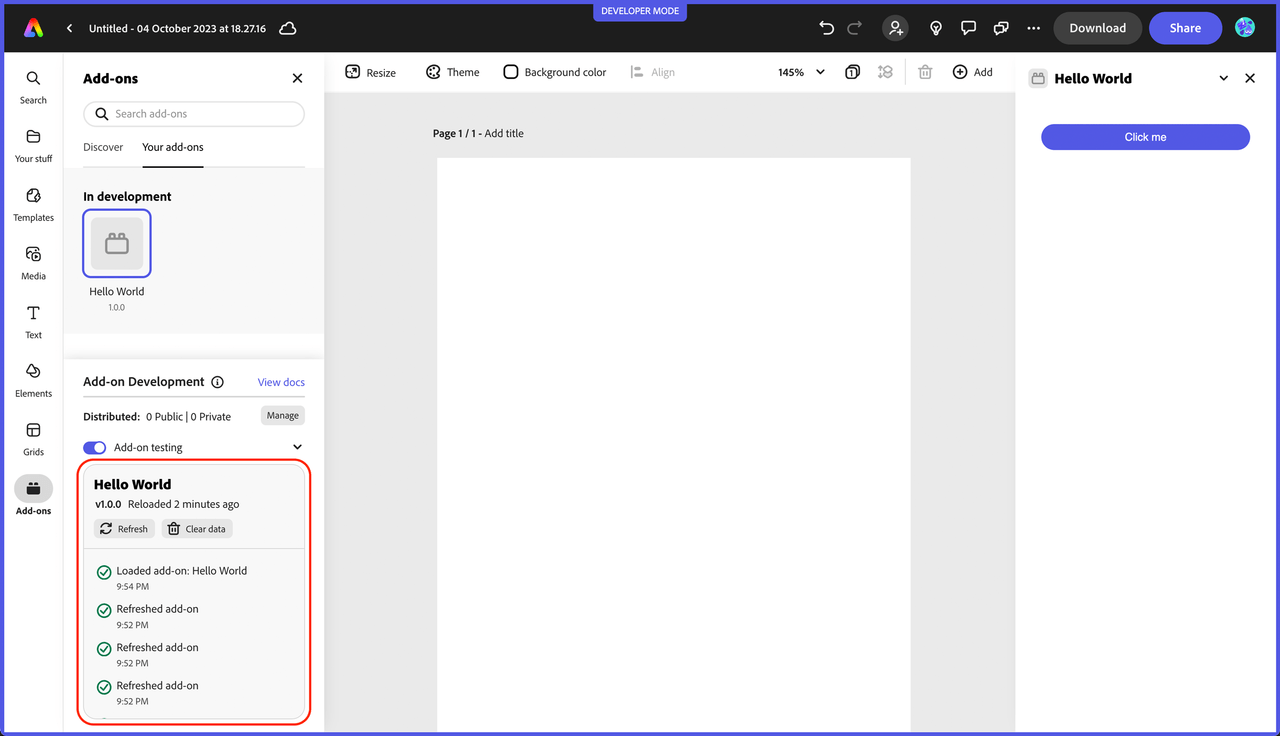
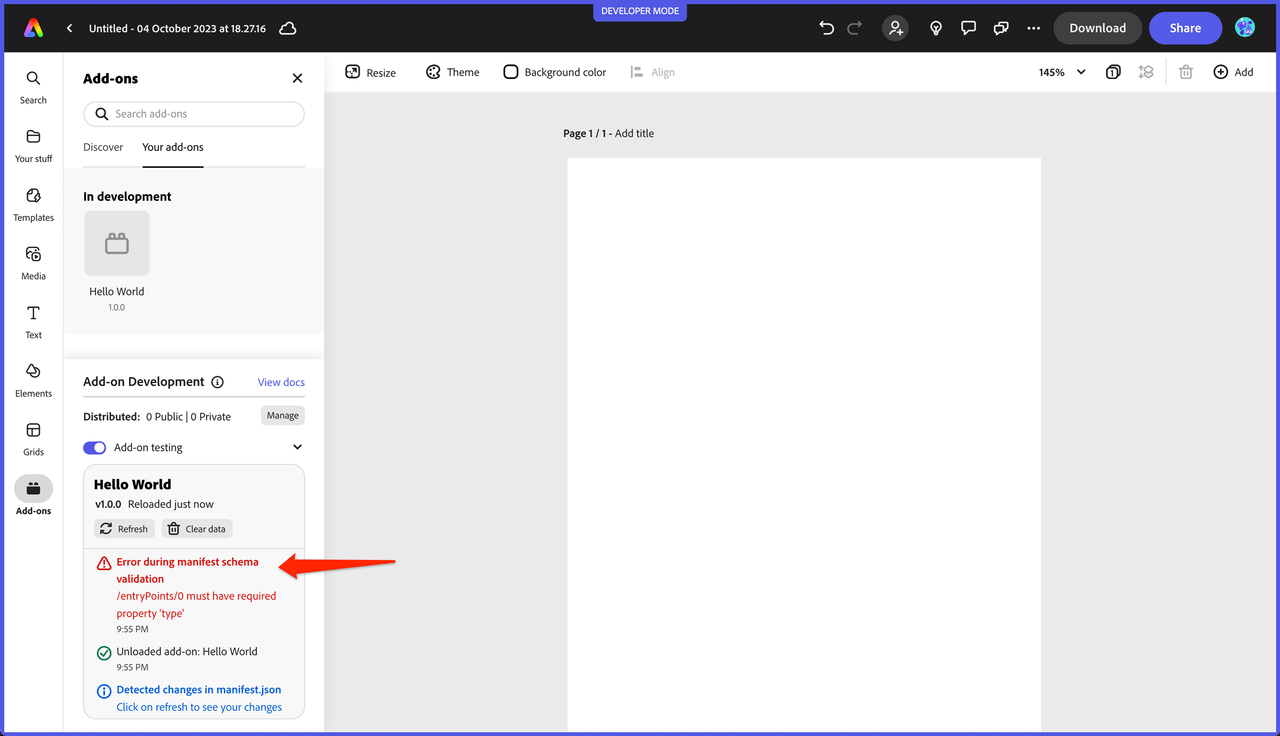
Add-on Development Tools Panel
The Add-on Development tools panel provides useful logging details indicating the status of your add-on, as well as action buttons to allow for refreshing and clearing the data associated with your add-on. The panel is shown in the screenshots below for reference:
The Refresh button can be used to reload your add-on's code and resources, and the Clear Storage button allows you to clear any data stored by your add-on.


