Hello, World!
In the great tradition of programming tutorials, we'll start by building a simple "Hello, World!" add-on.
This guide is divided into two tracks, which you can follow independently of each other, based on your experience and preferences.
| Code Playground Track | Command Line Interface (CLI) Track |
|---|---|
Already available in Adobe Express | Requires installation |
Browser-based sandbox | Local development |
Limited to built-in APIs | Full support for external packages |
Best for Learning & prototyping | Best for Production development |
Simple to moderate add-on's complexity | Moderate to complex add-ons |
The Code Playground path is based on a browser sandbox that runs instantly, requires no installation, and lets you explore add-on APIs with real-time feedback directly inside Adobe Express. If you are new to add-on development, or prefer to tinker-to-learn, then begin in the Playground to familiarise yourself with the environment; you can always try the CLI later.
The Command Line Interface (CLI) path will teach you to set up a local development environment, complete with a build pipeline, that allows you to build more complex add-ons that include external dependencies. This is the preferred path for developers who want fully control. You can always prototype rapidly in the Playground and transition to the CLI whenever project complexity calls for it.
Prerequisites
- An Adobe Express account (use an existing Adobe ID or simply create one for free).
- Basic familiarity with JavaScript, HTML and CSS.
- Node.js version 18 or higher (optional, only for the CLI track).
Add-on Development mode
A pre-requisite for both tracks is to have enabled the Add-on Development mode. Open Adobe Express in the browser and see the following animation for instructions, or expand the details below for a step-by-step guide.

Click to view a list of steps to enable the Development Mode
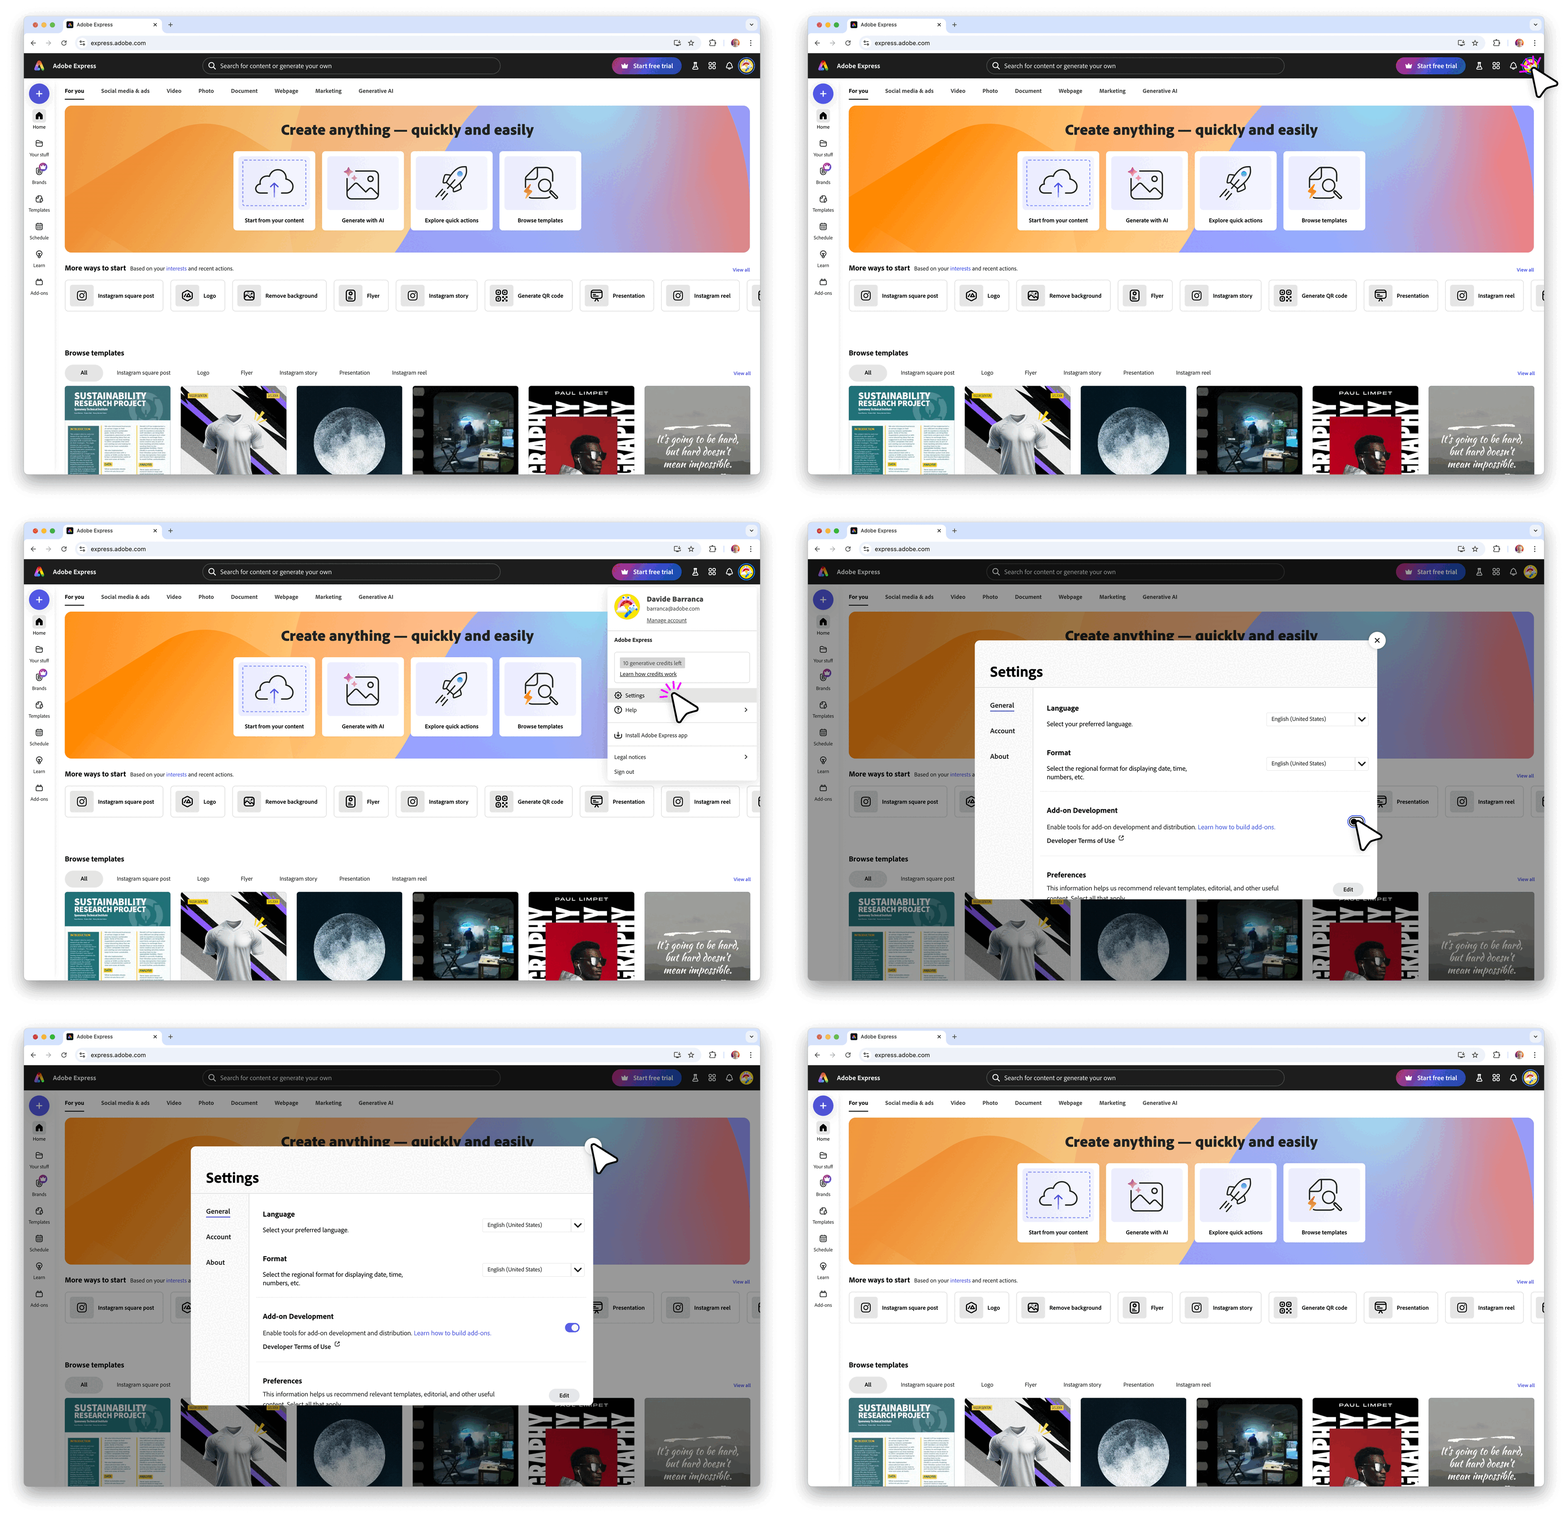
- Click the avatar icon in the top right corner of Adobe Express, then the gear icon to open the Settings.
- Enable Add-on Development if it's not already enabled. You might need to read the Developer Terms of Use first.
- Close the Settings dialog.
Code Playground
We have a dedicated page for the Code Playground, which you can always refer to for more detailed information. Here, we'll focus on the basics to get you started, linking to the relevant sections of the full documentation and including screenshots to help you navigate the interface.
1. Launch it
To launch the Code Playground, see the following animation or expand the details below for a step-by-step guide.

Click to view a list of steps to open the Code Playground
- Click the Add-ons icon in the left hand rail.
- Enable the Add-on Development switch on the top right corner.
- Click the Launch code playground button.
- Click the Script tab.
2. Run your first script
The Code Playground allows you to operate in two modalities:
- Script: directly runs code that operates on the current document.
- Add-on: creates an add-on, with a custom User Interface and logic, that is able to run code on the current document.
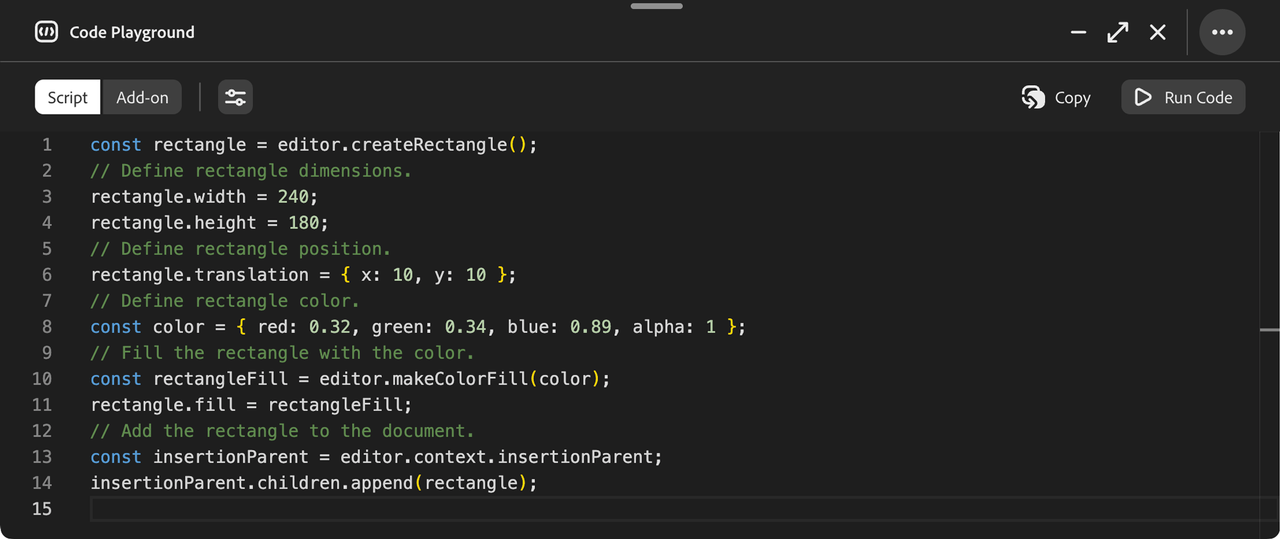
Make sure you've selected the Script tab, which is pre-filled with a sample script:

Click the Run Code button on the Playground's toolbar to see the rectangle added to the document. Not much, but it's a start!
3. Edit the script
Feel free to tweak the script to change the properties in the color object, or the translation and Rectangle dimensions; click Run Code again to see what happens.
To get a feel of the available APIs, visit the How-to guides and copy and paste code snippets into the Playground. For instance, check out the Use Text page and try the following script for the original "Hello World" experience.
Copied to your clipboard// Create a new TextNodeconst textNode = editor.createText("Hello,\nWorld!");// Center the text on the pageconst insertionParent = editor.context.insertionParent;textNode.setPositionInParent({ x: insertionParent.width / 2, y: insertionParent.height / 2 },{ x: 0, y: 0 });// Add the TextNode to the documentinsertionParent.children.append(textNode);// Get the text contentconsole.log("Text: ", textNode.fullContent.text);
You've been using the Document Sandbox APIs, a very extensive set of APIs that let you create all sorts of objects and manipulate the Adobe Express documents. They are documented in the SDK References and explained in detail in the Platform Concepts section.
4. Create an add-on
Click the Add-on tab to switch to the Add-on mode. You'll see that the Playground now shows four tabs:
HTML: controls the add-on's User Interface.CSS: adds styles.Iframe JS: the add-on's logic.Document JS: the Document Sandbox APIs (that is, the code that you've been using in the Script tab).
This time, clicking Run Code will make a new add-on appear on the right side of the screen. You can see and change its code in the HTML, CSS (UI and styles) and Iframe JS tabs (button click event). The "Create Rectangle" button runs the Document JS code, which does exactly what you would expect!

Script mode vs. Document JS
Even if the result of both the Script and Add-on modes in the Code Playground is the same rectangle being added to the document, you'll see that the code is different. Why? The Script mode is a simplified, prototype-friendly environment that takes care of many things under the hood, while the Add-on code needs to take care of the communication between the UI and the Document Sandbox APIs. More info here.
Command Line Interface (CLI)
The Adobe Express add-on CLI allows you to create and host Adobe Express add-ons directly from your local machine. Make sure you have enabled Add-on Development first.
1. Scaffold a new project
Open your Terminal and run the following command:
Copied to your clipboardnpx @adobe/create-ccweb-add-on hello-world --template javascript-with-document-sandbox
This command will scaffold a new add-on based on "pure" JavaScript with Document Sandbox support—the set of APIs that allow you to interact with Adobe Express documents.
npxis a package runner that can execute packages without installing them explicitly.@adobe/create-ccweb-add-onis the CLI maintained by Adobe to scaffold a new add-on.hello-worldis the name of the add-on projectyou are creating.- The
--templateflag specifies the template to use for the add-on; in this case,javascript-with-document-sandbox. The parameter is optional, and when missing, the CLI will prompt you to choose one from a list.
The Templates section on the Development Tools page provides a list of available options.
For Windows Users
If you're using the CLI in the terminal, you'll need to add openssl to the path under Environment Variables. If git is installed, openssl can be found at C:\Program >Files\Git\usr\bin. Otherwise, you can download git and add the directory location to the path variable in your Environment Variables.
CLI troubleshooting
If you run into problems, run this command to clear the npx cache and ensure the latest version of the CLI is invoked.
Copied to your clipboardnpx clear-npx-cachenpx @adobe/create-ccweb-add-on hello-world
The above may prove useful when updated versions of the CLI are released. If you want to read each individual CLI command manual page, run them via npx with the --help flag, for example:
Copied to your clipboardnpx @adobe/ccweb-add-on-scripts start --help
2. Build & start your add-on
Next, execute the following commands to change into the newly created hello-world add-on folder, build the add-on, and start the add-on in a local server:
Copied to your clipboardcd hello-world;npm run build;npm run start;
The start script will display messages like the following after it executes:
Copied to your clipboardDone. Your add-on 'hello-world' is hosted on: https://localhost:5241/
The add-on's code is now running on a local server; you must tell Adobe Express to load it.
3. Load & run your add-on
To sideload your add-on into Adobe Express, see the following animation or expand the details below for a step-by-step guide.

Click to view a list of steps to sideload an add-on in Adobe Express
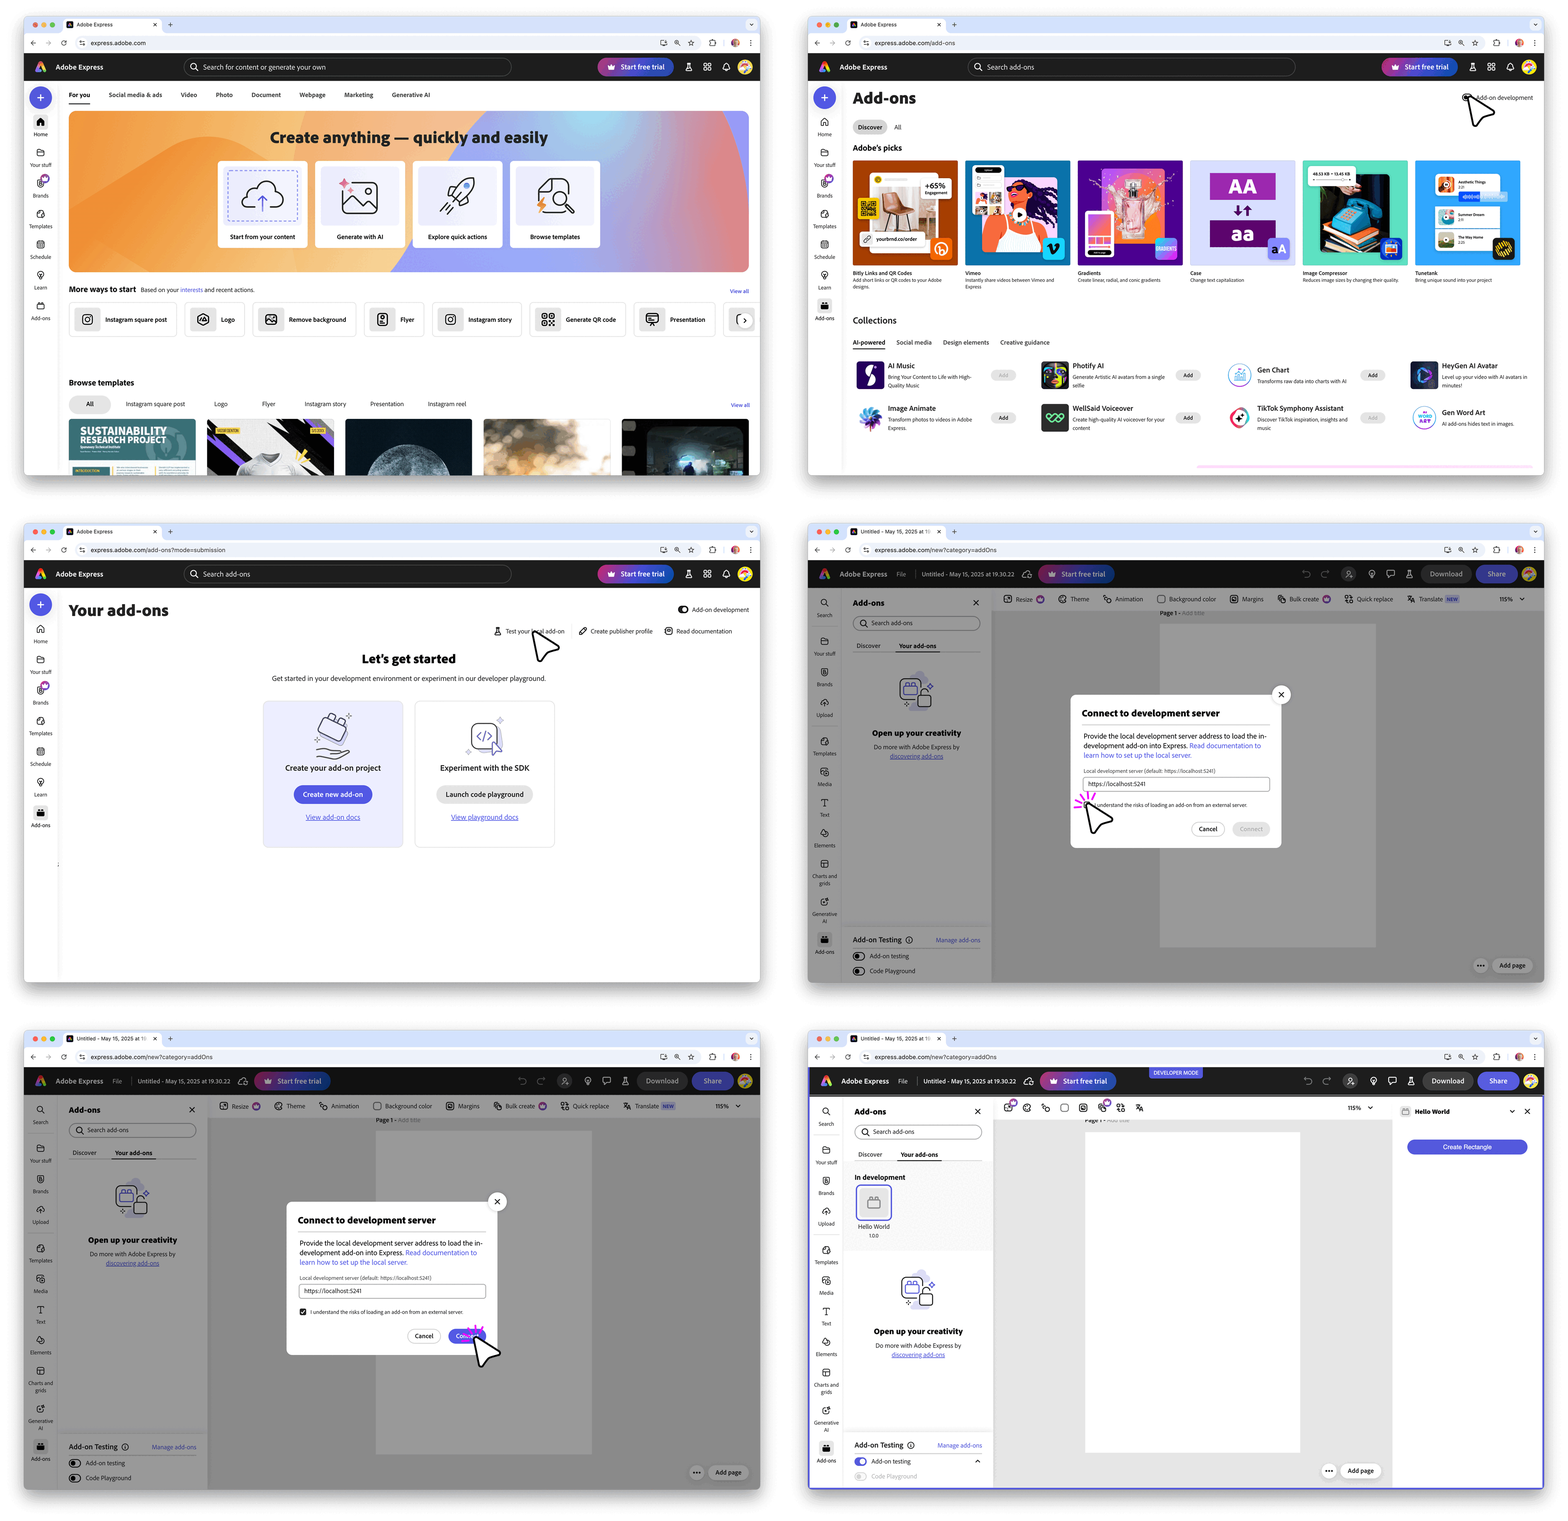
- Click the Add-ons icon in the left hand rail.
- Enable the Add-on Development switch on the top right corner.
- Click the Test your local add-on text.
- Check the checkbox in the Connect to development server modal.
- Click the Connect button.
- Click the Hello World add-on icon on the Add-ons tab on the left.
It's possible to achieve the same result when a document is already open clicking the Add-ons icon on the left hand rail, then browse to Your add-ons and switch on Add-on testing.
Click to see the screenshot

If you click the Create Rectangle button, you'll see the rectangle being added to the document.

4. Edit your add-on's code
While your add-on is still loaded and running, open the src/index.html file and update the "Create Rectangle" string in the <button> to something else, like Add Text. In the src/sandbox/code.js replace the body of the createRectangle() function with the following, borrowed from the Use Text how-to guide:
Copied to your clipboard// ...createRectangle: () => {// Create a new TextNodeconst textNode = editor.createText("Hello,\nWorld!");// Center the text on the pageconst insertionParent = editor.context.insertionParent;textNode.setPositionInParent({ x: insertionParent.width / 2, y: insertionParent.height / 2 },{ x: 0, y: 0 });// Add the TextNode to the documentinsertionParent.children.append(textNode);// Get the text contentconsole.log("Text: ", textNode.fullContent.text);},// ...
Note that the terminal where your add-on runs will display messages showing that the src has been rebuilt. Adobe Express has also updated the button label automatically, and the add-on will now add a "Hello, World!" text to the document.

You can continue to update your code while your add-on is running, and the add-on will automatically be rebuilt on save.
Manifest updates
Any changes to the manifest.json will require a manual reload of your add-on. The Add-on Development panel will indicate this in the log messages, and the Refresh button can be used to reload the add-on directly within Adobe Express.
Click to see the screenshot

Next steps
Congratulations! You've completed this Hello, World! guide and run your first add-on!
Next, check out the Code Playground page to discover all its features, and read the How To Guides to familiarise with the APIs and plug & play with code snippets. If you've liked the CLI track, in the Local Development section you can find more details and debugging instructions.
When you feel comfortable, you can dive into the Complete Projects, where we'll help you build fully-working add-ons from the ground up—the best way to learn is by doing! We also have an extensive collection of code samples, that are a great resource to help you get started building your own add-ons.
