Extend an appearance
In this topic, you will learn how to add a new user-defined property to an existing content type. Specifically, we will add a max-height property to all the Banner appearances. Why? Because our customers told us to, drill sergeant. (WTM?).
Scenario: Your customers use Banners to feature products on their site. However, they don't like the fact that the Banner's height grows with the content they enter. So they want you to add a max-height field to all the Banner appearances. That way they can limit all their banners to the same height, and have their extra content scroll as needed.
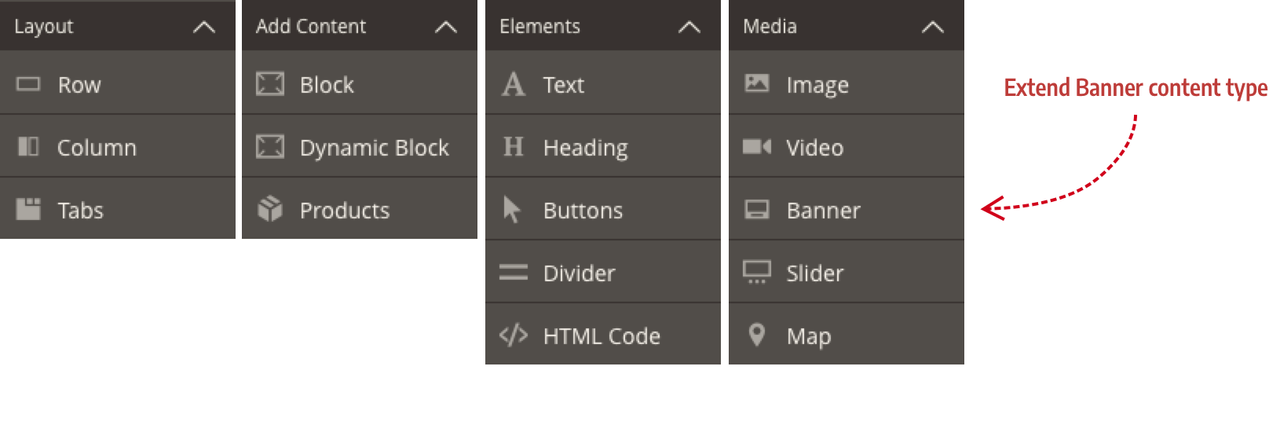
Steps to extend appearances
These steps describe the basic process for adding new style properties to existing content type appearances:
Add static styles (as needed).
Step 1: Create a Page Builder extension module
Use the PB Modules CLI to create the starting directory structure and files for a Banner extension. Instructions for using PB Modules can be found in the repo README.md file.
Navigate to your
<magento-instance-root>/app/code/directory and run the following command:Copied to your clipboardnpx https://github.com/commerce-docs/pbmodules.gitExtend the
Bannerand complete the remaining prompts. When finished, you should have a complete directory structure and all the files you need (plus extras) to start extending the Banner.
Before continuing, run
bin/magento setup:upgradeto install and enable your module.
Step 2: Add new properties to elements
Now we can add our max-height property to the right element in all the Banner appearances. But which element?
We know that the Banner's content is making the Banner grow. So we need to find the element node that controls text. And here it is:
Copied to your clipboard<element name="content"><html name="message" preview_converter="Magento_PageBuilder/js/converter/html/directive"/></element>
The use of an html node confirms it. The <html> element allows the value for a field to be output as HTML. We can confirm this as the right element by looking at the preview.html and master.html templates for the HTML elements that are bound to the content element:
Copied to your clipboard<!-- master.html --><div attr="data.content.attributes"ko-style="data.content.style"css="data.content.css"html="data.content.html"></div><!-- preview.html --><div if="isWysiwygSupported()"class="inline-wysiwyg"ko-style="data.content.style"css="data.content.css"attr="data.content.attributes"afterRender="afterRenderWysiwyg"contenteditable="true"event="mousedown: stopEvent, click: activateEditor, dblclick: handleDoubleClick"></div>
Both templates have <div> elements with several attributes bound to <element name="content">, including the html attribute on the frontend template (master.html). We can safely say that this is right element for our max-height property.
Because max-height is an official CSS property, we will add it using the style node as follows:
Copied to your clipboard<element name="content"><style name="max_height" source="max_height" converter="Magento_PageBuilder/js/converter/style/remove-px"/></element>
Attributes of the style node are described briefly here:
name— name used to bind to the form field with the same name.source— name of the CSS property in snake_case. Page Builder changesmax_heighttomax-heightwhen writing it to the DOM.converter— JavaScript function that converts internal property values to and from the DOM because DOM values are often not in the right format for internal processing.
To add the max-width property to the content element of each appearance:
Open your module's
banner.xmlconfiguration file.Remove the
previewandmastertemplates as well as themainelement nodes from each appearance.Add your new
contentelement andstylenode to theelementsnode of each appearance.
When you are done, the appearances section of your banner.xml configuration file should look like this:
Copied to your clipboard<appearances><appearance name="collage-left"><elements><element name="content"><style name="max_height" source="max_height" converter="Magento_PageBuilder/js/converter/style/remove-px"/></element></elements></appearance><appearance name="collage-centered"><elements><element name="content"><style name="max_height" source="max_height" converter="Magento_PageBuilder/js/converter/style/remove-px"/></element></elements></appearance><appearance name="collage-right"><elements><element name="content"><style name="max_height" source="max_height" converter="Magento_PageBuilder/js/converter/style/remove-px"/></element></elements></appearance><appearance name="poster"><elements><element name="content"><style name="max_height" source="max_height" converter="Magento_PageBuilder/js/converter/style/remove-px"/></element></elements></appearance></appearances>
Step 3: Add your property fields to the form
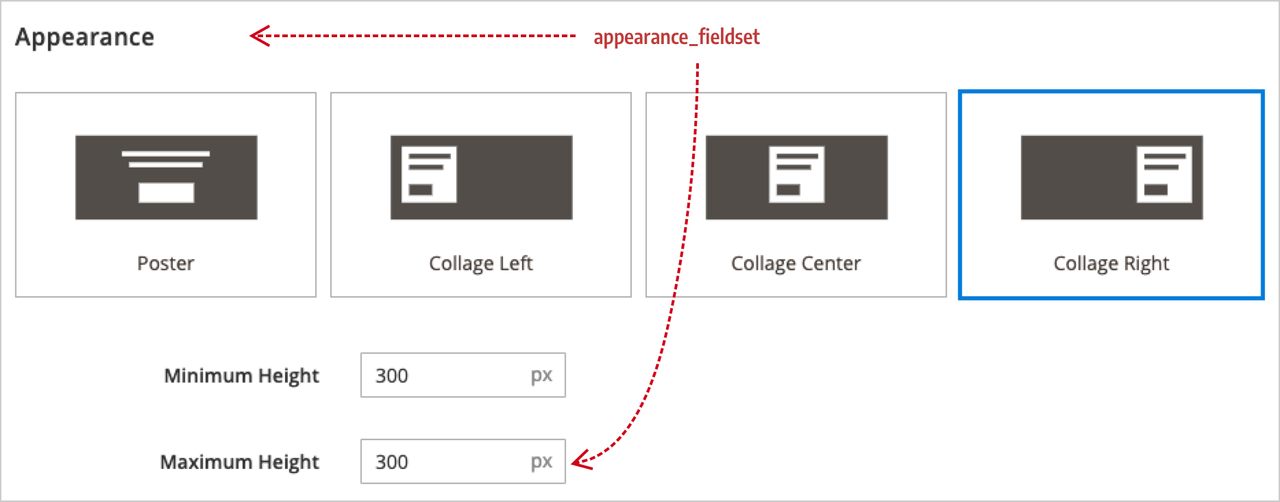
Before you add a field to the form of an existing content type, you need to decide where to add it. In other words, you need to pick a fieldset for your field. For our max_height field, it makes sense to add it below the Banner's existing min_height field, which is in the the appearance_fieldset.
In our example, we used the following markup for our max_height field:
Copied to your clipboard<form xmlns:xsi="http://www.w3.org/2001/XMLSchema-instance" xsi:noNamespaceSchemaLocation="urn:magento:module:Magento_Ui:etc/ui_configuration.xsd"><!-- Full Form: Magento/PageBuilder/view/adminhtml/ui_component/pagebuilder_banner_form.xml --><fieldset name="appearance_fieldset"><field name="max_height" sortOrder="30" formElement="input"><argument name="data" xsi:type="array"><item name="config" xsi:type="array"><item name="default" xsi:type="number">400</item></item></argument><settings><label translate="true">Maximum Height</label><additionalClasses><class name="admin__field-small">true</class></additionalClasses><addAfter translate="true">px</addAfter><dataType>text</dataType><dataScope>max_height</dataScope><validation><rule name="validate-number" xsi:type="boolean">true</rule></validation></settings></field></fieldset></form>
Explaining UI component form fields is beyond the scope of this topic, but a few brief descriptions of the most important nodes might help those of you who are not familiar with UI components. If you already know about UI components, feel free to skip this part.
| Elements | Description |
|---|---|
fieldset | The fieldset name should match the name of the fieldset from the Banner's form. The appearance_fieldset is common to all the content type forms and, by default, appears at the top of the forms using the sortOrder of 10. If you used PB Modules, the fieldset node names were copied from the Banner's form, so you're all set. |
field | The field name should match your style node name in your banner.xml config file. The same is true if you are adding attribute, css, html, or tag nodes; their names should match the field names that supply their values. Fields also have a sortOrder you can use to place your field above or below existing fields. The formElement for a field describes the HTML form type, such as input, wysiwyg, select, checkbox and more. |
argument > config | Provides the initial configuration for the field, including the default value. We set our default max_height field to 400 (px). |
settings | Provides the field with a label, CSS styling, validation, and other properties as needed. |
Step 4: Add static styles
For this Banner extension to work as expected, we need to add a CSS overflow property to the content element in the DOM. Specifically, we need to add overflow-y: auto to ensure that when the Banner reaches its max-height setting, any extra content can be scrolled vertically. And using auto (not scroll) hides the scroll bar when there's nothing to scroll.
In this case, the overflow property is considered a static style because users don't set it and there is no logic that changes its value for different conditions. The overflow property is also essential to the proper rendering of our Banner extensions because of the max-height user-defined property we added.
These qualities make the overflow property a perfect use case for adding it as a static_style on the content element. See static_style and static_attribute elements for more about these configuration elements.
Add overflow-y as a static_style property for each appearance:
Copied to your clipboard<appearances><appearance name="collage-left"><elements><element name="content"><style name="max_height" source="max_height" converter="Magento_PageBuilder/js/converter/style/remove-px"/><static_style source="overflow-y" value="auto" /></element></elements></appearance><appearance name="collage-centered"><elements><element name="content"><style name="max_height" source="max_height" converter="Magento_PageBuilder/js/converter/style/remove-px"/><static_style source="overflow-y" value="auto" /></element></elements></appearance><appearance name="collage-right"><elements><element name="content"><style name="max_height" source="max_height" converter="Magento_PageBuilder/js/converter/style/remove-px"/><static_style source="overflow-y" value="auto" /></element></elements></appearance><appearance name="poster"><elements><element name="content"><style name="max_height" source="max_height" converter="Magento_PageBuilder/js/converter/style/remove-px"/><static_style source="overflow-y" value="auto" /></element></elements></appearance></appearances>
As shown, all static_styles (and static_attributes) are simple to add, with only two attributes:
source— refers to the name of the CSS property.value— refers to the value you want to set for that property.
The hardest part is knowing when to add them to a configuration.
static_style or stylesheet style?
When should you add a style (CSS property) as a static_style in your configuration, versus adding that style as a property within a CSS selector in your stylesheet?
We offer these guiding principles:
Both options are valid when the style property's value is:
Not set by users
Not changed by code
Use stylesheets when the style property's value is:
- NOT REQUIRED to render the appearance correctly
Use static_style when the style property's value is:
- REQUIRED to render the appearance correctly
You will have to evaluate which of your extending style properties are required to render your content type's appearance as it was intended, without the addition styles that are external to the configuration.
Step 5: Add stylesheet styles
For styles that are not required for the basic rendering of your appearances, add them to your .less files in your css/source directories. From there, you can use them to target the elements you want to style. Here's how.
Open your module's Admin and frontend _default.less files (assuming you used PB Modules to create your module):
adminhtml/web/css/source/content-type/banner/_default.lessfrontend/web/css/source/content-type/banner/_default.lessWithin your less files, you can use Page Builder's CSS selector override pattern to create CSS selectors that target the
[data-element="<name-of-element>"]attribute in the DOM. This is the way to style any element in your content type from your CSS/Less stylesheets.
Styling best practices: If you don't know how Page Builder styles content, you need to stop reading this topic, go read that topic, then come back and continue. Knowing how Page Builder styles its content (and yours) is an essential part of mastering appearances. When you know how Page Builder generates and applies its CSS to the DOM, you gain control over your Page Builder styling destiny. No more dreams of selector magic shattered by nightmares of !importance. You can finally win the specificity war (in Page Builder).
Use case for stylesheet styles
Let's say your customers want to theme their content for Valentine's Day. They want you to change all the Banners to have a red background with white text.
In this case, you want to create a CSS selector that targets the banner content type, then the wrapper element within it (to change the background), then the content element (to change the text color).
Page Builder makes this easy by adding attributes to the HTML template elements when rendering them to the DOM. For Banners, Page Builder adds a data-content-type="banner" attribute to the top element of the Banner's templates to make it easy to target them in the DOM. Page Builder also adds a data-element="name" attribute to the HTML template elements that bind to a configuration element. The attribute takes the name of the element in the configuration.
We want to target the wrapper and content elements to make our CSS changes. So we start our selectors with #html-body followed by the banner, wrapper, and content attributes, and add our style properties like this:
Copied to your clipboard// Targeting the Banner elements on the frontend& when (@media-common = true) {#html-body {[data-content-type='banner'] {[data-element='wrapper'] {background-color: darkred;}[data-element='content'] {color: white;}}}}
The selectors for the background-color and the text color both have a specificity of 120, which overrides any styles Page Builder applies to the same DOM elements. And technically, you don't even need to look at the DOM to make this work. You just needed to know how Page Builder styles its content. (We, of course, look at the DOM all the time because its a great way to learn what attributes and classes Page Builder adds to your templates. Later, this can help you make creative decisions about what configuration and template elements you add to your extensions to get exactly what you want.)
When you get comfortable with targeting the element attributes, you can go much further with your styling customizations and theme nearly every element in your Banner extension:
Copied to your clipboard// Targeting the Banner elements on the frontend& when (@media-common = true) {#html-body {[data-content-type='banner'] {[data-element='wrapper'] {background-color: darkred;border-radius: 10px;}[data-element='overlay'] {max-width: 50%;}[data-element='content'] {color: white;margin-bottom: 25px;&::-webkit-scrollbar {display: none;}}[data-element='button'] {background: white;border: white;color: darkred;&::after {content: '❤️';display: inline-block;transform: translate(25px, -15px) rotate(25deg) scale(2);}}}}}
Notice how you don't have to worry about nesting beyond the banner attribute: [data-content-element='banner]. Our selectors for the wrapper, overlay, content, and button elements all have a specificity of 120. And that's all we need for our overrides.
Testing your work
After adding your CSS/Less, run your Less transpiler, clean your cache (bin/magento cache:clean), drag a new Banner to the Admin stage, open the form editor, and take a look at your new max-height field being rendered for every appearance in the form, similar to what's shown here:
Summary
Before you begin any Page Builder development, first explore whether you can meet your customer's needs by extending existing content types. If you can, you should. It's a quicker path to completion and less work than creating a completely new content type.
With more experience, you may be surprised at how often you can adapt existing content types to meet your customer's needs.
Next steps
You have two more topic options for learning more about using appearances to extend content types:
Extend another appearance where you will learn more about using the
attribute,style, andcsselements while extending a Heading content type.Add an appearance where you will learn how to add a completely new appearance to a content type.
