Integrating Firefly Services with Microsoft Power Automate
Microsoft's Power Automate is a powerful no-code solution that lets developers and non-developers alike create flexible workflows to automate processing using multiple different services. Firefly Services can be employed in the Power Automate platform and in this article, we'll walk you through the process of creating a sample workflow. Keep in mind that Power Automate is incredibly flexible and the example shown here is just one possible use of the platform.
Please note, this tutorial uses the Firefly Image Model 2. For details on using the Firefly Image Model 3 (preview) APIs, please see this guide.
Prerequisites
To complete this tutorial, you will need:
- Firefly API credentials. If you don't have them yet, first visit the Firefly Services Getting Started guide to obtain a
client_idandclient_secret. - An account with Microsoft and access to Power Automate.
Workflow
Our workflow will use the Firefly API to generate images. The steps involved are:
- Reading a set of prompts from a Microsoft list.
- Sending each prompt to Firefly.
- Take the result and send an email.
For simplicity's sake, this flow will be manually triggered, but certainly, but you could create a dynamically triggered workflow.
Step 1: Defining our prompts
As described earlier, we will use Microsoft List to define our prompts. We created a new list, named it Prompts, and added two simple values in the first column.

Step 2: Create the flow
Next, create a new Instant Power Automate flow. This will let us test as needed without being tied to any automatic process. Everything demonstrated in this article absolutely could run in that scenario.
Step 3: Read our list
PowerAutomate has steps that automatically integrate with Lists, so the next step will be to add the "Get items" action from Sharepoint. This will require you to configure the Sharepoint site hosting and select the list.
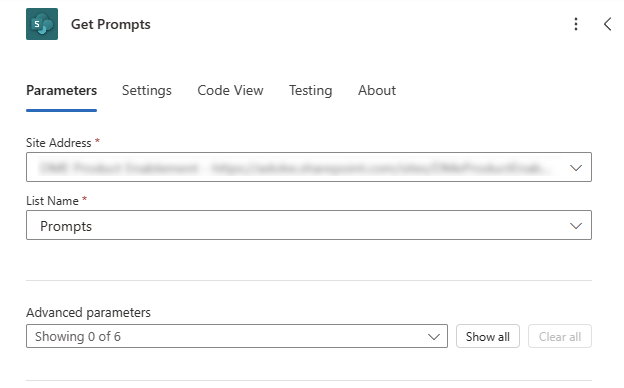
Note that we've renamed the action to Get Prompts.
Step 4: Define Variables
The following two actions are optional but help us out later in the flow. Create two actions to initialize variables. We're going to create two string values to store our Firefly authentication. The first one should use these values:
- Name:
FIREFLY_CLIENT_ID - Type:
String - Value:
Your client id
Name this step, Set Firefly Client ID.
The next one will use these values:
- Name:
FIREFLY_CLIENT_SECRET - Type:
String - Value:
Your client secret
Name this step, Set Firefly Client Secret.
At this point, your flow should look like this:
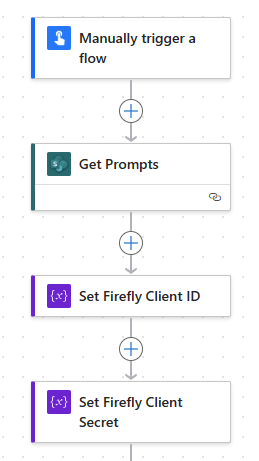
Step 6: Exchange Credentials
The next step will use the HTTP action to exchange our credentials for an access token. Add a new step, HTTP, and use the following URI:
Copied to your clipboardhttps://ims-na1.adobelogin.com/ims/token/v3?grant_type=client_credentials&client_id=@{variables('FIREFLY_CLIENT_ID')}&client_secret=@{variables('FIREFLY_CLIENT_SECRET')}&scope=openid,AdobeID,session,additional_info,read_organizations,firefly_api,ff_apis
As soon as you enter that value, the two variables section will change to reference the two earlier steps we defined. Set the method to POST and name the action, Get Access Token.
Follow this with a Parse JSON step. The content value will point to the body of the previous step. The schema will be the following:
Copied to your clipboard{"type": "object","properties": {"access_token": {"type": "string"},"token_type": {"type": "string"},"expires_in": {"type": "integer"}}}
This was created by using the "Use sample payload to generate schema" support in the step and by passing in a previous authentication result.
The net result of these two steps is to get an access token for Firefly calls and parse the result so Power Automate can make use of it.
Step 6: Initialize Image String
Before we start using the API, we need to define a variable, images, that we'll use for our results. Add a new step to initialize a variable with these values:
- name:
images - type:
String - value:
Leave blank
Name this step, "Initialize Image String".
At this point, your flow should look like this:

Step 7: Beginning the Loop
OOur workflow will generate results for each prompt and email them, so now we add a new action, Apply to each (found in the Control section when adding a new action). You will be prompted to select an output to drive the looping. If you remember, we read in our Microsoft List value in the beginning, so choose that:
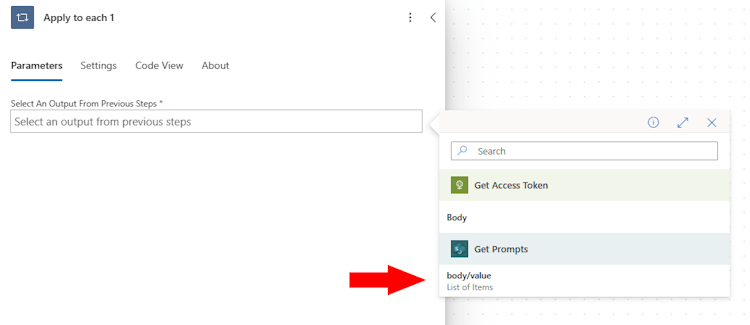
All of the next steps will be defined inside this loop.
Step 8: Resetting the Images Variable
In step six, we created an image variable named images. The point of this variable is to hold the results from Firefly so that it can be emailed. We need to reset this value for each prompt to an empty string. So, the first step inside our Apply to each loop is a Set the variable value action. It sets the variable, images, to null.
You can do this by entering: @{null}
Step 9: Calling Firefly's Generate Images API
We'll add another HTTP action that will call the Generate Images API. This API call requires a few parameters, including the prompt and number of desired images if you want more than one.
Begin by setting the URI to the API endpoint, as specified in the documentation: https://firefly-api.adobe.io/v2/images/generate.
Next, set the method to POST.
To access the API, two credentials must be sent in the headers. Begin by specifying an Authorization header which will use the access token gotten earlier. This can be used by inputting this value: Bearer @{body('Parse_JSON')?['access_token']}. Next, the header X-Api-Key should be set with the Firefly Client ID specified earlier: @{variables('FIREFLY_CLIENT_ID')}
The last thing required is the actual body of the request. The number of images and size will be hard coded, with the prompt being dynamic based on the loop value:
Copied to your clipboard{"n": 4,"prompt": "@{items('Apply_to_each')?['Title']}","size": {"width": "1024","height": "1024"}}
You should follow this step with a Parse JSON action again. Add that step and name it Parse Firefly Result JSON. Point it to the body of the previous step and use this schema:
Copied to your clipboard{"type": "object","properties": {"version": {"type": "string"},"size": {"type": "object","properties": {"width": {"type": "integer"},"height": {"type": "integer"}}},"predictedContentClass": {"type": "string"},"outputs": {"type": "array","items": {"type": "object","properties": {"seed": {"type": "integer"},"image": {"type": "object","properties": {"id": {"type": "string"},"presignedUrl": {"type": "string"}}}},"required": ["seed","image"]}}}}
As before, the net result of these two steps is to make an HTTP call and parse the result into usable data.
Step 10: Defining Image HTML
The next step will be twofold. We want to create a string variable for email that will include all the results from the Firefly call, but we want to define this in HTML. To do this, create another "Apply to each" step. This will use the output from the previous step that parsed the JSON result of the Firefly call: @{body('Parse_Firefly_Result_JSON')?['outputs']} Notice we're explicitly using the outputs portion of the result which will contain one object per image result.
Within this loop, add an Append to String variable step. The variable will be images, and the value, this little bit of complex logic:
Copied to your clipboard@{concat('<img src="',items('For_each')?['image']['presignedUrl'],'">')}
This value uses the contact function to join three strings:
- First, the beginning of an HTML image tag.
- Then, the current image from the
outputsloop, specifying thepresignedUrlvalue. - A closing bracket.
Step 11: Email the Result
The final step will handle emailing the result. You want to ensure it's in the loop for our prompts but not the previous loop that iterated over the image results.
For the To field, specify your email and pick anything appropriate for the Subject.
The body should contain the prompt and our images variable:
Copied to your clipboardHere are your generated images for the prompt, @{items('Apply_to_each')?['Title']}@{variables('images')}
Results
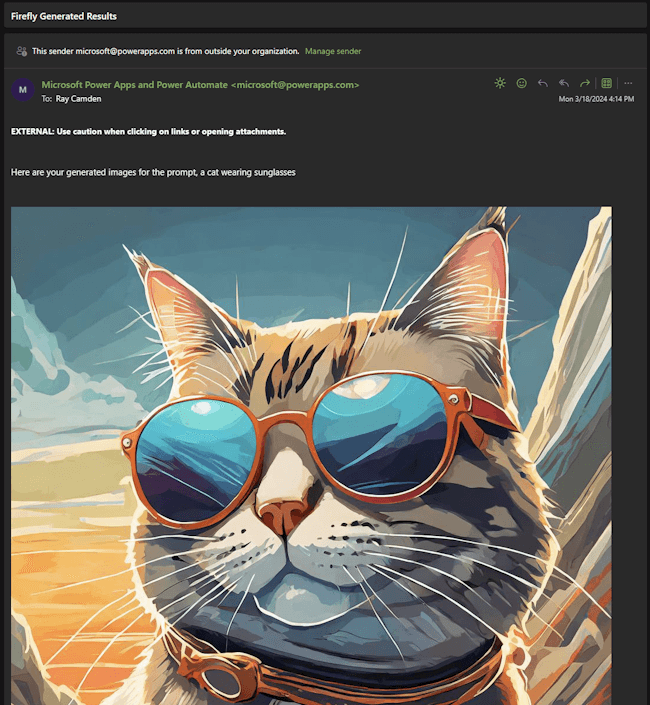
With the flow complete, we can save and test it. As it processes, it will fire off one email as each prompt is done. The images are somewhat large, so the screenshot below only shows one, but the additional results are directly beneath it:
