Troubleshooting Campaign push notifications
To set up server key/APNS server certificate in the Campaign Standard instance, complete the following steps:
Set up a server key
To configure the app in Google Firebase, see Firebase Console and sign in using your Google Developer credentials.
Add a project and add your app under that project using the application ID that you used in the app.
For more information, see Add Firebase to your Android project.
Add the generated "google-service.json" to the project and set up the project and module level gradle files.
For more information, see Add Firebase to your Android project.
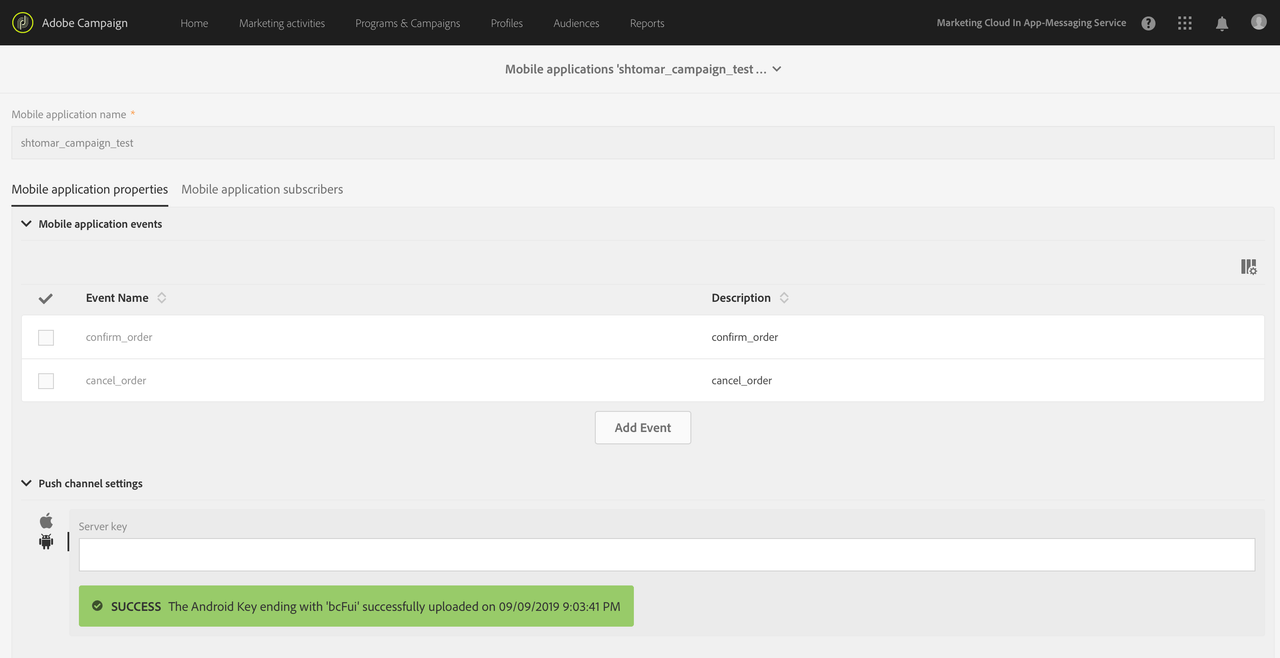
Verify that Firebase server key is configured in the Campaign instance by clicking Adobe Campaign > Administrator > Channels > Mobile App (AEP SDK).
Select the mobile app from the list and verify that the push channel settings status for Android is Android key set up success.
Set up the APNS server certificate
Add Push Notification entitlement to your app.
For more information, see Enable the Push Notifications Capability.
To configure the APNS certificate, register the app on your Apple developer account and generate the certificate.
For more information, see Establishing a Certificate-Based Connection to APNs.
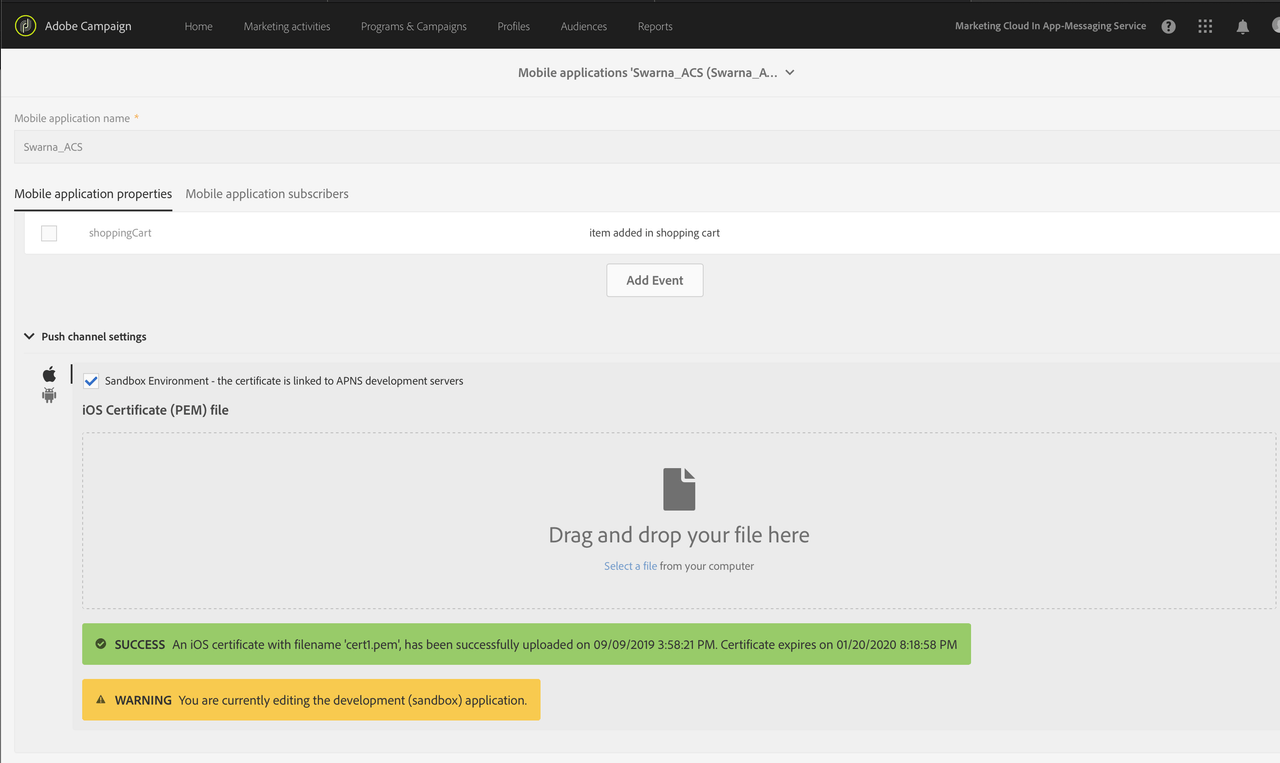
Verify that the APNS server certificate is configured in the Campaign instance by clicking Adobe Campaign > Administrator > Channels > Mobile App (AEP SDK).
Select the mobile app from the list and verify that push channel settings status for iOS is iOS certificate with filename *.pem is successfully uploaded.
Verify that you are using production certificate for production environment and development certificate for development environment.
Set up a server key
To configure the app in Google Firebase, see Firebase Console and sign in using your Google Developer credentials.
Add a project and add your app under that project using the application ID that you used in the app.
For more information, see Add Firebase to your Android project.
Add the generated "google-service.json" to the project and set up the project and module level gradle files.
For more information, see Add Firebase to your Android project.
Verify that Firebase server key is configured in the Campaign instance by clicking Adobe Campaign > Administrator > Channels > Mobile App (AEP SDK).
Select the mobile app from the list and verify that the push channel settings status for Android is Android key set up success.

Set up the APNS server certificate
Add Push Notification entitlement to your app.
For more information, see Enable the Push Notifications Capability.
To configure the APNS certificate, register the app on your Apple developer account and generate the certificate.
For more information, see Establishing a Certificate-Based Connection to APNs.
Verify that the APNS server certificate is configured in the Campaign instance by clicking Adobe Campaign > Administrator > Channels > Mobile App (AEP SDK).
Select the mobile app from the list and verify that push channel settings status for iOS is iOS certificate with filename *.pem is successfully uploaded.
Verify that you are using production certificate for production environment and development certificate for development environment.

For more information about configuration, see Channel specific application configuration in Adobe Campaign.
Set up an Android or iOS app to receive push notifications
Set up the Android app
Create the Firebase Messaging Service and add it to the Android Manifest file.
For more information, see Set up a Firebase Cloud Messaging client app on Android.
Generate a push token for the app using FireBase Instance ID class.
In the
onCompletefunction ofOnCompleteListener, set the Push identifier by calling the APIMobileCore.setPushIdentifier.For more information, see setPushIdentifier.
Verify that the push token has successfully synced with the Experience Cloud ID service
If SDK privacy status is optedout, the push identifier will not be set.
Verify the push token sync with the Experience Cloud ID service (ECID).
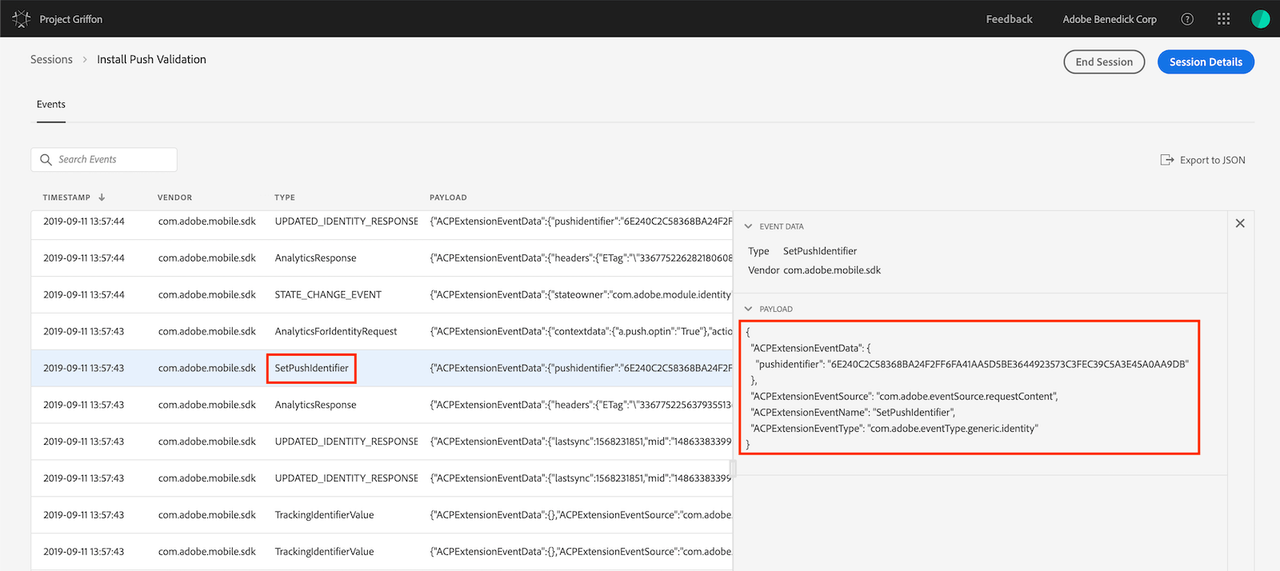
To verify, launch your app connected to an Adobe Experience Platform Assurance session.
In the list of events, verify that you have an event with type SetPushIdentifier.
In the details panel on the right, verify the value of the push token for this device. The value in pushIdentifier is the same value that is sent to the ECID service.
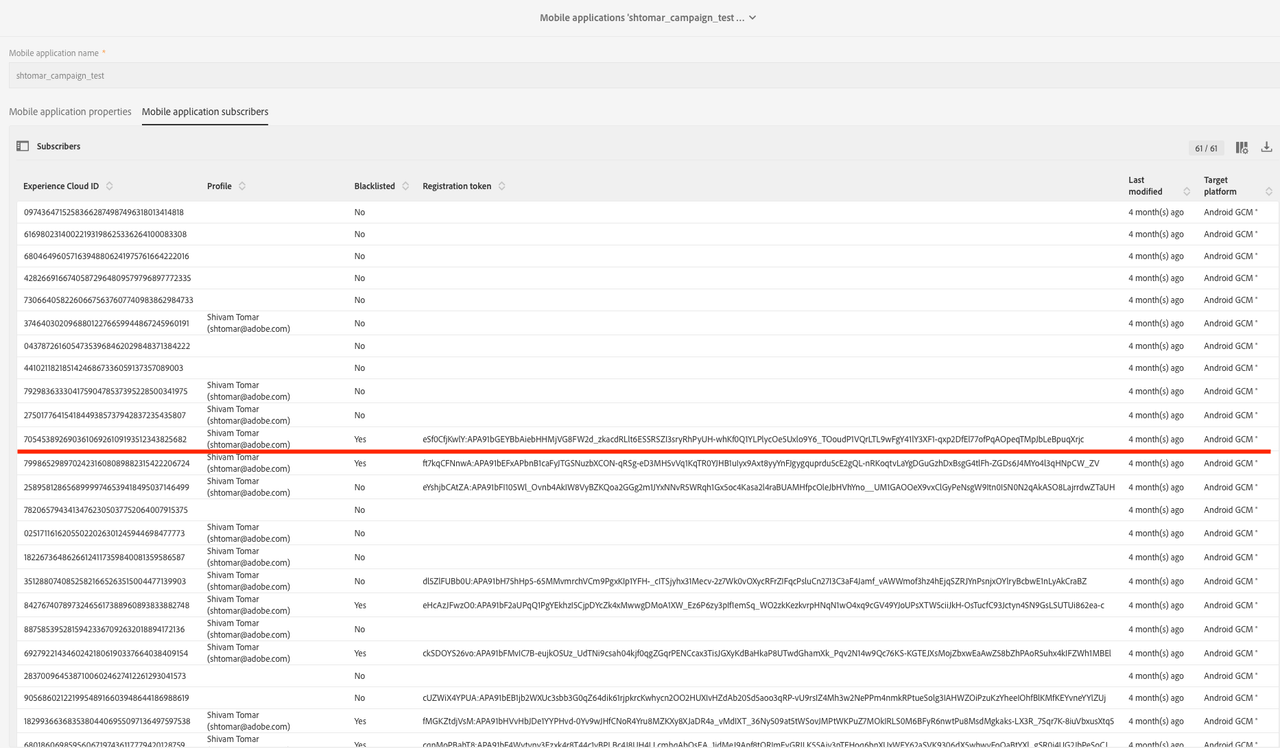
To verify that app's push token is mapped to the correct Experience Cloud ID (ECID) in the Campaign instance, click Adobe Campaign > Administrator > Channels > Mobile App (AEP SDK).
Select your app, under the mobile application subscribers verify that the Experience Cloud ID and the Registration token for the user is displayed.
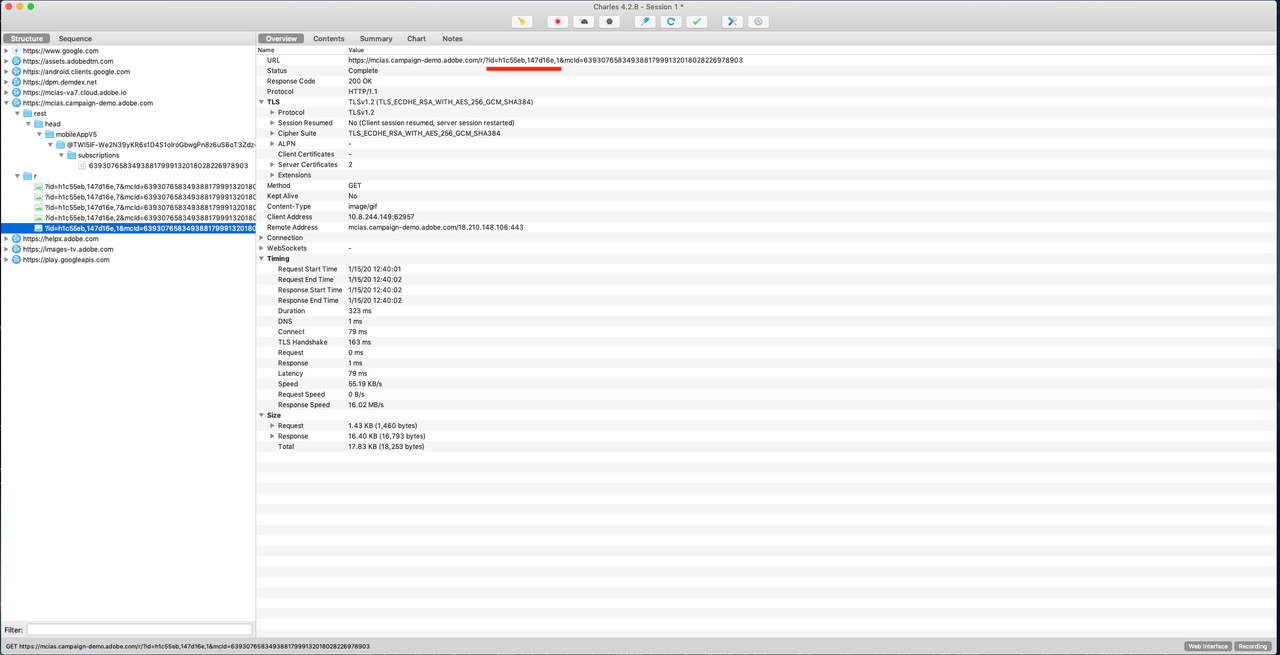
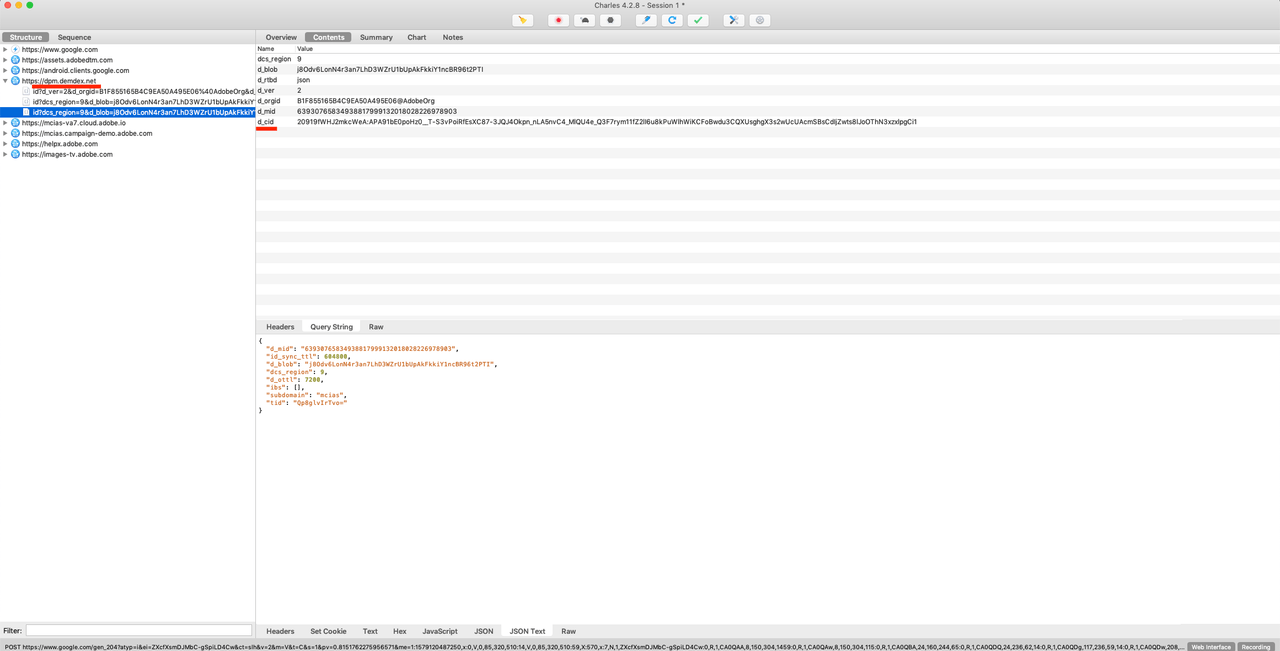
If you are using Charles, verify that the push token has successfully synced with the ECID service.
Check for the demdex request, which is marked with the red line in the screenshot below.
Verify the successful response(200) for this network call.
Set up the iOS app
After you launch the app, call
registerForRemoteNotificationsto register the app and receive the APNS token.This API generates and returns the APNS token through the
application:didRegisterForRemoteNotificationsWithDeviceToken:delegate function.For more information, see Registering Your App with APNs
In
application:didRegisterForRemoteNotificationsWithDeviceToken:, callsetPushIdentifierto set the Push identifier.For more information, see setPushIdentifier.
Verify that the push token has successfully synced with the Experience Cloud ID service
If SDK privacy status is optedout, the push identifier will not be set.
Verify the push token sync with the Experience Cloud ID service (ECID).
To verify, launch your app connected to an Adobe Experience Platform Assurance session.
In the list of events, verify that you have an event with type SetPushIdentifier.
In the details panel on the right, verify the value of the push token for this device.
The value in pushIdentifier is the same value that is sent to the ECID service.

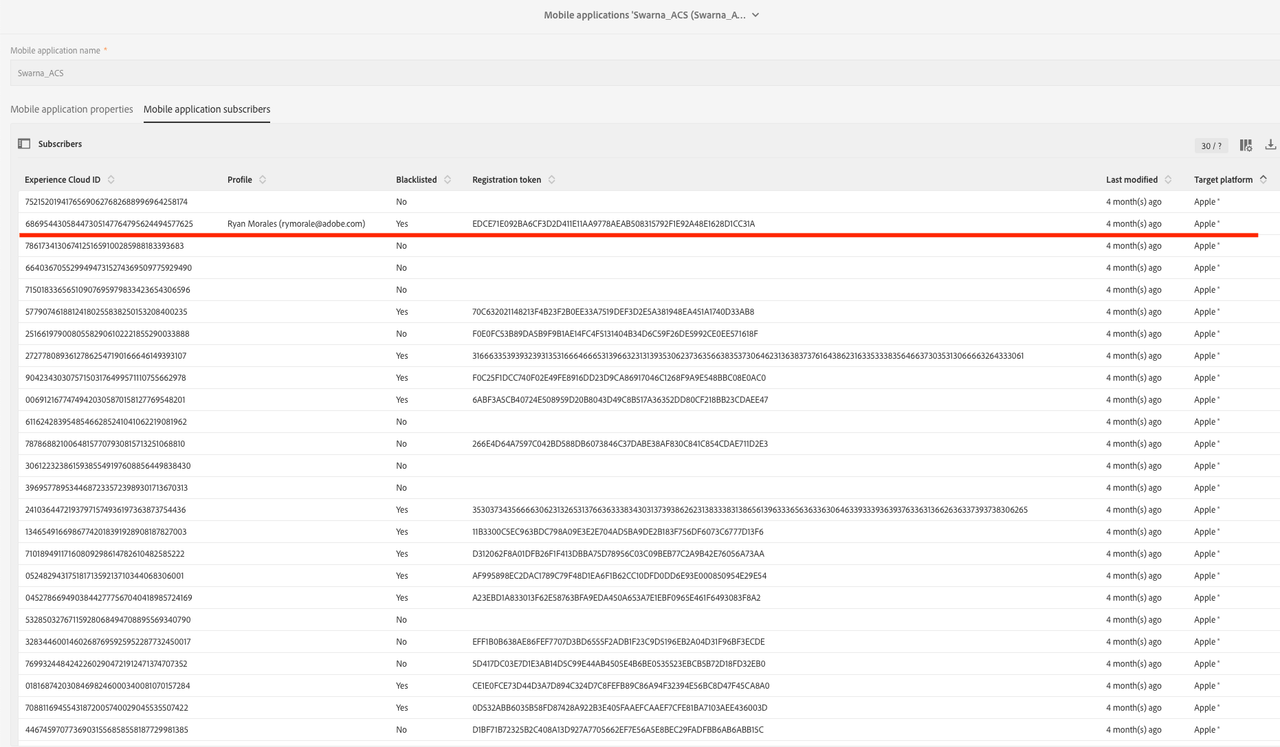
To verify that app's push token is mapped to the correct Experience Cloud ID (ECID) in the Campaign instance, click Adobe Campaign > Administrator > Channels > Mobile App (AEP SDK).
Select your app, under the mobile application subscribers verify that the Experience Cloud ID and the Registration token for the user is displayed.
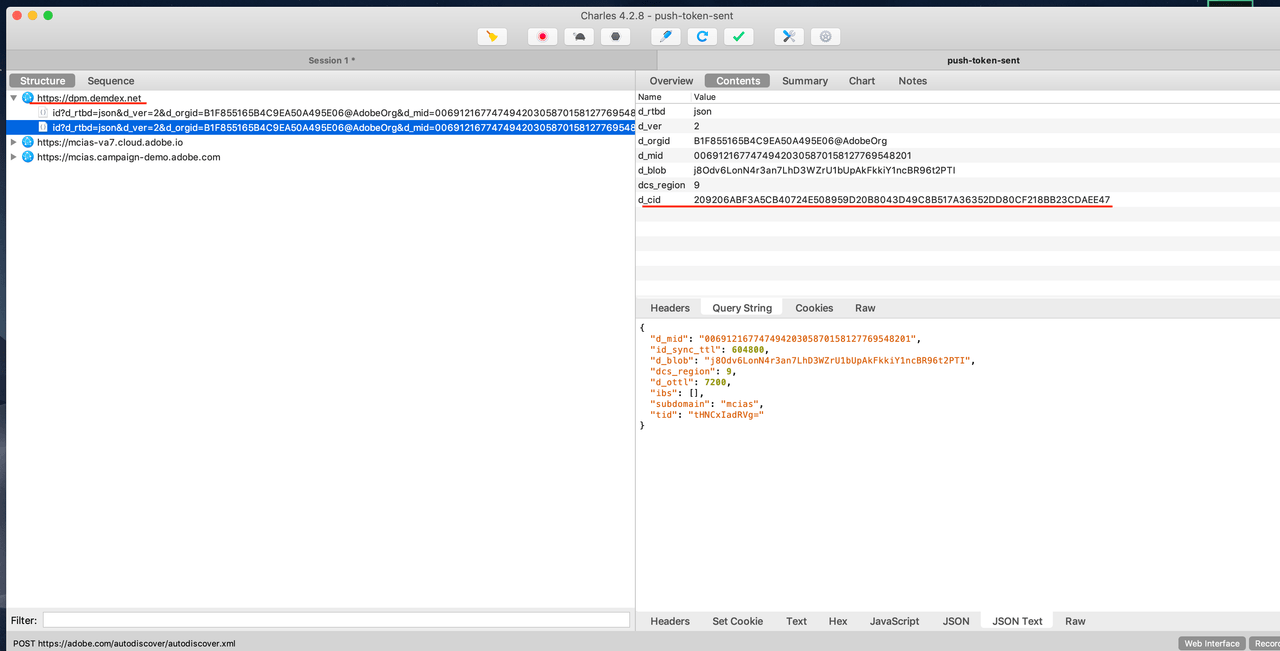
If you are using Charles, verify that the push token has successfully synced with the ECID service.
Check for the demdex request, which is marked with the red line in the screenshot below.
Verify the successful response (200) for this network call.
Set up the Android app
Create the Firebase Messaging Service and add it to the Android Manifest file.
For more information, see Set up a Firebase Cloud Messaging client app on Android.
Generate a push token for the app using FireBase Instance ID class.
In the
onCompletefunction ofOnCompleteListener, set the Push identifier by calling the APIMobileCore.setPushIdentifier.For more information, see setPushIdentifier.
Verify that the push token has successfully synced with the Experience Cloud ID service
If SDK privacy status is optedout, the push identifier will not be set.
Verify the push token sync with the Experience Cloud ID service (ECID).
To verify, launch your app connected to an Adobe Experience Platform Assurance session.
In the list of events, verify that you have an event with type SetPushIdentifier.
In the details panel on the right, verify the value of the push token for this device. The value in pushIdentifier is the same value that is sent to the ECID service.

To verify that app's push token is mapped to the correct Experience Cloud ID (ECID) in the Campaign instance, click Adobe Campaign > Administrator > Channels > Mobile App (AEP SDK).
Select your app, under the mobile application subscribers verify that the Experience Cloud ID and the Registration token for the user is displayed.

If you are using Charles, verify that the push token has successfully synced with the ECID service.
Check for the demdex request, which is marked with the red line in the screenshot below.
Verify the successful response(200) for this network call.

Set up the iOS app
After you launch the app, call
registerForRemoteNotificationsto register the app and receive the APNS token.This API generates and returns the APNS token through the
application:didRegisterForRemoteNotificationsWithDeviceToken:delegate function.For more information, see Registering Your App with APNs
In
application:didRegisterForRemoteNotificationsWithDeviceToken:, callsetPushIdentifierto set the Push identifier.For more information, see setPushIdentifier.
Verify that the push token has successfully synced with the Experience Cloud ID service
If SDK privacy status is optedout, the push identifier will not be set.
Verify the push token sync with the Experience Cloud ID service (ECID).
To verify, launch your app connected to an Adobe Experience Platform Assurance session.
In the list of events, verify that you have an event with type SetPushIdentifier.
In the details panel on the right, verify the value of the push token for this device.
The value in pushIdentifier is the same value that is sent to the ECID service.

To verify that app's push token is mapped to the correct Experience Cloud ID (ECID) in the Campaign instance, click Adobe Campaign > Administrator > Channels > Mobile App (AEP SDK).
Select your app, under the mobile application subscribers verify that the Experience Cloud ID and the Registration token for the user is displayed.

If you are using Charles, verify that the push token has successfully synced with the ECID service.
Check for the demdex request, which is marked with the red line in the screenshot below.
Verify the successful response (200) for this network call.

Troubleshooting push notification events tracking
The following events are related to the tracked push notifications:
- Impression: Notification is delivered.
- Click: User clicked the notification.
- Open: App opened in response to user's click on notification.
For more information about implementing the tracking of push notification events, see Implementing Push Tracking.
Troubleshooting using Adobe Experience Platform Assurance
You can verify the push notification tracking in Assurance.
- Connect your app to an Assurance session.
- Send a push notification to app from your Campaign instance.
To know more about how to send push notification, see Preparing and sending a push notification. - Receive a push notification in the device.
- Click on the push notification to launch the app.
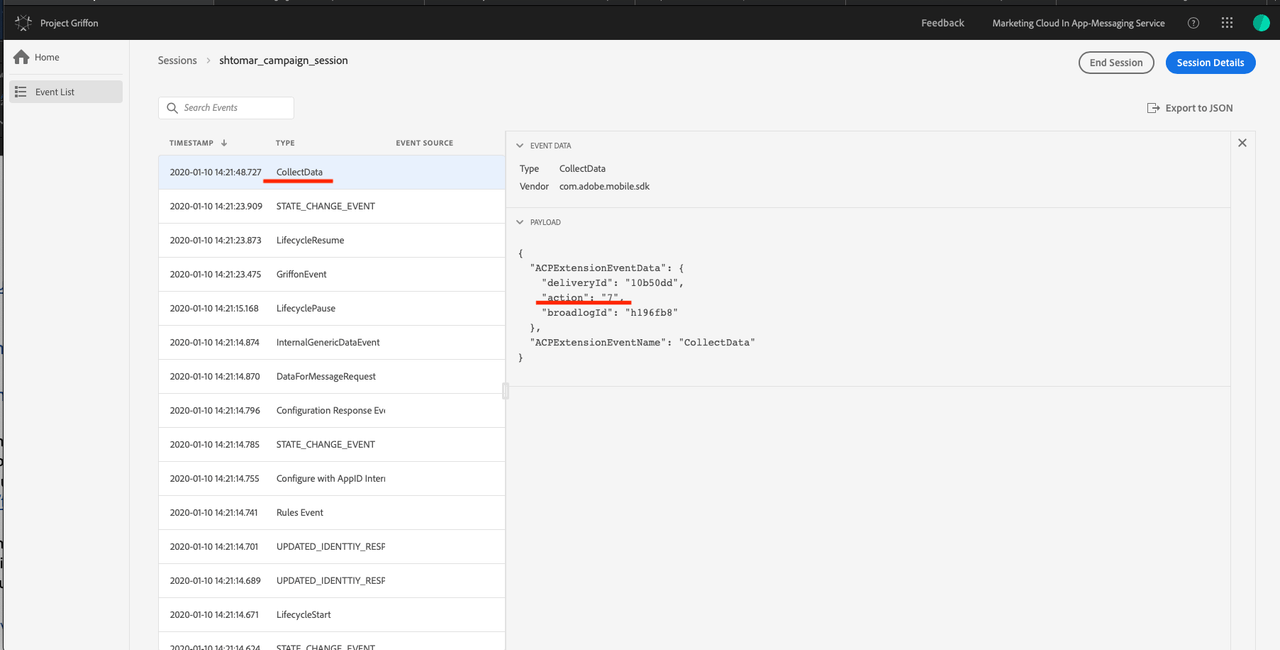
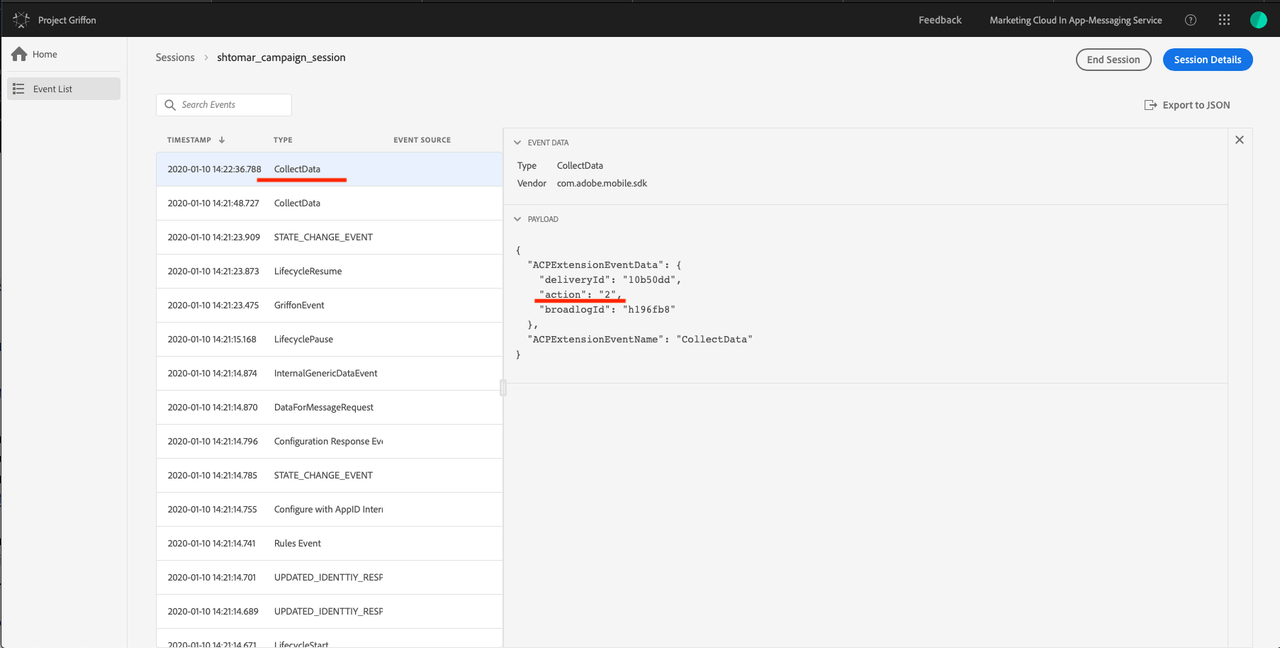
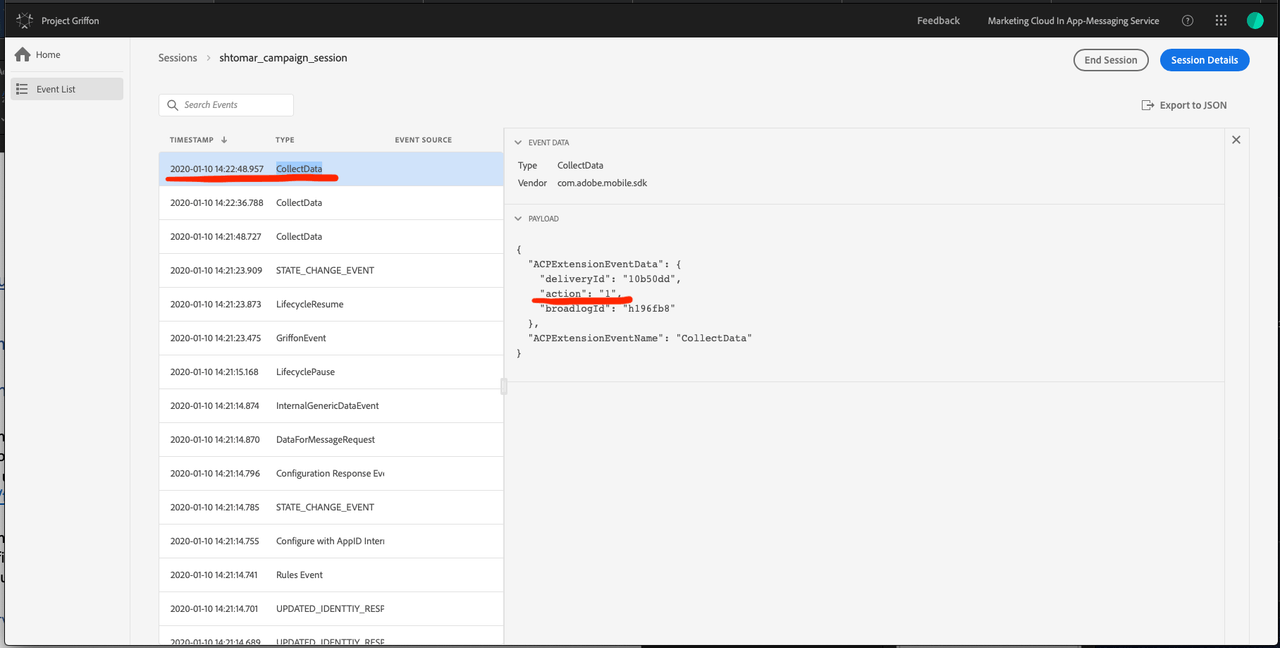
- In the list of events, verify that you have an event with type CollectData.
- In the Details panel on the right, verify the value of the action.
The value of the action should be 7 for impression, 2 for the click, and 1 for open.
Impression event tracking (action value 7)
Click event tracking (action value 2)
Open event tracking (action value 1)
Troubleshooting using Charles
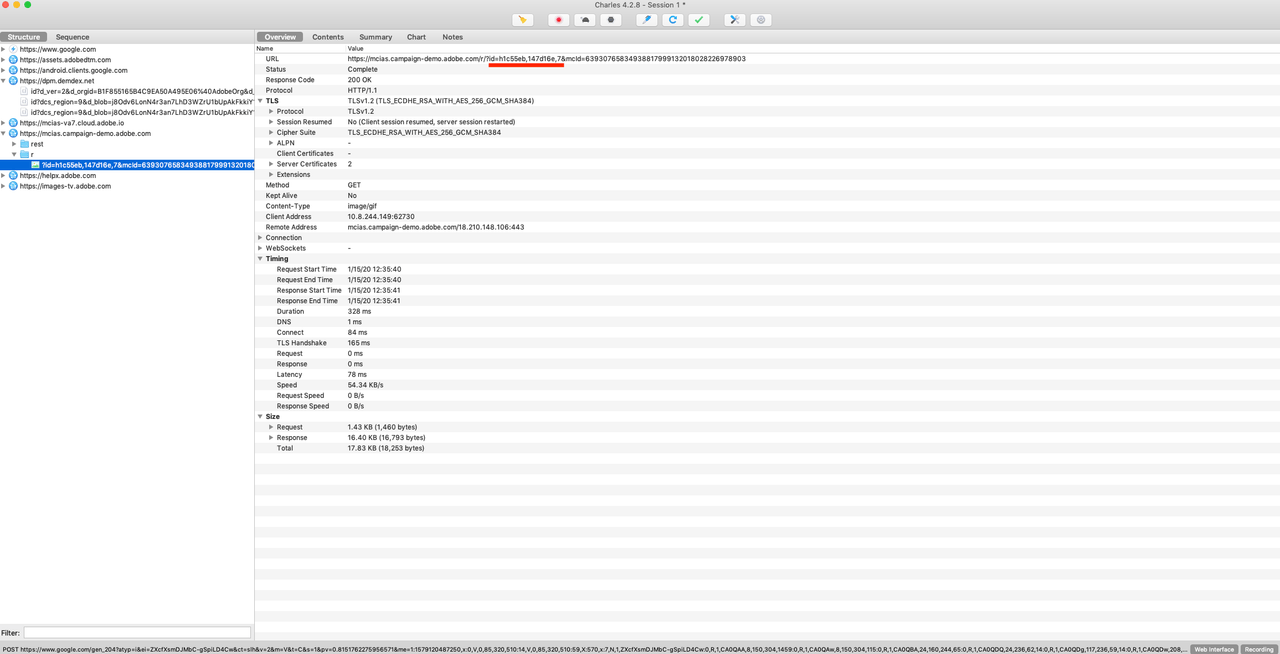
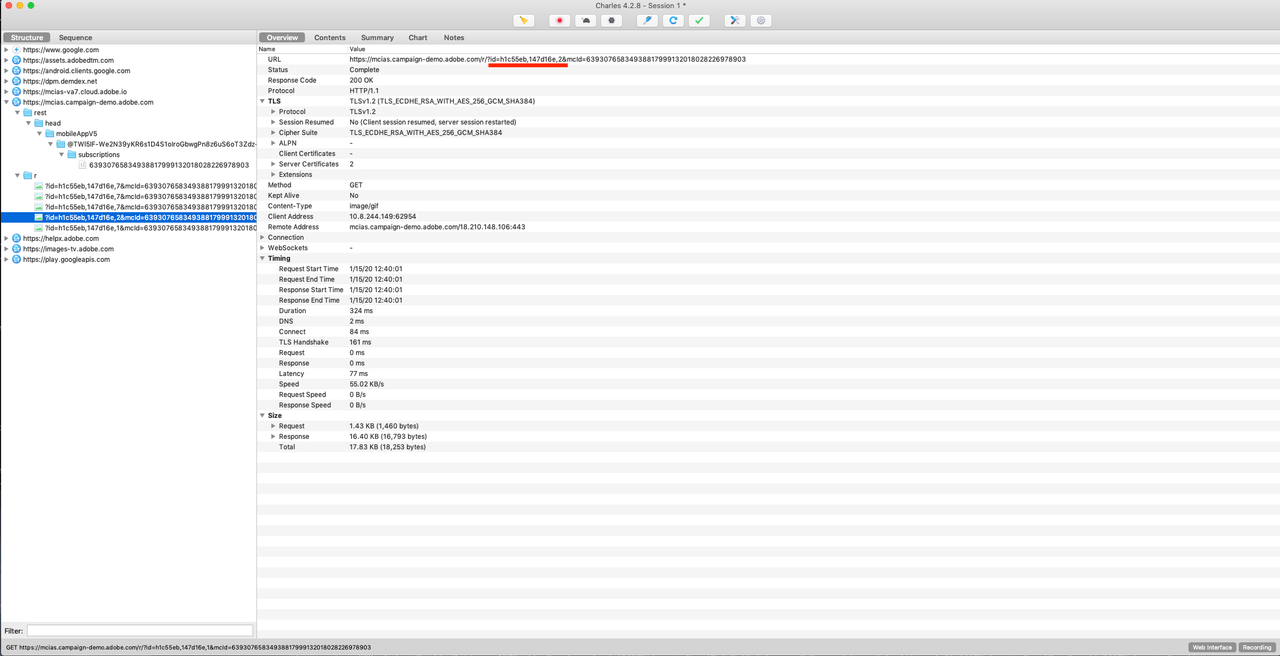
To verify that a successful network call is made to track the push notification interaction event, look for the GET request with the query string id=broadlogID,deliveryID,action to the Campaign server. See the screenshots below for more details about what to look for.
Impression event tracking (action value 7)
Click event tracking (action value 2)
Open event tracking (action value 1)
